

PRODUCER 3
06/18/97
Lighting Control Console
page
TEATRONICS LIGHTING CONTROLS,
TEATRONICS LIGHTING CONTROLS,
INC.
INC.
48
Appendix 4
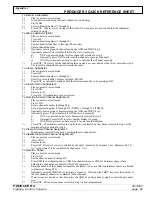
PRODUCER 3 QUICK REFERENCE SHEET
To Record a submaster:
1)
Place console in record mode.
2)
Set up desired look using channels, submasters, and bumps.
3)
Press SUB.
4)
Enter submaster number (1 through 34).
5)
Press ENT. Whatever was on stage at the time ENT was pressed is now loaded into the submaster
entered in step 4.
To alter a submaster (blind):
1)
Place console in record mode.
2)
Press ALT.
3)
Enter submaster number (1 through 34).
4)
Enter submaster fade time (1 through 180 seconds).
5)
Enter a channel number.
6)
Optionally enter a group of channels using the AND and THRU keys.
7)
Optionally press AT (levels default to full if no level is entered).
a)
If AT was pressed, enter level for channel(s) selected in step 4.
b)
Optionally press AND to select another channel or group of channels.
c)
If AND was pressed, go back to step 4 to enter another channel or group.
7)
Press ENT. The levels for the channels entered in step 4 are now altered to the levels entered in step 6.
The levels for channels not entered remain the same.
To Clear a Submaster:
1)
Place console in record mode.
2)
Press ALT.
3)
Enter submaster number (1 through 34).
4)
Enter five zeros (00000), display will show ERASE.
5)
Press ENT, or optionally continue with the alter sequence above by pressing AND.
To Clear All of the Submasters:
1)
Place console in record mode.
2)
Press SUB.
3)
Enter zero (0).
4)
Press ALT. All submasters are now cleared.
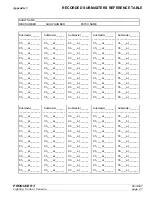
To Record a Dimmer/Channel Assignment:
1)
Place console in record mode.
2)
Press CHN.
3)
Enter a channel number (0 through 48).
4)
Enter a dimmer number (1 through 512 if DMX, 1 through 192 if AMX).
5)
Optionally enter a group of dimmers using the AND and THRU keys.
6)
Optionally press AT (levels default to full if no level is entered).
a)
If AT was pressed, enter level of dimmer(s) selected in step 5.
b)
Optionally press AND to select another dimmer or group.
c)
If AND was pressed, go back to step 4 to enter another dimmer.
7)
Press ENT. The dimmers entered in step 4 are now controlled by the channel entered in step 3 at the
maximum levels entered in step 6.
To Clear a Dimmer/Channel Assignment:
1)
Dimmers are removed from use by patching them to channel zero.
To Initialize the Dimmer/Channel Assignments:
1)
Place console in record mode.
2)
Press CHN.
3)
Enter zero (0).
4)
Press ALT. Dimmer 1 is now controlled by channel 1, dimmer 2 by channel 2, etc. Dimmers 49, 50,
etc. "wrap around" to be controlled by channels 1, 2, etc.
To Record a Chase:
1)
Place console in record mode.
2)
Press CHS.
3)
Enter a chase number (0 through 9).
4)
Press SUB for a submaster chase, CHN for a channel chase, or CHS for a dimmer chase (chase
defaults to a channel chase unless SUB or CHS is pressed).
5)
Enter the number of the channel, submaster, or dimmer to be up in this step (dimmer chases are limited
to dimmers 1 through 99).
6)
Optionally press the THRU key to program a sequence. Following the THRU key, enter the number of
the last, channel, submaster, or dimmer in the sequence.
7)
If more steps are desired in the chase, press the AND key and go back to step 4 to enter the next chase
step.
8)
Press ENT. The chase sequence selected in step 3 is now programmed.


