background image


30 


Use arrows UP and DOWN to select the finishing time of the first time period. Confirm by pressing MENU. 


Use arrows UP and DOWN to select the pre-set temperature to apply within this time period. Confirm by pressing 
MENU. 
 

When the schedule for all days of the week is ready, confirm the settings using EXIT button and select <Confirm>. Active 
option will be highlighted in white. 


NOTE 

The user may program 3 different time periods in a given schedule (with the accuracy of 15 minutes). 

XI.


UNREGISTER A SINGLE ACTUATOR 

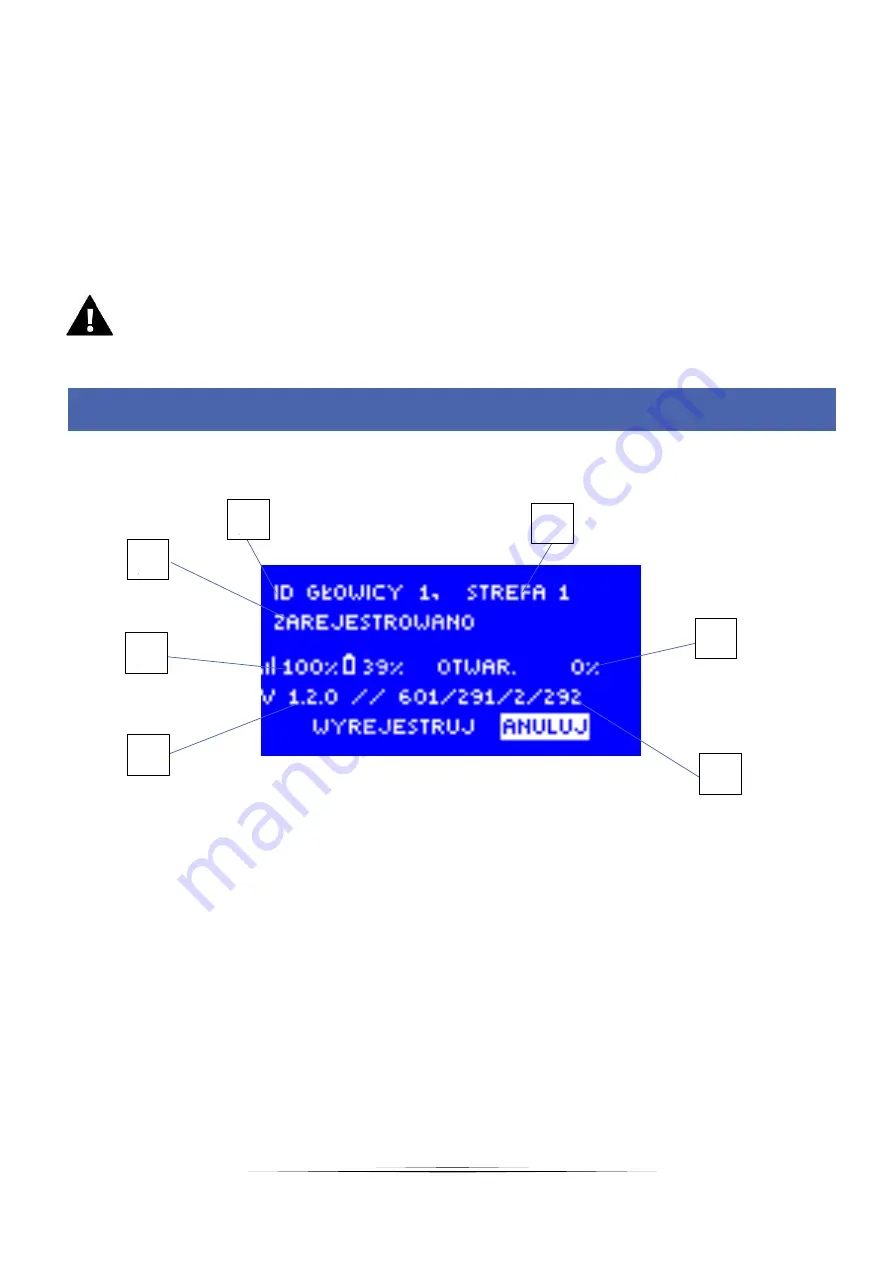
The user may unregister a single actuator by forcing communication. In order to do it, press the communication button on a 
given actuator and hold it until the control light flashes twice. The following screen will appear on EU L-8 display: 


1.


Actuator ID 

2.


Actuator zone 

3.


% opening actuators 

4.


Service details 

5.


Actuator software version 

6.


Range and battery level 

7.


Actuator status info 

 
In order to unregister a given actuator, use 

▲ 

or 

▼ 

to select <Unregister> and confirm by pressing MENU button. 


6


5


4


3


7


1


2


Summary of Contents for EU-L-8E

Page 1: ...1 EU L 8e...

Page 2: ...nes 19 4 External sensor 19 5 Manual mode 19 6 Time settings 19 7 Screen settings 19 8 Language 20 9 Fitter s menu 20 10 Service menu 20 11 Software version 20 VIII Zones 21 1 Block diagram zones menu...

Page 3: ...lve temperature 27 6 3 Calibration 27 6 4 Single stroke 27 6 5 Minimum opening 27 6 6 Opening time 27 6 7 Measurment pause 27 6 8 Valve type 27 6 9 Weather based control 27 6 10 Proportionality coeffi...

Page 4: ...e of the electric motors as well as the insulation resistance of the cables The regulator should not be operated by children NOTE The device may be damaged if struck by a lightning Make sure the plug...

Page 5: ...evice possibility of connecting ST 507 Internet or WiFi RS to control the system via the Internet possibility of connecting M 8 wireless control panel possibility of controlling the mixing valve via S...

Page 6: ...L 8 controller with all the devices to be controlled In order to connect the cables remove the controller cover and connect the cables as indicated on connector labels and diagrams below All the nece...

Page 7: ...7...

Page 8: ...8...

Page 9: ...devices Step 3 Activate the Internet module EU L 8 external controller is compatible with ST 507 and WiFi RS WiFi RS uses WiFi wireless network whereas ST 507 needs to be connected to a router with R...

Page 10: ...n process 1 Install the thermostatic actuator on the radiator and wait until it calibrates 2 Go to the controller menu select the number of zone in which the actuator is to be registered and select Re...

Page 11: ...one zone The following rules must be kept in mind The maximum of one temperature sensor may be assigned to each zone Once registered the sensor cannot be unregistered but only switched off in the subm...

Page 12: ...xternal controller R 8z two state room regulator power supply 230V 50Hz Sending current zone temperature data Adjusting pre set temperature directly from the zone The room regulator should be register...

Page 13: ...nsor should be installed in the window of a given zone and it should registered to a the zone C 8f floor sensor It sends information about current floor temperature The sensor should be registered in...

Page 14: ...ing standard operation the button is used to switch between different zones parameters 3 down minus it is used to view the menu options and decrease the value while editing parameters During standard...

Page 15: ...t temperature of C 8f floor sensor in a given zone blacklit numer in the zone bar see description no 12 10 Current temperature of C 8r room sensor in a given zone blacklit numer in the zone bar see de...

Page 16: ...urrent time 7 Current weekly schedule 8 Current room temperature in a given zone 9 Current floor temperature in a given zone 10 Maximum and minimum floor temperature 11 The numer of registered window...

Page 17: ...rent temperature in zone 3 3 7 Pre set temperature in zone 3 8 Floor temperature in zone 4 9 Current schedule G1 global schedule 1 L local schedule T time left before the next change of the pre set te...

Page 18: ...ones External sensor Registration Sensor type Manual mode Valves 1 8 Voltage free contact Pump Time settings Automatic Clock settings Date settings Screen settings Screensaver Button sounds Screen vie...

Page 19: ...is active the main screen displays external temperature and the controller menu offers average external temperature Averaging time the user sets the time period based on which the average external tem...

Page 20: ...u is described in section IX 10 SERVICE MENU In order to activate service options it is necessary to enter a 4 digit code provided by TECH company 11 SOFTWARE VERSION When this option is selected the...

Page 21: ...ps below the pre set temperature by hysteresis value When the temperature in all the zones is sufficient the controller disables both the pump and the voltage free contact Zones 1 8 ON Type of sensor...

Page 22: ...iven zone only It may be edited freely Global schedule 1 5 these schedules have the same settings for all zones NOTE Schedule settings are described in detail in section X Apart from schedules the use...

Page 23: ...erature in order to prevent undesired oscillation in case of small temperature fluctuation The setting range is 0 1 10 C with the accuracy of 0 1 C 9 CALIBRATION Room sensor calibration should be perf...

Page 24: ...cted the external controller monitors the temperature If the pre set temperature is exceeded by the value specified in range parameter all actuators in a given zone will be closed 0 opening This funct...

Page 25: ...er 10 minutes the main controller closes the actuators and disables the heating in a given zone NOTE If the delay time is set at 0 the controller will immediately send a signal to the actuators in ord...

Page 26: ...perature When all the zones reach the pre set temperature the pump is disabled Delay function enables the user to define the delay time for pump activation after the temperature drops below the pre se...

Page 27: ...to maintain the smallest flow 6 6 OPENING TIME This parameter defines the time needed for the valve actuator to open the valve from 0 to 100 position This value should be adjusted to the value given...

Page 28: ...less accurate The following formula is used to calculate the percent of a single opening PRE SET_TEMP SENSOR_TEMP PROP_COEFF 10 6 11 MAXIMUM FLOOR TEMPERATURE This setting is used when the valve type...

Page 29: ...will apply part 1 or part 2 In order to assign days to a given part of the week follow the steps Use arrows UP and DOWN to select Assign days Press MENU in order to edit Use arrows UP and DOWN to swit...

Page 30: ...ferent time periods in a given schedule with the accuracy of 15 minutes XI UNREGISTER A SINGLE ACTUATOR The user may unregister a single actuator by forcing communication In order to do it press the c...

Page 31: ...ctly Replace the valve on the radiator Actuator alarm ERROR 3 too little piston movement The valve got stuck Inappropriate valve on the radiator Too little stroke movement of the valve Inspect the val...

Page 32: ...tic sensor control In the event of temperature sensor damage or external sensor damage an alarm is activated informing the user about the type of failure e g Alarm No communication The alarm remains a...

Page 33: ...o hold EXIT button until a single sound signal is heard it signalises that the software update process has been initiated After it has been completed the controller restarts automatically NOTE Softwar...

Page 34: ...34...

Page 35: ...lated products the regulation by the Ministry of Economy of May 8 2013 concerning the essential requirements as regards the restriction of the use of certain hazardous substances in electrical and ele...

Page 36: ...36...

Reviews: