Water & Temperature Sensing Alarm System (Battery Operated)
(Product Code HD-S1P & HD-S2P)
General overview of hotun detect
• Audible and visual alarm unit for T/PRV discharges (complies with G3 regulations to aid visually and mobility impaired)
• Helps save water and energy
• Simple, quick, hook on design: Will fit all new and existing hotun dry trap tundishes
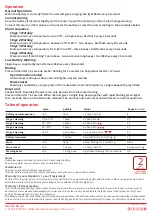
• Senses presence of water and temperature in four stages (up to 20°C, 20-60°C, 60-85°C, >85°C)
• Four alarm stages gives the plumber a better indication of fault when triaging the issue over the phone Giving
increased chance of first time repair
• Unit operational indication
• Battery low power alarm
• Simple Mute (12 hour) and reset operation
• Battery operated (2032 coin cell, supplied with unit.) Requires no specialist electrical knowledge to fit
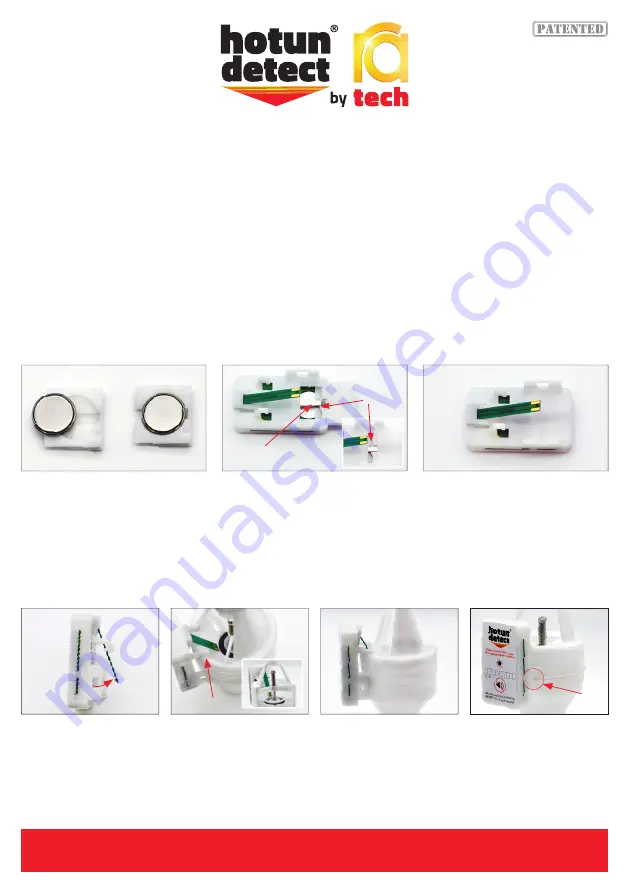
1. With the battery sliding door facing
up [a] place battery in battery door [a]
ensuring that the with battery positive
(+) is inserted face down [b].
1. Before installation onto
tundish carefully, slightly pull
the sensor [a] away from the
casing.
2. Insert battery sliding door housing
(with battery) [b] into detect casing [c].
Ensure the metal clip [d] is on top of
battery.
2. Ensuring that the sensor is
inserted inside of the tundish
seat the unit’s mounting hook
[b], onto tundish sides.
3. Push battery door housing [b]
completely into casing [c] and closes
with a click.
3. If required, hotun detect
can be secured to the hotun
tundish using the supplied
cable tie.
4. Feed the cable ties through
holes [c] and wrap zip wire
around the tundish and
secure lightly, trimming any
excess cable tie to suit
When a fresh battery has been inserted correctly the unit with flash a GREEN light (every 8 seconds). Should the battery have
insufficient power, the unit will emit a single beep with alternate flashing RED & GREEN lights.
The unit has a simple mounting (hook) arrangement and can be secured to the hotun tundish with the supplied cable tie.
When the battery requires replacing, insert a small flat bladed screwdriver into the battery compartment door at the base of
the unit and gently prise the compartment open.
1. Installation – Battery mounting
2. Installation – onto hotun tundish
3. Battery replacement
Installation, Operation & Maintenance Instructions
Prefer to watch a video of the installation?
View it now at www.hotun.co.uk
a
b
b
c
c
b
d
a
b
c
Patent No. GB2522634


