background image


20 


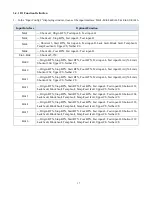
Function of Output 

Function Instruction 

-- 

Not have function. 

Nozzle 1 

Once the nozzle 1 comes to run the program, the output is in conducting state, or else 
not. 

Nozzle 2 

Once the nozzle 2 comes to run the program, the output is in conducting state, or else 
not. 

Nozzle 3 

Once the nozzle 3 comes to run the program, the output is in conducting state, or else 
not. 

Nozzle 4 

Once the nozzle 4 comes to run the program, the output is in conducting state, or else 
not. 

Ready flag 

When  the  unit  comes  into  the  normal  ready  state,  the  output  is  in  conducting  state, 
namely, once receiving the “START” signal, it comes to run. And it closes the output 
after running. 

Alarm flag 

When  set  the  mode  as  alarming,  once  it  detects  the  abnormal  state,  the  output  is  in 
conducting state, or else not. 

Working flag 

When the unit comes into the working state, the output is in conducting state, or else 
not. 

WorkEnd flag 

After t finishing the process, the output is keeping in conducting state 200ms, or else 
not. 

Cylinder 

Once the unit comes to run the cylinder process, the output is in conducting state, control 
cylinder motion, or else not. 

Clean output 

Once the unit comes to run the clean process, the output is in conducting state, do the 
clean (blowing or revolving brush), or else not. 


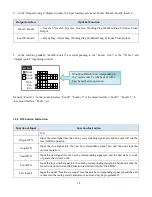
Note:  


The function settings of input & output cannot be accessed by the operator. It can only be operated by the 
manufacturer. 


Will not give advanced information if some functions are changed. 


3.5


Operation For First Time Use 


If using the unit for the first time, the operator should test the basic functionalities. 

Step 1: Install and Test


Before  using,  the  operator  should  properly  install  and  connect  the  system.  The  operator  should  test  the  basic 
functionalities of the system with the ‘Test’ function on the teaching pendant. Test should include if there are any 
problems with the axis movements towards positive or negative directions. 

Step 2: Parameters Setting 

Correctly set the global parameters and other parameters being used in the process. 
Remark: Failure to properly set the parameters will cause difficulties in using the system. 

Step 3: Teaching Program 

Program a profile with teaching pendant. Refer to the instruction manual of the teaching pendant. 

Step 4: Origin Calibration & Setting the Parameters of the Teaching Pendant 

1.


Origin calibration: The operator should adjust the start point when a teaching file is created for the first time. 

2.


Set file parameters. 

Step 5: Download & Process 

1.


Download: refer to instruction manual of the teaching pendant “Teaching File Download”. 

2.


Process: refer to instruction manual of the teaching pendant “File Processing”. 


Summary of Contents for TSR2000 Series

Page 1: ...1 TSR2000 Series 3 Axis Dispensing Robot Hardware Instruction Manual Version 1 3 ...

Page 2: ... us at the details listed below For Sales and Support Bergdahl Associates Inc 2990 Sutro Street Reno Nevada 89512 1616 www bergdahl com This manual is designed to provide information about Techcon Systems robot hardware Every effort has been made to make this manual as complete and accurate as possible There is no implied or expressed warranty as to the purpose suitability or fitness of the inform...

Page 3: ...4 Instruction of Input Output 3 4 1 IO Function Definition 3 4 2 IO Function Instruction 3 5 Operation For First Time 4 Off Line Operation Interface 4 1 Off Line Initialization 4 2 Off Line File Processing Interface 4 2 1 Select Processing File 4 2 2 File Process 4 2 3 Stop the File Processing 4 2 4 File Processing Count State 4 3 Off Line Origin Calibration Interface 4 4 Off Line Loop Work Parame...

Page 4: ...ith a 3 wire grounding plug and must be plugged into a 3 terminal grounded socket Do not modify the plug or use an ungrounded power socket If an extension cord is necessary use only a 3 wire extension cord that provides grounding Do not turn on the power of the machine if any parts are damaged especially if the power cord is damaged Caution about the teaching pendant Do not connect the teaching pe...

Page 5: ...bilities of teaching 3D graphics and user defined 3D array Capability to save mass files User defined array function easy solution for mould deviation Supports user defined 3D array Smoothing functions of changing speed and hi speed trajectory whilst moving User definable speed parameters Group function this function allows operators to copy delete modify array and pan multi points Advanced teachi...

Page 6: ... axis 0 1 600 mm sec Z axis 0 1 200 mm sec Repeatability Accuracy X Y Z axis 0 02mm Resolution X Y Z axis 0 01mm Payload Tool 5 Kg 7 Kg 7 Kg Head 4 Kg 4 Kg 4 Kg Storage for Teaching Files Max 999 files Max 60000 bytes Storage for Processing Files Max 255 files Working Ambient Temperature 0 40 Relative Humidity 20 90 no condensation Dimensions W D H 30 3 37 7 52 1cm 41 8 51 3 52 1cm 51 8 61 3 52 1c...

Page 7: ... Lead Hardware User Guide Teach Pendant User Guide Syringe Barrel Mounting Kit DB37 Connector TSR VCABLE not shown connects robot to TS250 TS350 or TS500R Inspect the unit for any damaged which may have occurred in transit If such damage has occurred notify the carrier at once Claim for damage must be made by the consignee to the carrier and should be reported to the manufacturer ...

Page 8: ...rdinate HOME Move the tip to the origin of the processing file this can be set SHF Switch point processing speed 3 level low middle high ENT Save the set parameters ORG Reset move the tip to the zero point 0 0 0 LOOP Set the loop operating parameters ESC 1 Return to file processing interface but not save the set parameters 2 Enter into the testing interface test the axis s function FEED Control di...

Page 9: ...ad the program file to the system from the teaching pendant The program is now complete and can be initiated 3 SETUPAND CONNECTION 3 1 Setup Connecting air tubing directly insert the air tube into the air connector on the back of the controller Removing air tube press down the connector head and then pull out the air tube from the controller DB9 connect with 7 pin socket Power switch Power socket ...

Page 10: ...onnector to the male OUTPUT connector on the rear of the robot Take the opposite end and connect the female 9 pin connector to the DB9 connector on the rear of the TS500R controller 3 1 3 How to Connect a TS920 Jet Valve Controller with Interface Cable Take the optional TSR DJETCABLE and connect the round female connector to the male OUTPUT connector on the rear of the robot Take the opposite end ...

Page 11: ...uired Follow the instructions below to test the other available outputs Press 4 Press Press 4 Press By pressing button 1 the controller will activate If the system is complete and under pressure fluid will exit out of the dispense outlet Press 1 to turn off output To go back to main screen press multiple times Press 1 through 4 to turn off outputs To go back to main screen press multiple times By ...

Page 12: ...12 3 2 I O Socket Instruction 3 2 1 Circuit Diagram of I O Socket Inside Inside ...

Page 13: ...or such as photoelectric switch 4 Ein13 External input 13 Used as alarm when lacking fluid etc 5 Ein14 External input 14 Used as alarm when lacking fluid etc Note If a special function is required the input and output signal can be set again 3 2 4 Seven Pin Socket Pin Out the following list describes the pins function of the seven pin socket By the socket it can control the external device Seven p...

Page 14: ...ND P01 20 GND P20 2 Eout8 P02 21 Ein8 P21 3 Eout7 P03 22 Ein7 P22 4 Eout6 P04 23 Ein6 P23 5 Eout5 P05 24 Ein5 P24 6 Eout4 P06 25 Ein4 P25 7 Eout3 P07 26 Ein3 P26 8 Eout2 P08 27 Ein2 P27 9 Eout1 P09 28 Ein1 P28 10 COM P10 29 GND P29 11 GND P11 30 Ein16 P30 12 Eout16 P12 31 Ein15 P31 13 Eout15 P13 32 Ein14 P32 14 Eout14 P14 33 Ein13 P33 15 Eout13 P15 34 Ein12 P34 16 Eout12 P16 35 Ein11 P35 17 Eout11...

Page 15: ...15 3 3 2 Circuit Diagram of DB37 ...

Page 16: ... to the interface at the IO Test display window After setting the function of IO interface can be tested at the IO Test display window The interfaces in the following table can be set at the Input Config or Output Config of System Config 2 of teaching pendant It can define the special function for the following input output interfaces which are corresponding to the above sockets Connection of DB37...

Page 17: ... Nether CS Ein11 Origin BTN Stop BTN Start BTN Foot BTN Test input L Test input H Adj X Limit Shortcut 262 Upper CS Nether CS Ein12 Origin BTN Stop BTN Start BTN Foot BTN Test input L Test input H Shortcut 263 Lack fault Block fault Temp fault Temp Feed fault Upper CS Nether CS Ein13 Origin BTN Stop BTN Start BTN Foot BTN Test input L Test input H Shortcut 264 Lack fault Block fault Temp fault Tem...

Page 18: ...11 etc 3 4 2 IO Function Instruction Function of Input Function Instruction N A Origin BTN Input the reset signal into the unit by corresponding signal pin and the unit will run the reset ORG operation Stop BTN Input the stop signal into the unit by corresponding signal pin and the unit stops the current operation Start BTN Input the start signal into the unit by corresponding signal pin and the u...

Page 19: ...n state Nether CS Input the signal cylinder down sensor in reaching state into the unit by corresponding signal pin and the unit judges the position of cylinder whether in reaching state Adj X Limit Adj Y Limit Adj Z Limit It is effective only for the soldering robot and only when connecting with 9036 tip calibration device Adj X Limit is corresponding to the Ein09 Input the signal by Ein09 to cal...

Page 20: ...he clean blowing or revolving brush or else not Note The function settings of input output cannot be accessed by the operator It can only be operated by the manufacturer Will not give advanced information if some functions are changed 3 5 Operation For First Time Use If using the unit for the first time the operator should test the basic functionalities Step 1 Install and Test Before using the ope...

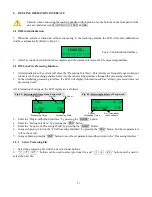
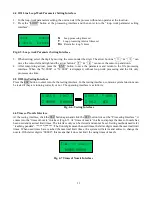
Page 21: ... as already processed times set processing times All information showing on the LCD display are as follows SJ001 N 0003 01 30 STOP File Name Processing State File No File Count Processing Times SJ001 0001 0002 01 30 STOP Set Times about the Loop Work Current Processing Times 3 Enter the Origin calibration Interface by pressing the HOME button 4 Enter the Testing Interface by pressing the ESC butto...

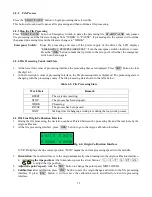
Page 22: ...ng course The file processing state shown in the table below Table 4 1 File Processing State Work State Remark RESET The system is resetting STOP The process has been stopped WORK Processing PAUSE The process has been paused WAIT Waiting time for hanging a work piece during the loop work process 4 3 Off Line Origin Calibration Interface 1 During the file processing the deviation can be calibrated ...

Page 23: ... the testing interface common system functions can be tested if they are running correctly or not The operating interface is as follows X 033 3 Z 00000 Y 067 5 R 00000 X 033 3 Z 08 2 Y 000 0 MID Fig 4 6 Testing Interface 4 6 Times of Nozzle Interface At the testing interface click the ESC button again and click the ESC button twice at the Processing Interface it comes into the times of nozzle inte...

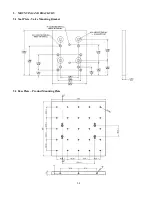
Page 24: ...24 5 MOUNTING AND BRACKTRY 5 1 Tool Plate Valve Mounting Bracket 5 2 Base Plate Product Mounting Plate ...

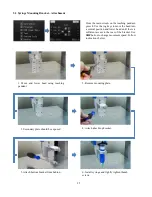
Page 25: ...d lower head until there is sufficient access to the rear of the bracket Use SHF button to change movement speed Follow instructions below 1 Move and lower head using teaching pendant 2 Remove mounting plate 4 Attach attach top bracket 3 Secondary plate should be exposed 5 Attach bottom bracket from behind 6 Install syringe and lightly tighten thumb screws ...

Page 26: ...rchase to be free from defects in material and workmanship but not against damages by misuse negligence accident faulty installations and instructions Manufacturer will repair or replace at factory s option free of charge any component of the equipment thus found to be defective on return of the component PREPAID to the factory during the warranty period In no event shall any liability or obligati...

Page 27: ... be incorporated into machinery or to be assembled with other machinery to constitute machinery covered by Directive 2006 42 EC And that the following harmonized standards and specifications have been used EN ISO 10218 1 2011 EN ISO 12100 2010 EN 60204 1 A1 2009 And furthermore declares that the product s covered by this Declaration must not be put into service until the machinery into which it is...

Page 28: ...48 9109 Effective Date May 23rd 2014 Conforms to protection requirements of Council Directive 2004 108 EC relating to Electromagnetic Compatibility by the application of the following EMC Standards EN61000 6 2 2005 EN61000 6 4 A1 2011 I the undersigned hereby declare that the equipment specified above conforms to the above Directive s and Standard s Signature Date May 23rd 2014 Jimmy Guo Quality E...

Reviews: