background image

 5

Unpacking 

Immediately upon receipt, carefully unpack and inspect the fixture to verify that all parts are 
present and have been received in good condition.  If any parts appear damaged from shipping 
or the shipping carton shows signs of mishandling, notify the shipper immediately.  Retain 
carton and all packing material for inspection.  In the event that the merchandise is to be 
returned, the original carton and packing must be used.  The customer will be billed for a new 
carton and packing if merchandise is received without the original carton and packing. 
 

Claims 

Physical damage must be reported to the Freight Carrier or Shipping Company upon 
receipt of merchandise.  Damage incurred in shipping is the responsibility of the Freight 
Carrier or Shipping Company. It is the customer’s obligation in the event that 
merchandise is received damaged, to notify the Freight Carrier or Shipping Company 
immediately.  All other claims not related to damage incurred during shipping must be 
made to the Dealer or Distributor within 7 days of receiving merchandise.  


Returns 

Returned merchandise must be in the original packing with a Return Merchandise 
Authorization number (RMA) clearly listed on the shipping label.    Items sent by Freight 
Collect or without a RMA number will be refused.   Call your sales person and request a 
RMA prior to shipping.  Be prepared to provide the model number, serial number and 
description of the nature of the return.  Shipping damage resulting from inadequate 
packaging is the customer’s responsibility.  Customer will be charged additional shipping 
charges to return products received in non original packing and or cartons. 


Power 


Do not apply power to the fixture until power source is verified. 


For protection against electric shock, fixture must be connected to suitable earth ground. 
Make sure fixture is disconnected from power mains before any service. 

 
The mains voltage and frequency of this fixture is automatically set. It may operate on an input 
AC voltage ranging from 100 to 250volts, 50/60Hz.  The listed power rating is its average 
wattage under normal conditions. All fixtures must be powered directly from a switched circuit.  
This fixture cannot be run on a rheostat or dimmer circuit even if used solely for a 0% to 100% 
switching.  Before applying power to a fixture, check that the fixture’s input voltage matches the 
power source voltage.  Consult a qualified electrician if there are any concerns about proper 
connection to power. 
 

Mounting 

Always consult a qualified professional when rigging.  Consider access for routine maintenance 
when selecting a mounting position. This fixture may be mounted in any position provided there 
is adequate room for movement and ventilation.  Mount the fixture securely using a mounting 
clamp and a safety cable. Always keep cords out of the way, thus preventing any trip hazards. 
Secure all cables properly. Do not mount where the fixture will be exposed to rain, high 
humidity, extreme temperature changes or restricted ventilation.  Do not obstruct any vents. 


Summary of Contents for DL-FLEXILED100W/B

Page 1: ...Information specifically for DL FLEXILED100W B V1 0 This manual contains important information Please read before operating fixture ...

Page 2: ...ed to and shall not exceed the purchase price paid Returning equipment and Repairs All returns must be accompanied by a Return Merchandise Authorization RMA number and sent pre paid Contact the dealer or Techni Lux directly to obtain an RMA The RMA number must be clearly listed on the shipping label Due care must be exercised in packing all merchandise to be returned All repairs must be accompanie...

Page 3: ...trol 7 DMX Data Connection 7 Data Terminator 8 Adapter 5 to 3 pin 8 DMX Start Address 9 DMX Channel Assignments 9 1 Channel Mode 01 9 3 Channel Mode 03 9 Channel Values and Functions 3 Channel Mode 10 CH 1 Dimmer 10 CH 2 Strobe 10 CH 3 Dimmer Curve 10 Dimming Curves 10 Maintenance 11 Accessory Items sold separately 11 Troubleshooting 12 DMX 512 Background 12 ...

Page 4: ...ing hole Physical Color Black Size 12 W x 8 75 H x 13 L Weight 9 5 lbs 4 32 kgs Housing Material Aluminum Environmental Location Indoor Min distance to flammable surface 3 3ft 1m Min distance to illuminated surface 1ft 0 3m Electrical Voltage Auto Ranging from 100 250vAC 50 60Hz Rated Power 120W Fuses 2 amp mini size 5 2x20mm Control Digital Protocol USITT DMX512 1990 Channels 1 and 3 maximum Data...

Page 5: ... of the nature of the return Shipping damage resulting from inadequate packaging is the customer s responsibility Customer will be charged additional shipping charges to return products received in non original packing and or cartons Power Do not apply power to the fixture until power source is verified For protection against electric shock fixture must be connected to suitable earth ground Make s...

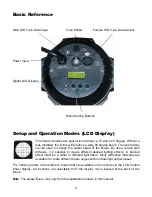
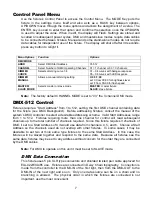
Page 6: ...output beam of the fixture By using certain light diffusers it is possible to create different desired lighting effects A desired effect might be a softer or diffused light beam Many diffraction materials are available to create different beam angles with minimal light output losses The following refers to the different modes that are available on this fixture via the LCD Control Panel display All...

Page 7: ...o a Start Address of 4 it would use data from channels 4 5 and 6 Choose a Start Address so the channels used do not overlap with other fixtures In some cases it may be desirable to set two or more same type fixtures to the same Start Address In this case the fixtures will be slaved together and respond to the same data Because all fixtures see the same data fixtures may be set to any address witho...

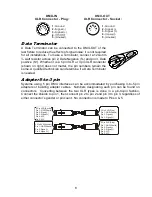
Page 8: ... adapters or building adapter cables Numbers designating each pin can be found on connectors Converting between the two XLR types is done in a pin to pin fashion Connect the shields to pin 1 then connect pin 2 to pin 2 and pin 3 to pin 3 regardless of either connector s gender or pin count No connection is made to Pins 4 5 5 Pin XLR Plug Pin 1 GND Sheild Pin 2 Signal Pin 3 Signal Pin 4 N C Pin 5 N...

Page 9: ...lable for a Start Address is found by adding the previous fixture s Start Address to its channel requirement 1 3 4 To maximize channel usage we will leave no empty channels between fixtures so the second Start Address is set to DMX channel 4 and that fixture occupies channels 4 thru 6 The third fixture will be addressed 4 3 7 and occupy channels 7 thru 9 The last fixture is addressed 7 3 10 and wi...

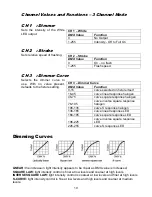
Page 10: ...tensity control is coarser at low levels and finer at high levels S CURVE light intensity control is fine at low levels and high levels and coarser at medium levels CH 1 White DMX Value Function 0 No Output 1 255 Intensity Off to Full On CH 2 Strobe DMX Value Function 0 On no flash 1 255 Flash speed CH 3 Dimmer Curve DMX Value Function 0 15 curve selected on fixture itself 16 45 curve linear respo...

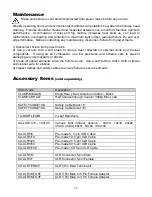
Page 11: ...s or effects 3 Clean all optical elements when the fixture is cold Use a soft lint free cotton cloth or tissue and cleaner safe for plastics 4 Inspect clamps and safety cables to ensure fixture is secure and safe Accessory Items sold separately Order Code Description CLAMP MEGA B Mega Heavy Duty Aluminum Clamp Black CLAMP CBHALF Half Cheeseborough Coupler 300kg Max Load SAFETYCABLE18B Safety Cable...

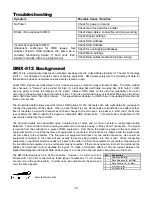
Page 12: ... all channels are transmitted one after another Even if the data on a specific channel has not been changed it must be sent In a packet a start code of all zeros is sent before the data to identify the signal as a Standard DMX transmission This start code is transparent to the user and is handled by the controller The physical signals are transmitted using a twisted pair of wires and a common shie...

Reviews: