background image

Product Overview 

1.2


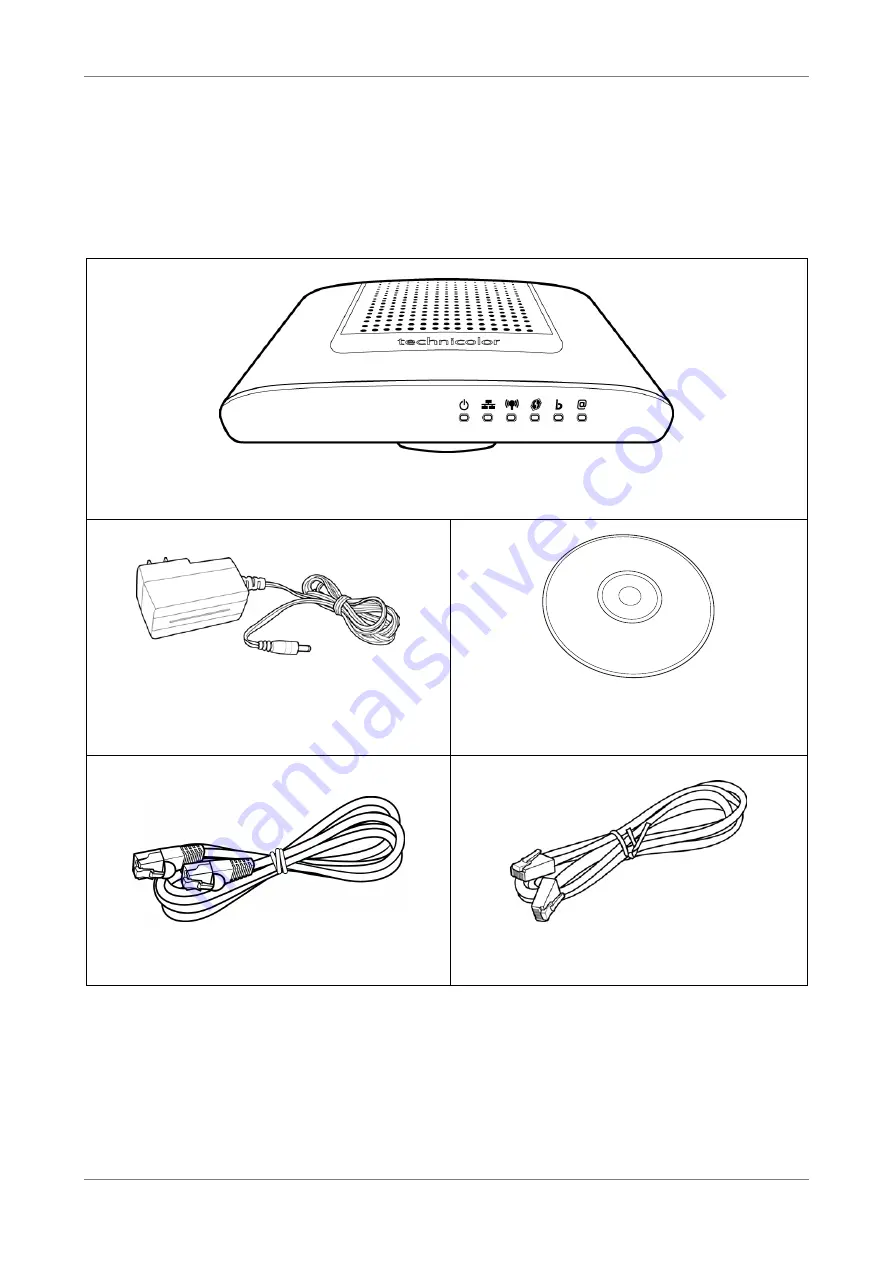
Package Contents 

Check if the package contains the following items. If any item is missing or appears 
damaged, contact your dealer. 


Wireless Gateway 


Power adapter 

CD-ROM with User’s Guide 


RJ-45 Ethernet cable 

RJ-11 telephone cable 


Wireless ADSL2+ Gateway 


Summary of Contents for TD5130

Page 1: ......

Page 2: ...2 2 4 Connect the Broadband DSL 13 2 4 1 Use a Splitter 13 2 5 Check the Installation 13 Chapter 3 Configure the Computer 14 3 1 Windows XP 14 3 2 Windows Vista 15 3 3 Windows 7 15 Chapter 4 Access the Wireless Gateway 16 4 1 Setup Wizard 16 4 2 Menu 20 Chapter 5 Setup 21 5 1 Internet Setup 21 5 1 1 Internet Connection Settings 21 5 1 2 Internet Settings 22 5 1 3 Protocol 22 5 2 Wireless Settings ...

Page 3: ...2 3 Default Route 46 6 3 Advanced LAN 47 6 4 IPv6 WAN 48 6 4 1 Static IPv6 48 6 4 2 Autoconfiguration Stateless DHCPv6 49 6 4 3 PPPoE 50 6 4 4 IPv6 in IPv4 Tunnel 51 6 4 5 6 to 4 52 6 4 6 6rd 53 6 5 IPv6 LAN 54 6 5 1 IPv6 LAN Stateless 54 6 5 2 IPv6 LAN Stateful 55 6 6 ADSL Settings 56 6 7 RIP Settings 56 6 8 NAT 57 6 8 1 Virtual Server 57 6 8 2 Port Trigger 58 6 8 3 ALG 59 6 8 4 VPN Passthrough 6...

Page 4: ...76 6 15 Port Mapping 76 6 16 Quality of Service QoS 78 6 16 1 Queue Management 78 6 16 2 Queue Config 78 6 16 3 Queue Classification 79 6 16 4 QoS Status 81 6 17 UPnP 82 6 18 SNMP 83 Chapter 7 Maintenance 84 7 1 Password 84 7 2 Remote Management 85 7 3 Remote Access 87 7 4 Init Script 88 7 5 SysLog 89 7 6 Time Schedule 91 7 7 Firmware Upgrade 91 7 8 Configuration Backup Restore 92 7 9 Ping 93 7 10...

Page 5: ...Wireless Clients 97 8 5 LAN Clients 97 8 6 Logs 98 8 7 Routing Table 98 8 8 Traffic Meter 99 8 9 Driver Version 100 8 10 Statistics 100 8 10 1 Basic Statistics 100 8 10 2 Statistics DSL Statistics 101 Appendix 102 A Wireless Considerations 102 B Regulatory Safety Information 103 C Specifications 106 ...

Page 6: ...1 1 Features Compliant with ADSL G dmt G 992 1 G lite G 992 2 standards Compliant with ADSL2 G dmt bis G 992 3 and ADSL2 G 992 5 standards Up to Up to 24Mbps downstream 1 2Mbps upstream with ADSL2 service IEEE 802 11b g n infrastructure operating modes Supports IPv4 and IPv6 protocols Supports web based configuration Supports Command Line Interface CLI via Telnet Supports NAT DHCP Supports VLAN an...

Page 7: ...s Check if the package contains the following items If any item is missing or appears damaged contact your dealer Wireless Gateway Power adapter CD ROM with User s Guide RJ 45 Ethernet cable RJ 11 telephone cable Wireless ADSL2 Gateway 7 ...

Page 8: ...gress Solid RED Indicates malfunction Off The device is powered off 2 Ethernet LED Solid GREEN A wired connection is established Flashing GREEN Data transmission is in progress Off No wired connection detected 3 WLAN LED Lights up to indicate wireless connection Solid GREEN Wireless connection is established Flashing GREEN Data transmission is in progress Off Wireless connection is disabled Wirele...

Page 9: ...s disabled 5 Broadband DSL LED Lights up to indicate DSL connection status Flashing GREEN Attempts to synchronize with DSL line Solid GREEN DSL connection is established Off DSL connection is not present 6 Internet LED Lights up to indicate Internet connection status Solid GREEN Internet is connected but no activity Flashing GREEN Data transmission is in progress Solid RED Internet connection fail...

Page 10: ...2 The LAN LED 1 2 lights up when a device is connected to the Ethernet port 1 2 4 Ethernet port 1 2 3 4 Connects a computer and other Ethernet network devices to the Wireless Gateway using RJ 45 cables 5 LAN LED 3 4 The LAN LED 3 4 lights up when a device is connected to the Ethernet port 3 4 6 DC In jack Connects to the power adapter 7 Power button Press to turn your device on or off 8 WPS button...

Page 11: ...1 Connect the power adapter to the DC In jack of your Wireless Gateway 2 Plug the power adapter to a wall outlet or a power strip NOTE Use only the supplied power adapter Using other power adapters may cause damage to the device Connect all devices to your Wireless Gateway before connecting the power adapter to a wall outlet Wireless ADSL2 Gateway 11 ...

Page 12: ...ct one end of an RJ 45 cable to the hub or switch and the other end to the computer 2 3 Connect Wireless Devices Before connecting wireless devices to the Wireless Gateway configure the wireless security settings of your Wireless Gateway see Security Setting on page 32 Take note of the SSID and the password you have set you need the SSID and the password to connect devices to your Wireless Gateway...

Page 13: ...cable to the DSL port of your Wireless Gateway 3 Connect the other end of the RJ 11 cable to the MODEM port of the splitter 4 Connect the telephone to the LINE port of the splitter using another RJ 11 cable 2 5 Check the Installation To ensure that all devices are properly connected check the LED indicators on the front of your Wireless Gateway For basic installation the following LEDs must be lit...

Page 14: ...uctions below to configure your computer 1 Click Start Control Panel Network Connections 2 Right click Local Area Connection then click Properties 3 On the network components list make sure that Internet Protocol TCP IP is checked If not check it to enable the Properties button 4 Select Internet Protocol TCP IP and then click Properties 5 On the General tab select Obtain an IP Address automaticall...

Page 15: ...lect Obtain an IP Address automatically and Obtain DNS server address automatically 6 Click OK General Page 3 3 Windows 7 If you are using Windows 7 follow the instructions below to configure your computer 1 Click Start Control Panel Network Sharing Center 2 Click Local Area Connection 3 Click Properties 4 On the network components list make sure that Internet Protocol TCP IP is checked If not che...

Page 16: ...r the User name and Password The default user name is root and the password is empty It is advised to change the password see Password on page 84 4 1 Setup Wizard It is recommended to follow the wizard if you are setting up the network and configuring the Wireless Gateway for the first time 1 Select a PVC Permanent Virtual Circuit then click Next It is recommended to use the default setting PVC0 w...

Page 17: ... you select here 3 Select a scanning method and then click Next to continue Auto Scan The Wireless Gateway automatically scans for Virtual Path Identifier VPI and Virtual Channel Identifier VCI Manual Scan To allow you to configure the VPI and VCI manually 4 If Auto Scan is selected skip to step 5 If Manual Scan is selected do the following Wireless ADSL2 Gateway 17 ...

Page 18: ... the network protocol you selected on step 2 Obtain the required information from your ISP The following is a PPPoE example a On State of Connection select Enable b Select an IP Protocol Version c Select the d Enter the connection Name User Name and User Password Re type the password in the Confirm Password field e Select whether to enable or disable features such as NAT Network Address Translatio...

Page 19: ...name that you can easily remember Click Next to continue 7 Select the Security Mode Authentication Type and Encryption and enter a passphrase Click Next to continue The screen below varies depending on the security mode you selected below is an example of a WPA security screen 8 When prompted to reboot click OK Wireless ADSL2 Gateway 19 ...

Page 20: ...Use the main menu located on the left panel of the screen to manually configure your Wireless Gateway Click a menu item then a submenu to display the page on the screen For submenus with more options move the mouse cursor over the submenu to view the options Wireless ADSL2 Gateway 20 ...

Page 21: ...ther to enable or disable this Internet connection Enable AutoPVC Select whether to automatically enable this Internet connection whenever needed VPI Enter the Virtual Path Identifier VPI provided by your ISP The default VPI is 0 VCI Enter the Virtual Channel Identifier VCI setting provided by your ISP The default VCI is 33 Encapsulation Select LLC Logical Link Control or VCMUX Virtual Circuit Mul...

Page 22: ...ed by your DSL line options are PPPoE RFC 2516 PPP over Ethernet PPPoA RFC 2364 PPP over ATM IPoA RFC 1483 Routed Dynamic IP Address IPoEoA MER MAC Encapsulated Routed with DHCP Static IP Address Bridge Mode RFC 1483 Bridged CIP RFC 1577 Classic IP ARP over ATM 5 1 3 Protocol This section varies depending on the selected network protocol PPPoE RFC 2516 PPP over Ethernet If you select PPPoE Point t...

Page 23: ...d to its default setting DNS Enabled Select whether to enable or disable DNS Domain Name System DNS Override Allowed Select whether to enable or disable DNS override DNS Server 1 and DNS Server 2 If provided by your ISP enter the DNS server Otherwise leave these fields blank PPPoE Service Name Enter a PPPoE service name MAC Address Displays the cloned MAC address Click the Clone Mac button to clon...

Page 24: ...ve your changes or click the Cancel button to discard your changes NOTE If the IPv6 protocol is selected the web utility may prompt for you to configure the IPv6 connection settings See IPv6 WAN on page 48 PPPoA RFC 2364 PPP over ATM If you select PPPoA Point to Point Protocol over ATM the screen below is displayed State of Connection Select whether to enable or disable this connection IP Protocol...

Page 25: ...on Trigger You can configure how you want your Wireless Gateway to connect and terminate the Internet connection Options are OnDemand Enables the Wireless Gateway to cut off the Internet connection after being idle for a specified period of time The Wireless Gateway automatically re establishes the connection when you try to access the Internet again On the Idle Disconnect Time field enter the num...

Page 26: ...nter your desired connection name NAT Select whether to enable or disable NAT Network Address Translation Enable this setting to share one WAN IP address with multiple computers on your network External IP Address Enter the IP address provided by your ISP Subnet Mask Enter the subnet mask provided by your ISP Default Gateway Enter the default gateway provided by your ISP DNS Enabled Select whether...

Page 27: ...ted Routed with DHCP the screen below is displayed State of Connection Select whether to enable or disable this connection IP Protocol Version Select the type of IP protocol to use with this connection IPv4 only Select to use IPv4 protocol IPv4 v6 both Select to use this connection in both IPv4 and IPv6 protocols IPv6 only Select to use IPv6 protocol Name Enter your desired connection name NAT Sel...

Page 28: ...Check this box to enable ICMP Internet Control Message Protocol messages to be sent back to the host that sent the message Proxy ARP Enable Check this box to enable proxy ARP function Click the Apply button to save your changes or click the Cancel button to discard your changes NOTE If the IPv6 protocol is selected the web utility may prompt for you to configure the IPv6 connection settings See IP...

Page 29: ...k the Clone Mac button to clone the MAC address of your computer As system default route Check this box to set the current setting as the default route ICMP Reply Enable Check this box to enable ICMP Internet Control Message Protocol messages to be sent back to the host that sent the message Proxy ARP Enable Check this box to enable proxy ARP function Click the Apply button to save your changes or...

Page 30: ...his connection IPv4 only Select to use IPv4 protocol IPv4 v6 both Select to use this connection in both IPv4 and IPv6 protocols IPv6 only Select to use IPv6 protocol Name Enter your desired connection name NAT Select whether to enable or disable NAT Network Address Translation Enable this setting to share one WAN IP address with multiple computers on your network External IP Address Enter the IP a...

Page 31: ...for you to configure the IPv6 connection settings See IPv6 WAN on page 48 5 2 Wireless Settings The Wireless Settings page allows you to enable and configure wireless connections 5 2 1 Basic Setting The Basic Settings page allows you to enable the wireless function of your Wireless Gateway and set its SSID To access the Basics Settings page click SETUP Wireless Settings Basic Setting or click the ...

Page 32: ...ly 802 11g wireless devices can connect to the network 802 11n 802 11g 802 11b All 802 11n 802 11g and 802 11b wireless devices can connect to the network 802 11n only Only 802 11n wireless devices can connect to the network 5 2 2 Security Setting It is strongly recommended to enable the security settings to secure your network from unauthorized access Use the Security Setting page to configure th...

Page 33: ...ss communications Shared Key Requires users to enter the same WEP key to exchange data with other wireless devices Encryption Strength Select 64bit to enter or generate a 10 character key or select 128bit to enter or generate a 26 character key Key Format Select HEX to generate hexadecimal characters only or ASCII to generate ASCII characters Passphrase Enter a passphrase then click the Generate b...

Page 34: ...s of the authentication server Radius Server Port The port number used to connect to the authentication server Radius Server Key Enter the passphrase that matches the authentication server Encryption Type Select an encryption protocol TKIP Select to use the Temporal Key Integrity Protocol TKIP AES Select to use Advanced Encryption Standard AES TKIP and AES Select if you are unsure which protocol t...

Page 35: ... Gateway If you select EAP enter the following information Radius Server IP The IP address of the authentication server Radius Server Port The port number used to connect to the authentication server Radius Server Key Enter the passphrase that matches the authentication server Encryption Type TKIP and AES is automatically selected Group Rekey Time Enter the number of seconds to elapse until the Wi...

Page 36: ...ocal Domain Name Enter a name to refer to the group of devices that will be assigned addresses from this pool DNS Relay Select whether to enable or disable the DNS relay function Check this box to request automatic assignment of a DNS then enter the Primary DNS Server and the Secondary DNS Server in the DHCP Setting screen below 5 3 2 DHCP Setting This section allows you to configure your Wireless...

Page 37: ...o assign The default value is 192 168 1 2 IP Pool Ending Address Enter the highest range of IP address to assign The default value is 192 168 1 253 Subnet Mask Enter the subnet mask The default value is 255 255 255 0 Router IP Address Enter the IP address of your Wireless Gateway The default value is 192 168 1 1 Primary DNS Server and Secondary DNS Server Enter a primary and a secondary DNS server...

Page 38: ...you can set your Wireless Gateway to act as a DHCP relay agent When a device on your network requests Internet access your Wireless Gateway contacts the ISP to obtain the IP configuration and then forwards the information to that device DHCP Server IP Enter the IP address of the DHCP server Click the Apply button to save your changes or click the Cancel button to discard your changes 5 3 3 DHCP Re...

Page 39: ...es the reserved IP address is listed on the DHCP Reserved Address table Or to discard changes click the Cancel button 5 4 Time and Date The Time and Date page allows you to configure the time and date of your network by setting the time zone synchronizing with a Network Time Protocol NTP server or manually set the time and date To access the Time and Date page click SETUP Time and Date Wireless AD...

Page 40: ...f another NTP server to synchronize your network with in case Server 1 is not available First Poll Frequency Enter the number in seconds of the first poll Thereafter Frequency Select the succeeding frequency from the drop down list Daylight Saving Check the Enable box to enable daylight saving time Start Time Select the month and the day to start the daylight saving time End Time Select the month ...

Page 41: ...anced Wireless 6 1 1 Wireless Router Settings This page allows you to configure advanced wireless router settings Click Advanced Advanced Wireless Advanced Wireless or click the Advanced Setting button SSID Advertise Check this box to allow wireless devices scanning the area for wireless networks to detect your Wireless Gateway Transmit Power Select the output power of the wireless LAN Data Rate S...

Page 42: ...hreshold The default and recommended value is 2347 Should you encounter inconsistent data flow only slight modifications should be made Beacon Interval Enter a value in milliseconds A beacon is a packet that is sent out by the Wireless Gateway to synchronize the wireless network The beacon interval value indicates the frequency interval of the beacon The default value is 100 Click the Apply button...

Page 43: ...check its SSID Advertise box to allow wireless devices scanning for a wireless network to detect the VAP Click the Apply button to save your changes or click the Cancel button to discard your changes 6 1 3 Wireless MAC Filter This page allows you to deny or allow devices to access the wireless network by filtering their MAC addresses Click Advanced Advanced Wireless Wireless MAC Filter or click th...

Page 44: ...the Apply button to apply the MAC filter or click the Cancel button to discard your changes To Remove MAC Filter 1 On the MAC ADDRESS LIST click the icon to remove the device from the list of MAC addresses with restriction 2 When prompted click OK to confirm 6 1 4 WPS Setting Wi Fi Protected Setup WPS is designed to make wireless setup easy and yet secure Users do not need to know the network SSID...

Page 45: ...he Reset to Not configured button Click the Apply button to save your changes or click the Cancel button to discard your changes 6 2 Multi WAN 6 2 1 DSL Auto Scan This page allows you to view and edit the VPI VCI of the DSL line To access the DSL Auto Scan page click Advanced Multi WAN DSL Auto Scan List or click the DSL Auto Scan List button The CURRENT AUTO PVC TABLE displays the current PVCs Yo...

Page 46: ... settings vary depending on the type of connection that you want to add 2 On the Interface field select the PVC 3 Enter the necessary connection settings See Protocol on page 22 for connection configuration details 4 Click the Apply button to save your changes or click the Cancel button to discard your changes To delete an IP or PPP connection click the corresponding icon 6 2 3 Default Route This ...

Page 47: ...on LLMNR When enabled this allows both IPv4 and IPv6 hosts to perform name resolution for the names of neighboring computers without using a DNS server or DNS client configuration Click the Apply button to save your changes or click the Cancel button to discard your changes Add IP Interface To add an IP interface do the following 1 On the first record on the table enter the IP Address and Subnet M...

Page 48: ...n is select Static IPv6 Connection Name Select an Internet connection to use This is the connection that you set up in SETUP Internet Setup page See Internet Setup on page 21 WAN IPv6 Address Settings Connection Name Enter the connection name provided by your ISP or a desired connection name IPv6 Address Enter the IPv6 IP address provided by your ISP Subnet Prefix Length Enter the subnet prefix le...

Page 49: ...ection is select Autoconfiguration Stateless DHCPv6 Connection Name Select an Internet connection to use This is the connection that you set up in SETUP Internet Setup page See Internet Setup on page 21 IPv6 DNS Settings Connection Name Enter the connection name provided by your ISP or a desired connection name DHCP Mode Select the DHCP mode recommended by your ISP Obtain a DNS Server address auto...

Page 50: ... an Internet connection to use This is the connection that you set up in SETUP Internet Setup page See Internet Setup on page 21 PPPOE Connection Name Enter the connection name provided by your ISP or a desired connection name Address Mode Select Dynamic IP or Static IP IP Address If the Address Mode is Static IP enter the IP address Obtain a DNS Server address automatically Select to obtain the D...

Page 51: ...onnection that you set up in SETUP Internet Setup page See Internet Setup on page 21 IPv6 in IPv4 Tunnel Settings Connection Name Enter the connection name provided by your ISP or a desired connection name Remote IPv4 Address Enter the remote IPv4 address provided by your ISP Remote IPv6 Address Enter the remote IPv6 address provided by your ISP Local IPv4 Address Enter the local IPv4 address prov...

Page 52: ... desired connection name 6to4 IPv4 Address Enter the 6 to 4 IPv4 address provided by your ISP 6to4 IPv6 Address Enter the 6 to 4 IPv6 address provided by your ISP 6to4 Relay IPv4 Address Enter the 6 to 4 relay IPv4 address provided by your ISP Primary DNS Address and Secondary DNS Address If provided by your ISP enter the DNS server address Otherwise leave the fields blank Click the Apply button t...

Page 53: ...he 6rd address and prefix provided by your ISP IPv4 Address Enter the IPv4 address and Mask Length provided by your ISP Assign IPv6 Prefix Enter the assigned IPv6 prefix provided by your ISP 6RD4 Border Relay IPv4 Address Enter the 6RD4 border relay IPv4 address provided by your ISP Primary DNS Address and Secondary DNS Address If provided by your ISP enter the DNS server address Otherwise leave t...

Page 54: ...page See IPv6 WAN on page 48 LAN Link Local Address Displays the Wireless Gateway LAN Link Local address 6 5 1 IPv6 LAN Stateless After selecting the WAN interface on Autoconfig Type select stateless More fields appear Available fields vary depending on the enabled features Enable DHCP PD Check this box to enable DHCP PD feature LAN Global Address Available only if DHCP PD is disabled Enter the Wi...

Page 55: ...6 LAN Stateful After selecting the WAN interface on Autoconfig Type select stateful More fields appear Available fields vary depending on the enabled features Enable DHCP PD Check this box to enable DHCP PD feature LAN Global Address Available only if DHCP PD is disabled Enter the Wireless Gateway LAN global address Advertise Local Address Prefix Check this box to advertise the local address prefi...

Page 56: ...tions Consult your ISP to determine the appropriate settings To access the ADSL Settings page click Advanced ADSL Settings Check a corresponding box to select the option Click the Apply button to save your changes or click the Cancel button to discard your changes 6 7 RIP Settings A Routing Information Protocol RIP is an Internet protocol that is used to share routing information table with other ...

Page 57: ...rver allows remote devices accessing the Web or FTP services via a public IP address be redirected to local servers i TCP UDP port number your Wireless Gateway redirects the external service request to the appropriate server in the LAN To access the Virtual Server page click Advanced NAT Virtual Server or click the Virtual Server button The table displays the virtual servers on your network To edi...

Page 58: ...ting the server Time Schedule Select a schedule when to use the virtual server or click the New Time Schedule button to create a new schedule your changes or click the Cancel button to discard your Port triggering is a type of port forwarding where outgoing data e Port The table displays the port triggers on your network To edit an entry click the corresponding Click the Apply button to save chang...

Page 59: ...blic port protocol Time Sche Click the Apply bu 6 8 3 ALG Application Layer Gateway ALG consists of a security component that augments FTP File Transfer Protocol FTP is used to transfer files between computers on a TCP IP based network such as the Internet Check this box to enable this funct work through your Wireless Gateway ion to ed SNMP Simple Network Management Protocol SNMP is a network prot...

Page 60: ... real time applic b to e It is recommended to retain the defau Click the Apply button to save your changes or click the Cancel button to discard your changes 6 8 4 VPN Passthro IPSEC Passthrough Internet Protocol Security IPSec is a protocol suite used to box neling Protocol PPTP allows Point to Point to enable this hat enables ISPs to operate VPNs Check this box to enable this function to work th...

Page 61: ...lick the Cancel button to discard your changes MAC Address Enter the MAC address of the device you want to allow or deny access to the Internet To use the MAC address of the DHCP client click the Clone button The MAC address is automatically copied to the MAC address field Click the Add button to add the MAC address to the filter list The MAC ADDRESS CONTROL LIST displays the MAC address of the de...

Page 62: ...er the ending point of the source IP address Source Port Enter the source port number Start Destination IP Address Enter the starting point of the destination IP address End Destination IP Address Enter the ending point of the destination IP address Destination Port Enter the destination port number Protocol Type Select the protocol from the drop down list Time Schedule Select the time to implemen...

Page 63: ...d activate the filter or click the Cancel button to discard your changes To Filter a URL 1 On the Add FQDN Rule field enter a Fully Qualified Domain Name FQDN that you want to block NOTE For example if you block www google com then you cannot access the website www google com 2 Select the time to implement the URL filter or click the New Time Schedule button to create a new schedule 3 Click the Ad...

Page 64: ...sted on the URL LIST table To delete an entry click the corresponding button 6 9 4 DOS Protection This page allows you to protect your network from hackers to run Denial of Service DoS attacks To access the DOS Protection page click ADVANCED Firewall DOS Protection or click the DOS Protection button Dos Protection Check this box to enable DoS protection Wireless ADSL2 Gateway 64 ...

Page 65: ...nable domain blocking Click the Apply button to activate domain blocking To Block Domains 1 On the Domain field enter the domain name to block 2 Select the time to implement the domain blocking or click the New Time Schedule button to create a new schedule 3 Click the Add button to add the domain The entry is listed on the DOMAIN LIST table To delete an entry click the corresponding icon 6 9 6 DMZ...

Page 66: ...PI Settings page click ADVANCED Firewall SPI Settings or click the SPI Settings button SPI Enable Select whether to enable or disable the SPI function Endpoint Filter Select an endpoint filter option Independent Forwards all incoming traffic from an open port to the application that opened the port Restrict Incoming traffic must match the IP address of the outgoing connection Log Dropped Packet En...

Page 67: ...in spaces Interface Select the interface to implement the filter Type Select In to filter incoming packets or select Out to filter outgoing packets Default Action Select Drop to drop the packets or select Permit to allow packets to pass through if the rule requirement is met Click the Apply button to save the filter or click the Cancel button to discard your changes The new entry is listed on the ...

Page 68: ...cted action the fields below may or may not be displayed on the screen Origin IP Address Enter the IP address of the origin of the packets Origin Mask Enter the subnet mask of the origin of the packets Origin Start Port and Origin End Port Enter the starting and ending port range of the origin of the packets Destination IP Address Enter the IP address of the destination of the packets Destination ...

Page 69: ...the Add button under the desired IP protocol static route table IPv4 Static Route Rule Enable Enable or disable rule Forwarding Policy Option Select whether to enable or disable routing Rule Name Enter desired rule name Source IP Enter the source IP address Source SubMask Enter the source subnet mask Dest IP Enter the destination IP address Dest SubMask Enter the destination subnet mask Gateway En...

Page 70: ... to discard your changes 6 12 Multicast This page allows you to configure IGMP and MLD settings To access the Multicast page click ADVANCED Multicast 6 12 1 IGMP Internet Group Management Protocol IGMP for IPv4 protocol manages members of groups of devices called IP multicast groups IGMP is used by IP hosts and adjacent multicast routers to establish multicast group membership It is an integral pa...

Page 71: ...utton IGMP Proxy IGMP proxy enables your Wireless Gateway to forward multicasts traffics between LAN and WAN networks 1 On IGMP Option select Proxy 2 Click the Apply button 3 Click the Apply button again More fields appear on the screen 4 Select the IGMP Proxy Version Wireless ADSL2 Gateway 71 ...

Page 72: ...AN3 or LAN4 to enable IGMP in the respective network connection 9 Click the Apply button to save and apply changes IGMP Snooping With IGMP snooping your Wireless Gateway can make intelligent multicast forwarding to connections that have group members attached As a result IGMP snooping prevents or reduces traffic on the interface that is not registered as a receiver of a specific multicast group 1 ...

Page 73: ...s 6 12 2 MLD Multicast Listener Discovery MLD is a component of IPv6 MLD manages group membership in IPv6 similar to IGMP in IPv4 To access the Multicast MLD page click ADVANCED Multicast MLD or click the MLD button MLD Proxy MLD proxy enables your Wireless Gateway to forward multicasts traffics between LAN and WAN networks in the IPv6 protocol 1 On MLD Option select Proxy 2 Select the DSL Interfa...

Page 74: ...Gateway can make intelligent multicast forwarding to connections that have group members attached in IPv6 protocol 1 On MLD Option select Snooping 2 To enable fast leave option check the Fast Leave box 3 Check Drop Unknown Stream box to drop unknown streams 4 Enter values for Last Member Query Interval Last Member Query Count and Query Response Interval If you are unsure about them leave the defau...

Page 75: ...ick the Add button Connection Name Select a connection from the drop down list Use Dynamic DNS Service Check this box to register this account to the DNS server Service Provider Select a service provider from the drop down list NOTE Additional charges may be incurred depending on the selected service provider Host Name Enter a domain name to be registered to the DNS server User Name Enter the user...

Page 76: ...FlowCntrl box of the LAN interface to enable flow control Click the Apply button to save your changes 6 15 Port Mapping Port mapping allows you to group interfaces for traffic control Traffic is isolated from group to group Therefore traffic coming from an interface of a group can only be flowed to the interfaces in the same group By default all interfaces belong to the Default group You can creat...

Page 77: ...ed interface to the Grouped Interfaces panel 4 Repeat step 3 to add more members to the group 5 Click the Apply button to save your changes To Modify Groups 1 Click the radio button to select the group to modify 2 To add or remove a member from the group select the interface then click the or buttons 3 Click the Apply button to save your changes To Delete Groups Click the corresponding Delete butt...

Page 78: ...e Default DSCP Mark Select a DSCP mark from the drop down list The DSCP mark is used to classify and prioritize types of packets NOTE If the drop down lit does not contain the DSCP marking that you want select either Private DSCP value or Public DSCP value Default Rate Check the Auto box to set the rate to its auto default or uncheck the box to enter the QoS rate manually Click the Apply button to...

Page 79: ...l Each traffic is assigned to a class and each class is given its own queue Precedence Select the precedence from the drop down list Bandwidth Expression Select one of the following options bits Enter the Shaping Rate and Ceiling Rate Percent Enter the Percent Burst Size Enter the burst size Click the Apply button to save the queue configuration or click the Cancel button to discard your changes 6...

Page 80: ...ntry click the corresponding icon Class Name Enter a classification name Class Enable Check this box to enable the classification Specify Classification Criteria You can classify traffic based on ingress interface Ether type packet length source or destination MAC address MAC Mask or a combination of them Select an option or enter the values on the fields that you want to use for the criteria Othe...

Page 81: ... priority from the drop down list Mark DSCP Select the DSCP mark from the drop down list If the DSCP mark that you want is not listed select either Public DSCP value or Private DSCP value Default VLAN ID Check this box to use the default VLAN ID VLAN ID If Default VLAN ID is not checked enter preferred VLAN ID Forwarding Policy Name Select the forwarding policy name from the drop down list Click t...

Page 82: ...is commonly used for gaming and video streaming If you feel that UPnP is a security concern disable this feature To access the UPnP page click ADVANCED UPnP UPnP Check this box to enable the UPnP feature UPnP LOG Check this box to log UPnP status UPnP WAN Interface Select the interface to implement UPnP Click the Apply button to save and apply the settings Wireless ADSL2 Gateway 82 ...

Page 83: ...ter the contact person or contact information for your Wireless Gateway System Name Enter an assigned name for your Wireless Gateway System Location Enter an assigned location for your Wireless Gateway Public Community and Private Community Enter a public and private community name Trap Check this box to enable the Trap function then provide the following information Trap Version Select an SNMP tr...

Page 84: ...e default password is empty For security reasons it is strongly recommended to change the password Once the password is changed you are required to login before you can access to the Web Configurations To access the Password page click MAINTENANCE Password User Name Displays the user account Current Password Enter the current password New Password Enter the desired password Confirm Password Re ent...

Page 85: ...ent page click MAINTENANCE Remote Management Access Management Check the Only allow administrator access from WAN box to enable only the users who have administrator rights to login from WAN or uncheck the box to enable all users to login from WAN Click the Apply button to save your changes or click the Cancel button to discard your changes NOTE Remote access rights depend on the enabled remote ma...

Page 86: ...sten Port Enter the Listen port Session Timeout Enter the time wherein the session will automatically timeout after being idle for the specified time Click the Apply button to save your changes or click the Cancel button to discard your changes FTPD Management Check the FTPD Enable box to allow network administrators to upgrade the firmware or restore configurations using the FTP Keep old session ...

Page 87: ... edit an entry click the corresponding icon To delete an entry click the corresponding icon To create remote access rules click the Add button Wan Interface Select the interface from the drop down list Status Select whether to enable or disable remote access of the device Remote IP Enter the IP address of the remote device Remote IP Mask Enter the IP mask of the remote device Service Select the ty...

Page 88: ...TENANCE Init Script Init start scripts are scripts that run before the system starts up Init end scripts are scripts that run before the system shuts down To import scripts do the following 1 Click the Browse button 2 Browse for the file then click the Open button 3 Click the Import Script button To show the scripts on your computer click the Show Start End Script button To delete the scripts on y...

Page 89: ...ns Kernel Common Message Check this box to generate logs Click the Apply button to save and apply the setting Log Rules Setting The table displays current log rules To edit an entry click the corresponding icon To create log rules click the Add button The screen below is displayed 1 Select Module and Facility 2 Select Severity level emerg is the highest level while debug is the lowest level 3 Sele...

Page 90: ...lowing 1 Check the SMTP Server box to enable logging of e mails periodically 2 Enter the SMTP Server IP Source E mail Address and Destination E mail Address 3 Check the SMTP Authentication box to enable authentication And enter the SMTP Username and SMTP Password Re enter the password in the Confirm Password field 4 Select the Time Frequency of logging e mails 5 Click the Apply button to save your...

Page 91: ... Check the days to implement the schedule and select the time period 3 Click the Add button to save the schedule The new entry is listed on the TIME SCHEDULE LIST To delete a schedule click the corresponding icon 7 7 Firmware Upgrade This page displays the current firmware version of your Wireless Gateway and allows you to install the upgrade To access the Firmware Upgrade page click MAINTENANCE F...

Page 92: ...page allows you to save a backup of your current settings revert settings to a backup point or restore the default factory settings To access the Configuration Backup Restore page click MAINTENANCE Configuration Backup Restore Backup Settings To backup the current settings click the Backup Settings button Restore Settings To restore settings from a backup point do the following 1 Click the Browse ...

Page 93: ...e some time Do not turn off the Wireless Gateway 7 9 Ping Once you have configured your Wireless Gateway it is recommended to ping the network devices to verify their connection When you execute a ping test a series of packets are sent to a specific computer When the computer receives the packets it will respond with an acknowledgment that it received the packets To access the Ping page click MAIN...

Page 94: ...he drop down list and then click the Test button 7 11 Reboot Device In the event that your device does not respond correctly or stops responding reset your device All your settings will be retained 1 Click MAINTENANCE Diagnostics 2 Click the Reboot button 3 Click OK to confirm 4 When prompted click OK NOTE Rebooting the Wireless Gateway may take some time Do not turn off the power until the reboot...

Page 95: ...TM PVC Internet connection LAN and wireless ports status To access the Summary page click STATUS Summary The status is automatically refreshed every 10 seconds To stop automatic refresh click the Stop Refresh button 8 2 IPv6 Info This page displays the status of the IPv6 Internet and LAN status To access the IPv56 Info page click STATUS IPv6 Info Wireless ADSL2 Gateway 95 ...

Page 96: ...g used Standards Supported Displays the supported standards Link Encapsulation Used Displays the used link encapsulation mode Link Encapsulation Supported Displays the supported link encapsulation mode Link Encapsulation Requested Displays the requested link encapsulation mode Line Encoding Displays the line encoding Data Path Displays the data path Interleaved Depth Displays the interleaved depth...

Page 97: ...nnected on your network via wireless connection To access the Wireless Clients page click STATUS Wireless Clients The list is automatically refreshed every 10 seconds To stop automatic refresh click the Stop Refresh button 8 5 LAN Clients This page displays the clients connected on your network To access the LAN Clients page click STATUS LAN Clients The lists are automatically refreshed every 10 s...

Page 98: ...g is automatically refreshed every 10 seconds To stop automatic refresh click the Stop Refresh button Click the buttons to scroll through the logs Click the Clear History button to delete old logs Click the Backup Logs button to save a backup of the logs 8 7 Routing Table This page displays the destination routes commonly accessed by your network To access the Routing Table page click STATUS Routi...

Page 99: ...he specified interface To access the Traffic Meter page click STATUS Traffic Meter Traffic Data Interface The table lists the available interfaces on your network Check the State box of the interface to view its traffic You may check more than one interface Traffic Bandwidth Interval Interval Enter the interval of refreshing the traffic bandwidth Traffic Bandwidth Meter This table lists the curren...

Page 100: ... STATUS Driver Version 8 10 Statistics 8 10 1 Basic Statistics This page displays the transmission and reception statistics of the Internet connection LAN device wireless port and the LAN ports To access the Basic Statistics page click STATUS Statistics Basic Statistics or click the Basic Statistics button Wireless ADSL2 Gateway 100 ...

Page 101: ...DSL Statistics This page displays the transmission and reception statistics of the DSL line To access the DSL Statistics page click STATUS Statistics DSL Statistics or click the DSL Statistics button The statistics is automatically refreshed every 10 seconds To stop automatic refresh click the Stop Refresh button Wireless ADSL2 Gateway 101 ...

Page 102: ...ange the default wireless network name Your device has a default Service Set Identifier SSID which is the wireless network name Change the SSID with a unique name to identify your network The SSID can be up to 32 characters in length 2 Change the default password Your device has a default password You have to enter this password to change your network settings Change the password to prevent unauth...

Page 103: ...hat are not expressly approved by the manufacturer may void the user s authority to operate the equipment The Manufacturer is not responsible for any radio or television interference caused by unauthorized modification of this device of the substitution or attachment Manufacturer and its authorized resellers or distributors will assume no liability for any damage or violation of government regulat...

Page 104: ...en the radiator your body This transmitter must not be co located or operating in conjunction with any other antenna or transmitter The availability of some specific channels and or operational frequency bands are country dependent and are firmware programmed at the factory to match the intended destination The firmware setting is not accessible by the end user CE statement Europe EU Declaration o...

Page 105: ...EMC standard for radio equipment Part 17 Specific conditions for Broadband Data Transmission Systems This device is a 2 4 GHz wideband transmission system transceiver intended for use in all EU member states and EFTA countries except in France and Italy where restrictive use applies In Italy the end user should apply for a license at the national spectrum authorities in order to obtain authorizati...

Page 106: ...net LAN ports Buttons 1 x Power ON OFF button 1 x WPS button 1 x Reset to default button LEDs Front panel Power LED Ethernet LED Wi Fi LED WPS LED ADSL LED Internet LED Back panel 4 x Ethernet LEDs IO Ports 1 x RJ 11 DSL connector 4 x RJ 45 Ethernet connector 1 x DC In jack Antenna Standard 1 internal printed antenna DC inputs 12VDC 1A Temperature Operating 0 C 40 C Storage 10 c 70 C Humidity Oper...

Reviews: