background image

40


  Troubleshooting


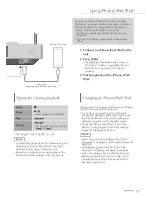
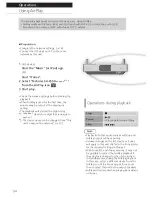
  Heat buildup of this unit

 This unit becomes warm when used for a long 
time. This is not a malfunction.

  Do you have the latest 

firmware installed?

 Panasonic is constantly improving the unit’s 
firmware to ensure that our customers are 
enjoying the latest technology. (

 38)

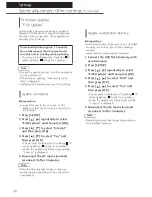
  To return all settings to the 

factory defaults

 When the following situations occur, reset the 
memory:


 There is no response when buttons are 
pressed.


 You want to clear and reset the memory 
contents.

 1  Press [SETUP].

 2  Press [ ], [ ] repeatedly to select 

“Initialization” and then press [OK].

 3  Press [ ], [ ] to select “Yes” and 

then press [OK].


 All the settings are set back to the factory 
defaults. It is necessary to set the memory 
items again.

 4  Press [ ], [ ] to select “Yes” and 

then press [OK] again.


  General

 The unit does not work.
 Operations are not done properly.


 One of the unit’s safety devices may have been 
activated.


 Press [

] on the unit to switch the unit to 

standby.


 If the unit does not switch to standby, 
press [

] on the unit for at least 5 

seconds. The unit is forcibly switched to 
standby.
 Alternatively, disconnect the AC mains 
lead, wait for at least 3 minutes, then 
reconnect it.


 Press [

] on the unit to switch on. If the 

unit still cannot be operated, consult the 
dealer.

 A “humming” sound can be heard during 
playback.


 An AC mains lead or fluorescent light is near 
the cables. Keep other appliances and cords 
away from the cables of this unit.


 A strong magnetic field near a TV or other 
device may adversely affect the audio quality. 
Keep this unit away from such devices.


 The speakers may output noise when a device 
nearby is emitting powerful radio waves, such 
as when a mobile phone is on a call.

 No sound.


 Check the volume of this unit.


 Check connections to speakers and other 
equipment. After checking the connections, 
measure the output signal of the amplifier. 
(

 39)


 Check to see if the correct input source is 
selected.


 Insert the plugs of the cables to be connected 
all the way in.


 Playback of multi-channel content is not 
supported.


 The digital audio input terminals of this unit can 
only detect linear PCM signals. For details, refer 
to the operating instructions of the device.

 Before requesting service, make the following checks. If you are uncertain about some of the check 
points, or if the solutions indicated in the following guide does not resolve the issue, then consult your 
dealer for instructions.

Summary of Contents for SU-C550

Page 1: ...SU C550 CD Stereo Amplifier Operating Instructions...

Page 2: ......

Page 3: ...erless and timeless touching people s hearts across cultures and generations Each day the discovery of a truly emotive experience from an unencountered sound awaits Let us take you on your journey to...

Page 4: ...04...

Page 5: ...ended and enable them to feel the emotional impact that enthuses and delights them Through delivering this experience we want to support the development and enjoyment of the world s many musical cultu...

Page 6: ...echnics com uk LAPC Load Adaptive Phase Calibration Adaptive processing of speaker impedance flattens frequency amplitude and phase characteristics The result is the reproduction of sound with rich sp...

Page 7: ...tions 24 Playing back CDs etc Settings 36 Other settings Using output correction function LAPC Troubleshooting 40 Before requesting service read the troubleshooting Others 45 Playable media Specificat...

Page 8: ...mains socket outlet with a protective earth connection Caution Unit Do not place sources of naked flames such as lighted candles on this unit This unit may receive radio interference caused by mobile...

Page 9: ...your safety please read the following text carefully This appliance is supplied with a moulded three pin mains plug for your safety and convenience A 10 ampere fuse is fitted in this plug Should the...

Page 10: ...Note for the battery symbol bottom symbol This symbol might be used in combination with a chemical symbol In this case it complies with the requirement set by the Directive for the chemical involved D...

Page 11: ...C mains lead from the outlet before maintenance Clean this unit with a soft cloth When dirt is heavy wring a wet cloth tightly to wipe the dirt and then wipe it with a soft cloth Do not use solvents i...

Page 12: ...12 Control reference guide Main unit SELECT...

Page 13: ...switches work just by touching the marks Each time you touch the switch there will be a beep sound 36 05 Display Input source playback status etc are displayed For details visit www technics com suppo...

Page 14: ...ntrol 2 1 R03 LR03 AAA Alkaline or manganese batteries Note Insert the battery so the terminals and match those in the remote control Point it at the remote control signal sensor on this unit 12 Keep...

Page 15: ...nit is still consuming a small amount of power 02 CD USB PAIRING Select the device to be operated 24 26 27 28 29 03 SELECT Switch the input source 30 31 32 04 MENU Enter menu 24 26 28 32 35 05 SETUP E...

Page 16: ...speakers 39 Speaker cable not supplied Speaker connection 1 Turn the knobs to loosen them and insert the core wires into the holes 2 Tighten the knobs Note When the connections are completed pull the...

Page 17: ...plug from the main electrical outlet if you will not be using the unit for an extended period of time Place the unit so the plug can be easily removed Speaker cable not supplied AC mains lead supplie...

Page 18: ...nection to the network a wired LAN connection is recommended Wired LAN connection Broadband router etc LAN cable not supplied 1 Disconnect the AC mains lead 2 Connect this unit to a broadband router e...

Page 19: ...he WAC Wireless Accessory Configuration 20 For other network setting method Choose a network setting method Note When this unit is switched to standby mode and turned on before the Wi Fi setting is co...

Page 20: ...23 You can set a password for this system under SPEAKER PASSWORD You will need this password if you make network settings by internet browser next time 5 Select Next to apply the settings Linking is d...

Page 21: ...s method again from SETUP menu If Fail is still displayed try other methods 19 4 Press OK on the remote control to exit the setting is displayed Using the WPS PIN code WPS PIN If your wireless router...

Page 22: ...connection complete screen may not be displayed 7 Make sure to connect your compatible device back to your home wireless network 8 Press OK on the remote control to exit the setting is displayed Note...

Page 23: ...delete a letter Press 10 to insert a letter A Default name is Technics SU C550 stands for a digit that is unique to each set 5 Press OK to apply the settings 6 Press RETURN repeatedly to exit the set...

Page 24: ...function Do not leave the top cover open for prolonged periods of time This will cause the lens to get dirty Be careful not to touch the lens with your fingers The lens lights when the following opera...

Page 25: ...make further selections 5 Press to start playback Stop Press Programmed content is maintained Check the programmed order Press or in the stop mode Add tracks Do step 4 in the stop mode Clear the last...

Page 26: ...d then press OK 1 Track Only plays the selected track 1 is displayed All All tracks in the folder are repeated is displayed Setting is available even when the input source is switched to CD 24 or DMP...

Page 27: ...charging from the USB cable connection during standby mode make sure the iPhone iPad iPod has started charging before turning the unit to standby mode Check the iPhone iPad iPod to see if the battery...

Page 28: ...nput source is Bluetooth If prompted for the passkey input 0000 You can register up to 8 devices with this unit If a 9th device is paired the device that has not been used the longest will be replaced...

Page 29: ...smission mode You can change the transmission mode to prioritise transmission quality or sound quality 1 Press PAIRING If a Bluetooth device is already connected disconnect it 2 Press MENU 3 Press rep...

Page 30: ...edly to select OPT 6 Start playback on the connected device Note The digital audio input terminals of this unit can only detect linear PCM signals For details refer to the operating instructions of th...

Page 31: ...r to the PC Only for Windows OS Download and install the driver from the website below www technics com support Download and install the dedicated app Technics Audio Player free of charge on your PC D...

Page 32: ...1 Press SELECT repeatedly to select DMP The server selection screen will be displayed 2 Press to select a DLNA server on the network and then press OK The folder content selection screen will be displ...

Page 33: ...rate DMC playback of other audio sources will stop and DLNA output will have priority Depending on the contents and the connected equipment operations or playback may not be possible This unit does no...

Page 34: ...k will start with a slight delay 1 stands for a digit that is unique to each set 2 The device name can be changed from This unit s name on the network 23 Operations during playback Stop Pause Press ag...

Page 35: ...to the connected device to verify the selected setting You can also set on the connected iOS device PC Random repeat playback Shuffle 1 Press MENU 2 Press repeatedly to select Shuffle and then press O...

Page 36: ...a minute Press any button to cancel it The factory default is On To disable this function select Off Note The auto off function works unless you turn it off even if you turn this unit to standby mode...

Page 37: ...abled or disabled The factory default is Off Wi Fi signal strength Signal Level To check the Wi Fi signal strength where this system is located It is recommended to have a signal strength of 3 Change...

Page 38: ...select Internet and then press OK 4 Press to select Yes and then press OK The progress is displayed as Updating while updating stands for a number When the update has finished successfully Success is...

Page 39: ...t tone is output from both the left and right speakers A test tone will output after several seconds of starting the measurement When the measurement is complete amplifier output correction will be au...

Page 40: ...ins lead wait for at least 3 minutes then reconnect it Press on the unit to switch on If the unit still cannot be operated consult the dealer A humming sound can be heard during playback An AC mains l...

Page 41: ...discs this unit can play back Playback takes time to start It may take some time for the disc to load if there are a lot of tracks on it USB The USB drive or its contents cannot be read The USB drive...

Page 42: ...ndows Cannot find music files stored on the PC When you play back music files over a network those that are not registered to its network server are not displayed For details refer to the operating in...

Page 43: ...solve the problem make a wired LAN connection for all connected DLNA compatible devices which have LAN terminal this unit Network Attached Storage DLNA server etc 18 The DLNA server and its contents...

Page 44: ...ent settings Check the steps and settings PGM Full The number of programmed tracks is more than 24 Please Wait This is displayed for example when this unit is turned to standby on For up to approx 1 m...

Page 45: ...ible to use USB card reader writers This unit cannot record music to a USB device Not all files on the USB device may be read if there are some files not supported About supported format refer to File...

Page 46: ...e different This system supports Bluetooth security features But depending on the operating environment and or settings this security is possibly not sufficient Transmit data wirelessly to this system...

Page 47: ...ks or registered trademarks of Microsoft Corporation in the United States and or other countries This product is protected by certain intellectual property rights of Microsoft Corporation and third pa...

Page 48: ...AMPLIFIER SECTION Output power 20 W 20 W 1 kHz T H D 0 5 8 20 kHz LPF 40 W 40 W 1 kHz T H D 0 5 4 20 kHz LPF Load impedance 4 16 Frequency Response 20 Hz 90 kHz 3 dB 8 DISC SECTION Playable Disc 8 cm...

Page 49: ...TX 10BASE T Digital Input Optical digital input Optical terminal Format support LPCM FORMAT SECTION USB A USB Standard USB 2 0 high speed USB Mass Storage class USB B USB Standard USB 2 0 high speed U...

Page 50: ...16 24 bit ALAC m4a 32 44 1 48 88 2 96 176 4 192 kHz 16 24 bit DSD dff dsf 2 8224 MHz 5 6448 MHz PC USB B 1 File format Extension Sampling frequency Bit rate Number of quantisation bits LPCM 32 44 1 4...

Page 51: ......

Page 52: ...n Kadoma Osaka Japan Importer for Europe Panasonic Marketing Europe GmbH Panasonic Testing Centre Winsbergring 11 22525 Hamburg Germany Panasonic Corporation Web Site http www panasonic com Panasonic...

Reviews: