background image

8

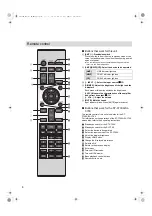
Buttons that work for this unit

1

[AMP

Í

]: Standby/on switch

Press to switch the unit from on to standby mode or vice 
versa. In standby mode, the unit is still consuming a small 
amount of power.

The remote control do not operate when the power switch 
lever is in the lowered position.

2

[AMP]/[NWP]/[CD]: Select the device to be operated

3

[

N

INPUT

O

]: Select the input source (

>

13)

4

[DIMMER]: Adjust the brightness of the light and the 
indicators

Each press of this button switches the brightness.

5

[LAPC]: Measure the characteristics of the amplifier 
and correct its output (

>

13)

6

[

r

VOL

s

]: Adjust the volume

7

[MUTE]: Mute the sound

Input indicator blinks. Press [MUTE] again to cancel.

Buttons that work for the ST-C700A/SL-
C700

The remote control of this unit also works for the ST-
C700A/SL-C700.
For information on the operations of the ST-C700A/SL-C700, 
please also refer to their operating instructions.

1

Standby/on switch for the ST-C700A

2

Standby/on switch for the SL-C700

3

Select the device to be operated

4

Select the input source of the ST-C700A

5

Adjust the display brightness

6

Display HOME menu

7

Change the displayed information

8

Selection/OK

9

Return to the previous display

:

Enter menu

;

Turn on/off Direct mode

<

Turn on/off Re-master

=

Basic playback control buttons

>

Numeric buttons, etc.

Remote control

[AMP]

LINE indicator lights up

[NWP]

COAX1 indicator lights up

[CD]

COAX2 indicator lights up

SU-C700_SQTxxxx_EB_EBGN_mst.book  8 ページ  2015年6月12日 金曜日 午後4時4分

Summary of Contents for SU-C700A

Page 1: ...Operating Instructions Stereo Integrated Amplifier SU C700A SU C700_SQTxxxx_EB_EBGN_mst book 1...

Page 2: ...SU C700_SQTxxxx_EB_EBGN_mst book 2...

Page 3: ...touching people s hearts across cultures and generations Each day the discovery of a truly emotive experience from an unencountered sound awaits Let us take you on your journey to rediscover music SU...

Page 4: ...on of sound with rich spatial expression High speed and lower noise linear power supply The combination of a large current Schottky barrier diode a rectifier circuit with a large storage capacitor and...

Page 5: ...od of time with doors and windows closed Do not take apart or short circuit Do not recharge alkaline or manganese batteries Do not use batteries if the covering has been peeled off Do not mix old and...

Page 6: ...ions 5 Accessories 6 Unit care 6 Control reference guide 7 Getting started 9 Operations 13 Listening to audio from a PC etc 15 Troubleshooting 16 Specifications 17 About descriptions in these operatin...

Page 7: ...is knob clockwise or anticlockwise to switch the input source 13 7 Peak power meter Display the output level 8 Input indicator 13 The indicator for the selected input source lights up The indicator bl...

Page 8: ...d Input indicator blinks Press MUTE again to cancel Buttons that work for the ST C700A SL C700 The remote control of this unit also works for the ST C700A SL C700 For information on the operations of...

Page 9: ...oles 2 Tighten the knobs When the connections are completed pull the speaker cables lightly to check that they are connected firmly Be careful not to cross short circuit or reverse the polarity of the...

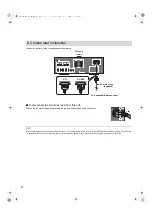
Page 10: ...ct the system connection cables to the system terminals CONTROL1 CONTROL2 Connect the ST C700A to CONTROL1 and the SL C700 to CONTROL2 Connect coaxial digital cables to the digital audio input termina...

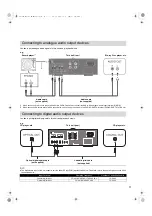
Page 11: ...y the linear PCM LPCM signals listed below For details refer to the operating instructions of the connected device Connecting to analogue audio output devices e g Record player 1 This unit rear Blu ra...

Page 12: ...unit consumes a small amount of AC power 17 even the power switch lever is in the OFF position Remove the plug from the main electrical outlet if you will not be using the unit for an extended period...

Page 13: ...effect of the output correction function may be minimal The corrected output remains in effect until you measure the characteristics again When you use other speakers redo the measurement Operations...

Page 14: ...s unit and the ST C700A SL C700 with system connection cables and coaxial digital cables 10 2 Set the power switch lever of this unit and the ST C700A SL C700 to the I position Switching this unit and...

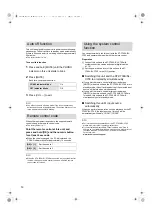
Page 15: ...her registered trademarks or trademarks of Microsoft Corporation in the United States and or other countries Connecting to a PC Before connecting to a PC follow the steps below Refer to the following...

Page 16: ...rightness level of and press DIMMER The peak power meter does not operate In the following cases this meter does not operate When a headphone plug is connected When the peak power meter light is turne...

Page 17: ...O MM 20 Hz to 20 kHz RIAA DEVIATION w1 dB 8 LINE 20 Hz to 80 kHz s3 dB 8 COAX1 2 3 20 Hz to 90 kHz s3 dB 8 Input sensitivity Input impedance LINE 200 mV 22 k PHONO MM 2 5 mV 47 k TERMINALS SECTION Hea...

Page 18: ...SU C700_SQTxxxx_EB_EBGN_mst book 18...

Page 19: ...SU C700_SQTxxxx_EB_EBGN_mst book 19...

Page 20: ...an Importer for Europe Panasonic Marketing Europe GmbH Panasonic Testing Centre Winsbergring 15 22525 Hamburg Germany Panasonic Corporation Web Site http www panasonic com C Panasonic Corporation 2015...

Reviews: