background image

English   

- 16 -


 Now pressing “ ” or “ ” button moves to the previous/
next character. Pressing “ ” or “ ” button toggles 
the current character, i.e., ‘b’ character becomes ‘a’ 
by “ ” and ‘c’ by “ ”. Pressing the numeric buttons 
‘0...9’ replaces the highlighted character with the 
characters printed above the button one by one as 
the button is pressed.  
 Press the “

MENU

” button to cancel the editing or OK 

button to save the new name. 

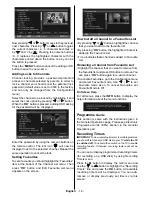
 Adding Locks to Channels 

 Channel locking provides a password-protected 
access to channels selected by parents. In order to 
lock a channel you should know the parental lock 
password (default value is set to 0000 in the factory 
and can only be changed from the Con

fi

 guration 

menu). 
Select the channel to be locked by highlighting it and 
select the Lock option by pressing “ ” or “ ” button. 
When the “

OK

” button is pressed, a dialog OSD asking 

for the password will be  displayed.


 Enter the password by using the numeric buttons on 
the remote control. The lock icon “

” will now be 

displayed next to the selected channel. Repeat the 
same operation to cancel the lock. 

 Setting Favourites 

   To set a favourite you should highlight the “Favourites” 
item at the bottom of the Channel List menu. Then 
press “

OK

” button and Edit Favourite List menu 

appears on the screen.  


How to Add a Channel to a Favourites List

 • By pressing “ ” or “ ” buttons, highlight the channel  

that you want to add to the favourite list.

• By pressing  “

OK

”  button, the highlighted channel is 

added to the Favourite List. 

• F icon indicates that a channel is added  to Favourite 

List.

  Removing a Channel from Favourite List

  • Highlight the channel that you want to remove from 

the favourite list and press OK button to remove.You 
can press “

OK

” button again to re-add a channel.

 • To activate Favourites, go to the Con

fi

 guration menu 

and select Favourite mode. Use “ ” / “ ” to set 
Favourite mode as on. To cancel Favourites, set 
Favourite Mode to Off.


  On Screen Help  

 For all menus, press the  

INFO

  button to display the 

help information about the menu functions. 


Programme

 Guide 

 This section is same with the instructions given in 
the General Operations page. Please see Electronic 
Programme Guide (EPG) section in the General 
Operations part. 

Recording Timers

IMPORTANT

To view recording timers or record programmes, 

you should 

fi

 rst connect a USB disk to your TV

 while the TV 

is switched off

You should then switch on the TV to enable 

recording feature. Otherwise, recording feature will not be 
available.

You can set or display programmed recording timers 
(for recording on a USB disk) by using Recording 
Timers menu.
Press the  

M

  button to display the main menu and 

use the “ ” or “ ” button to highlight the “Recording 
Timers” line and press the  

OK

  button. All available 

recording timers will be displayed. You can add, 
remove or display previously set timers via this 
screen: 

MB45_[GB]_1900UK_PVR_IDTV_NICKEL9_19882W_10066963_50161761.indd   16

29.01.2010   14:24:45

Summary of Contents for LCD19-915

Page 1: ...COLOUR TELEVISION WITH REMOTE CONTROL OPERATING INSTRUCTIONS For assistance please call our Tesco Electrical Helpline on 0845 4566767 LCD19 915 ...

Page 2: ...ext 14 Widescreen 14 IDTV Menu System 15 Channel List 15 Recording Timers 16 Recordings Library 18 Conditional Access 18 TV Setup 18 Setup 18 Media Browser 23 Playing MP3 Files 23 Viewing JPG Files 23 YELLOW Toggles media browser viewing style 24 MENU Exits media browser 24 RETURN Returns to the previous menu 24 Slideshow Options 24 Video Playback 24 Recordings 24 Media Browser Settings 24 Analogu...

Page 3: ...nal expansion of the reception and display sources possible receiver DVD player DVD recorder VCR PC etc This device is only suitable for the operation in dry interiors This appliance is intended solely for private domestic use and may not be used for industrial and commercial purposes We exclude liability in principle if the device is not used as intended or unauthorized modifications have been ma...

Page 4: ...nally a few non active pixels may appear on the screen as a fixed blue green or red point Please note that this does not affect the performance of your product needs to be replaced it should be done by qualified personnel Moisture and Water Do not use this device in a humid and damp place avoid the bathroom the sink in the kitchen and near the washing machine Do not expose this device to rain or w...

Page 5: ... in case of emergency the mains plug can be pulled immediately To exclude the danger of fi re the power cord should principally be separated from the mains socket prior to a longer period of non usage i e during vacations Electrical device not in the hands of children Never let children use electrical device unsupervised Children can t always recognize properly the possible dangers Batteries accum...

Page 6: ...ward in DTV mode Page right 19 in DTV mode Info TXT reveal 20 No function 21 Picture mode selection 22 Source selection 23 Red Sound 24 Green Picture 25 Yellow Feature Current language 26 in DTV mode Menu 27 Blue Install 28 OK Select Hold in TXT mode 29 Cursor right TXT Subpage 30 Cursor down TXT Downpage 31 Volume up 32 Volume down 33 Subtitle in DTV mode TXT Subtitle 34 in analogue mode Mute 35 ...

Page 7: ...eo Inputs YpBPr are used for connecting component video You can use PC input to enable YPbPr signal connection with a device that has component output Connect the YPbPr to PC cable between the PC INPUT on the TV and the component video outputs of your device HDMI 3 HDMI input HDMI Input is for connecting a device that has an HDMI socket Your LCD Television is capable of displaying High Definition ...

Page 8: ...S on the TV and the AUDIO OUTPUT jacks on your device Also to enable PC YPbPr sound connection in such a case use an appropriate audio cable between the connected device s audio outputs and the TV s audio inputs Note If you connect a device to the TV via the VIDEO or PC YPbPr cable you should also connect your device with an audio cable to the AUDIO INPUTS of the TV to enable audio Headphone jack ...

Page 9: ... the formatted disk type should be FAT32 SIDE VIEW USB MEMORY CAUTION Quickly plugging and unplugging USB devices is a very hazardous operation Especially do not repeatedly quickly plug and unplug the drive This may cause physical damage to the USB player and especially the USB device itself Do not pull out USB module while playing or recording a file Programme Recording Programme recording is ava...

Page 10: ...y have different connectors Please refer to your DVD player s instruction book for additional information Power off both the TV and the device before making any connections Note Cables shown in the illustration are not supplied If your DVD player has an HDMI socket you can connect via HDMI When you connect to DVD player as illustrated below switch to HDMI source See Input Selection section Most DV...

Page 11: ...g backwards from the indicated part Insert two AAA R3 or equivalent type batteries inside Place the batteries in the right directions and replace the battery cover Note Remove the battery from remote control when it is not to be used for a long period Otherwise it can be damaged due to any leakage of batteries Switching the TV On Off To Switch the TV On Connect the power cord to the 220 240V AC 50...

Page 12: ...enu system of your TV Functions of the menu system are described in the following sections Volume Setting Press V button to increase the volume Press V button to decrease the volume Avolume level scale slider will be displayed on the screen Programme Selection Previous or Next Programme Press P button to select the previous programme Press P button to select the next programme Programme Selection ...

Page 13: ...ld then switch on the TV to enable recording feature Otherwise recording feature will not be available Press PAUSE button while watching a broadcast for switching to timeshifting mode In timeshifting mode the programme is paused and simultaneously recorded to the connected USB disk Press PLAY button again to watch the paused programme from the stopped moment This playback is performed in x1 playba...

Page 14: ... use button to slow forward Pressing button consecutively will change slow forwarding speed Electronic Programme Guide EPG Some but not all channels send information about the current and next events Press EPG button to view the EPG menu EPG appears on the screen It is able to get Information of the channel programs weekly by means of 7 DAY EPG All programs of channels are displayed On the bottom ...

Page 15: ...u Highlight the Subtitle item in Language settings menu and use or button to set Subtitle to the desired language If Subtitle is on and a language option is set pressing the button causes the following warning message display on the screen for UK only Digital Teletext for UK only Press the button The digital teletext information appears Operate it with the coloured buttons cursor buttons and OK bu...

Page 16: ...ll be moved Press or buttons to select the Move item on Channel List menu Following OSD will be displayed next to OK item to indicate that enter a number by using the numeric buttons on the remote control and press OK to confirm Note If you enter the same programme number of the channel that you want to move channel services will be replaced Do you want to continue OSD will be displayed Press OK t...

Page 17: ...essing or buttons highlight the channel that you want to add to the favourite list By pressing OK button the highlighted channel is added to the Favourite List F icon indicates that a channel is added to Favourite List Removing a Channel from Favourite List Highlight the channel that you want to remove from the favourite list and press OK button to remove You can press OK button again to re add a ...

Page 18: ...n the Recording Tiners menu by pressing or button Press GREEN button on the remote control and Modify Timer OSD will be displayed on the screen You can press RED button to set this recording as discarded when the disk is full You can set desired preferences and when completed you can press GREEN button to save your settings Deleting a Recording Timer Select a timer in the Recording Timers menu by ...

Page 19: ...uire a subscription and a hardware decoder Obtain the Conditional Access Module CAM and the viewing card by subscribing to a pay channel company then insert those to the TV using the following procedure Switch off the TV and unplug from the mains The CAM should be correctly inserted it is impossible to insert fully if reversed The CAM or the TV terminal may be damaged if the CAM is forcefully inse...

Page 20: ...ails about the USB disk highlight Hard Disk Info by using or key and press OK USB disk information will be displayed Configuration You can configure the settings of your TV Select Configuration from Setup menu and press OK to view this menu Press the EXIT button on the remote control to exit Dolby D Digital for EU countries only Optional In the Configuration Menu highlight the Dolby D item by pres...

Page 21: ...INSTALLATION MENU Installation menu is locked So the user can t add channels Changes will be updated after exiting Configuration Menu Set PIN Use or buttons to go to Set PIN option Press OK to display the Set PIN window Use numeric buttons to enter new pin number you will need to input your new pin a second time for verification purposes The factory default pin number is 0000 if you change the pin...

Page 22: ... by pressing or buttons Subtitle if subtitle is backed up alter the subtitle language with or buttons The chosen language will be seen in subtitles Note If the Country option is set to Denmark Sweden Norway or Finland the Language Settings menu will function as described below Language Settings In the configuration menu highlight the Language Settings item by pressing or buttons Press OK and Langu...

Page 23: ...hannel number signal level and signal quality are shown on the screen In both manual and auto search any existing channel in the database is not re stored to avoid redundant duplicates of that channel Clear Service List This setting is visible only when the Country option is set to Denmark Sweden Norway or Finland Use this setting to clear channels stored Press or button to select Clear Service Li...

Page 24: ...e Note Some USB compliant devices may not be supported Note If the USB stick is not recognized after power off on or First Time Installation first plug the USB device out and power off on the TV set Plug the USB device in again Playing MP3 Files Select MUSIC option from the main media browser window and all available music files will be displayed Play This OK button Plays the selected file Play bu...

Page 25: ...ck Rewind button Goes backward Forward button Goes forward GREEN Jumps to the selected time RED Sets subtitle time correction Menu MENU button Sets subtitle Audio You can set subtitles by using OK button before starting the playback or by using MENU button during the playback Note Selected subtitles may not be displayed correctly in some cases In order to display movie subtitles correctly you shou...

Page 26: ... normal television programmes Press or button to select Film Mode Press or button to set this feature On or Off Turn this feature on when you are watching films to see the fast motion scenes clearly Game Mode optional Select Game Mode by pressing or button Use or button to set Game Mode as On or Off When Game Mode is set to On specific game mode settings which are optimized for better video qualit...

Page 27: ...e louder than programmes Press or button to select AVL Press or button to set the AVL as On or Off Store Press or button to select Store Press or OK button to store the settings Stored will be displayed on the screen Feature Menu Sleep Timer Press or button to select Sleep Timer Use or button to set the Sleep Timer The timer can be programmed between Off and 2 hours 120 minutes in steps of 10 minu...

Page 28: ...et Full Mode as 1 1 or Normal by using or If you select 1 1 screen ratio will be adjusted correctly If you set Normal screen ratio may expand Ext Out Press or button to select Ext Out Use or button to set the Ext Out as On or Off Note For copying from a DVD or VCR device you should choose desired source from source menu and turn On to EXT Out from feature menu Ext Out should be On in order to use ...

Page 29: ...be highlighted Press or button to change that letter and or button to select the other letters By pressing the RED button you can store the name Move Select the programme which you want to move by navigation buttons Press the GREEN button By navigation buttons move the selected programme to the decided programme space and press the GREEN button again Delete To delete a programme press the YELLOW b...

Page 30: ...e that PC mode menu settings are available only while the TV is in PC source PC Position Menu Select the first icon by pressing or button PC Position menu appears on the screen Autoposition If you shift the picture horizontally or vertically to an unwanted position use this item to put the picture into correct place automatically This setting therefore automatically optimizes the display Select Au...

Page 31: ...wing requirements Available options are Dynamic Natural and Cinema Note This feature cannot be set while in PC mode Freezing Picture You can freeze the picture on the screen by pressing the OK button on the remote control Press the OK button to freeze picture Press again to quit freeze mode Note This feature will not be available while in PC mode or watched movie from DVI source Zoom Modes You can...

Page 32: ...N Index Selects the teletext index page Subcode Pages Selects subcode pages if available when the teletext is activated INFO Reveal Shows hidden information e g solutions of games SCREEN Expand Press once to enlarge top half of the page press again to enlarge the bottom half of the page Press again to revert back to normal size P P and numbers 0 9 Press to select a page Note Most TV stations use c...

Page 33: ...on lights etc Mountains or high buildings can cause double pictures or ghost images Sometimes you can improve the picture quality by changing the direction of the aerial Is the picture or teletext unrecognisable Check if you have entered the correct frequency Please retune the channels The picture quality may degrade when two peripherals are connected to the TV at the same time In such a case disc...

Page 34: ... 4 3 2 640 480 72 37 9 VESA 16 9 4 3 3 640 480 75 37 5 VESA 16 9 4 3 4 800 600 56 35 2 VESA 16 9 4 3 5 800 600 60 37 9 VESA 16 9 4 3 6 800 600 70 43 8 16 9 4 3 7 800 600 72 48 1 VESA 16 9 4 3 8 800 600 75 46 9 VESA 16 9 4 3 9 832 624 75 49 7 MAC 16 9 4 3 10 1024 768 60 48 4 VESA 16 9 4 3 11 1024 768 70 56 5 VESA 16 9 4 3 12 1024 768 72 57 7 16 9 4 3 13 1024 768 75 60 0 16 9 4 3 14 1152 864 70 64 2...

Page 35: ...50Hz O 1080P 60Hz O HDMI1 480I 60Hz O 480P 60Hz O 576I 50Hz O 576P 50Hz O 720P 50Hz O 720P 60Hz O 1080I 50Hz O 1080I 60Hz O 1080P 24Hz O 1080P 25Hz O 1080P 30HZ O 1080P 50HZ O 1080P 60HZ O X Not Available O Available Note In some cases a signal on the LCD TV may not be displayed properly The problem may be an inconsistency with standards from the source equipment DVD Set top box etc If you do expe...

Page 36: ...mat Remarks Video Audio Maximum resolution Bit rate etc Movie optional mpg dat vob MPEG1 MPEG Layer 1 2 3 MPEG2 MPEG2 avi XviD PCM MP3 XviD Verson up to 1 1 2 MPEG4 PCM MP3 MS ISO MPEG4 PCM MP3 Support SP and ASP Music PCM Sample Rate 8K 48KHz mp3 MPEG 1 2 Layer 1 2 3 MP3 Sample Rate 8K 48KHz Bit Rate 64K 320Kbps Photo jpg Baseline JPEG WxH 8902x8902 up to 77Mega pixel Support format 444 440 422 4...

Page 37: ...els Transmission standard DVB T MPEG 2 Demodulation COFDM with 2K 8K FFT mode FEC all DVB modes Video MP ML PAL 4 3 16 9 Audio MPEG Layer I II 32 44 148kHz NUMBER OF PRESET CHANNELS 200 CHANNEL INDICATOR On Screen Display RF AERIAL INPUT 75 Ohm unbalanced OPERATING VOLTAGE 220 240V AC 50 Hz AUDIO German Nicam Stereo AUDIO OUTPUT POWER WRMS 10 THD 2 x 2 5 POWER CONSUMPTION W 45 W max 1 W Standby PA...

Page 38: ...ed to the terminal which is marked with the letter N or coloured Black The wire which is coloured brown or red must be connected to the terminal which is marked with the letter L or coloured Red For continued protection against risk of fire replace only with same type and rating of fuse ASTA approved 5A 250VAC fuse Note Earth connection is used only for class I applications This symbol means this ...

Page 39: ...50161761 ...

Reviews: