background image

English   

- 18 -

• Setting  

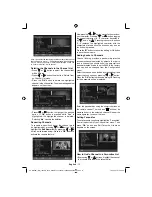
Warm

  option gives white colours a slight red 

stress.
• For normal colours, select  

Normal

  option. 

 Noise Reduction 

 If the broadcast signal is weak and the picture is 
noisy, use  

Noise Reduction

  setting to reduce the 

noise amount. 
 Press “ ” or “ ” button to select  

Noise Reduction.


Press “ ” or “ ” to choose from one of these options: 
 

Low

 ,  

Medium

 ,  

High

  or  

Off

 . 

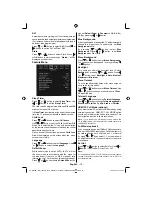
   Game Mode (optional) 

 Select  

Game Mode

  by pressing “ ” or “ ” button. 

Use “ ” or “ ” button to set Game Mode as  

On

  or 


Off

 . When Game Mode is set to On, speci

fi

 c game 

mode settings, which are optimized for better video 
quality, will be loaded.
Also; Picture Mode, Contrast, Brightness, Sharpness, 
Colour and Colour Temp settings will be invisible and 
disabled while Game Mode is on. 


Note

 :

Picture mode selection button on the remote control will have 
no function while Game Mode is on. 

 Picture Zoom 

 Select  

Picture Zoom

  by pressing “ ” or “ ” button.

Use “ ” or “ ” buttons, to change picture zoom  to 
 

Auto

 ,  

16:9

 ,  

4:3

 ,  

Panoramic

 ,  

14:9

 ,  

Cinema

 ,  

Subtitle


or  

Zoom

 . 

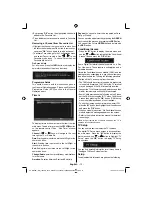
Store

 Press “ ” or “ ” button to select Store. Press “ ” 
or  

OK

  button to store the settings. “ 

Stored...

 ” will be 

displayed on the screen. 

 Reset 

 Press “ ” or “ ” button to select  

Reset

 . Press 

“ ” or “ ” or  

OK

  button to reset the picture modes to 

factory default settings. 


    Sound Menu 


 Volume 

 Press “ ” or “ ” button to select  

Volume

 . Press “ ” 

or “ ” button to change the level of the Volume. 

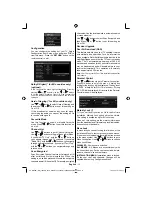
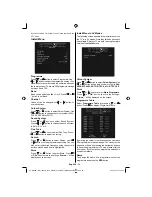
 Equalizer 

 Press “ ” or “ ” button to select  

Equalizer

 . Press “

” button to view equalizer menu. 


 Press “ ” or “ ” button to change the preset. In 
equalizer menu, the preset can be changed to  

Music

 , 


Movie

 ,  

Speech

 ,  

Flat

 ,  

Classic

  and  

User

 . 

 Select the desired frequency by pressing “ ” or “ ” 
button and increase or decrease the frequency gain 
by pressing “ ” or “ ” button. 
 Press the “ 

M

 ” button to return to the previous menu. 


Note

 : Equalizer menu settings can be changed only when 

the  

Equalizer


Mode

  is in  

User

 . 

 Balance 

 This setting is used for emphasizing left or right 
speaker balance.
Press “ ” or “ ” button to select 

Balance

. Press “

” or “ ” button to change the level of the balance. 

Balance level can be adjusted between 

-32

 and 

32

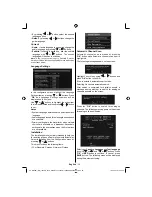
 Headphone 

 Press “ ” or “ ” button to select  

Headphone

 . Press 

“ ” button to view the headphone menu.
Headphone sub-menu options are described below: 

 Volume 

 Press “ ” or “ ” button to select  

Volume

 . Press   “

” button to increase headphone volume level. Press 
“ ” button to decrease headphone volume level. 
Headphone volume level can be adjusted between 
0 and 63 .


 Sound Mode  

 Press “ ” or “ ” button to select  

Sound Mode 

. Using 

“ ” or “ ” button, you can select Mono, Stereo, Dual I 
or Dual II mode, only if the selected channel supports 
that mode. 

00_MB45M_[GB]_1205UK_IDTV_NICKEL13_32855W_10066808_50164923.indd   18

00_MB45M_[GB]_1205UK_IDTV_NICKEL13_32855W_10066808_50164923.indd   18

18.02.2010   15:44:33

18.02.2010   15:44:33

Summary of Contents for LCd26-209X

Page 1: ...COLOUR TELEVISION WITH REMOTE CONTROL OPERATING INSTRUCTIONS For assistance please call our Tesco Electrical Helpline on 0845 4566767 LCD32 209X ...

Page 2: ...ers in European Union Countries 3 Disconnecting the Device 3 Headphone Volume 3 Installation 3 LCD Screen 3 Warning 3 Overview of the Remote Control 4 LCD TV and Operating Buttons 5 Viewing the Connections Back Connectors 5 Viewing the Connections Side Connectors 6 Power Connection 6 Aerial Connection 6 Connecting the LCD TV to a PC 7 Connecting to a DVD Player 7 Using Side AV Connectors 8 Connect...

Page 3: ...et To prevent any fault and unsafe situations please do not place any objects on top of the set Use this device in moderate climates Safety Precautions Please read the following recommended safety precautions carefully for your safety Power Source The TV set should be operated only from a 220 240 V AC 50 Hz outlet Ensure that you select the correct voltage setting for your convenience Power Cord D...

Page 4: ... TV set are intended for ventilation and to ensure reliable operation To prevent overheating these openings must not be blocked or covered in anyway Heat and Flames The set should not be placed near to open flames and sources of intense heat such as an electric heater Ensure that no open flame sources such as lighted candles are placed on top of the TV Batteries should not be exposed to excessive ...

Page 5: ...ttons 11 Exit in DTV mode 12 Hold in TXT mode 13 Update in TXT mode No function 14 Index page Guide in DTV mode 15 Reveal in TXT mode Switch from TV to 16 PC Green Picture menu 17 Red Sound menu 18 Menu 19 OK Select 20 Cursor Left 21 AV Source 22 Info 23 Volume up down 24 Mute 25 Picture mode selection 26 Time Subtitle on off in DTV mode 27 Teletext PAT mode 28 Mix in TXT mode No function 29 Expan...

Page 6: ...F Input connects to an antenna or a cable 4 Note that if you use a decoder or a media recorder you should connect the aerial cable through the device to the television with an appropriate antenna cable as shown in the illustration in the following pages HDMI 5 2 HDMI input HDMI 6 1 HDMI input HDMI Input is for connecting a device that has an HDMI socket Your LCD Television is capable of displaying...

Page 7: ...he audio cable between the AUDIO INPUTS on the TV and the AUDIO OUTPUT jacks on your device Also to enable PC YPbPr sound connection in such a case use an appropriate audio cable between the connected device s audio outputs and the TV s audio inputs Note If you connect a device to the TV via the VIDEO or PC YPbPr cable you should also connect your device with an audio cable to the AUDIO INPUTS of ...

Page 8: ...layer s instruction book for additional information Power off both the TV and the device before making any connections Note Cables shown in the illustration are not supplied If your DVD player has an HDMI socket you can connect via HDMI When you connect to DVD player as illustrated below switch to HDMI source See Input Selection section Most DVD players are connected through COMPONENT SOCKETS Use ...

Page 9: ...side Place the batteries in the right directions and replace the battery cover Note Remove the battery from remote control handset when it is not to be used for a long period Otherwise it can be damaged due to any leakage of batteries Switching the TV On Off To Switch the TV On Connect the power cord to the 220 240V AC 50 Hz Press STANDBY switch Then the standby LED lights up To switch on the TV f...

Page 10: ... the volume Press button to decrease the volume A volume level scale slider will be displayed on the screen Programme Selection Previous or Next Programme Press P button to select the previous programme Press P button to select the next programme Programme Selection DirectAccess Press numeric buttons on the remote control to select programmes between 0 and 9 The TV will switch to the selected prog...

Page 11: ...the current and next events Press EPG button to view the EPG menu EPG appears on the screen It is able to get Information of the channel programs weekly by means of 7 DAY EPG All programs of channels are displayed On the bottom of the screen info bar showing all the available commands will be displayed RED button Shrink makes the info boxes smaller GREEN button Expand makes the info boxes larger Y...

Page 12: ...ize changes depending on the chosen image size Notice AC3 audio type is not supported In this case Tv sound will be muted If the broadcast includes AC3 stream the following warning message will be displayed on the screen If there is no audio available the following warning message will be displayed on the screen IDTV Menu System Press the M button Main menu will be displayed Channel List Using the...

Page 13: ...haracter with the characters printed above the button one by one as the button is pressed Press the M button to cancel the editing or OK button to save the new name Adding Locks to Channels Channel locking provides a password protected access to channels selected by parents In order to lock a channel you should know the parental lock password default value is set to 0000 in the factory and can onl...

Page 14: ...n menu and use the or button to highlight the Conditional Access line and press the OK button Some Digital Terrestrial channels operate on a Pay Per View basis These require a subscription and a hardware decoder Obtain the Conditional Access Module CAM and the viewing card by subscribing to a pay channel company then insert those to the TV using the following procedure Switch off the TV and unplug...

Page 15: ... automatically and searches for new information automatically and searches for new information when available Note that this setting is inactive to be when available Note that this setting is inactive to be modified modified Please ensure that the TV is set to standby mode The TV automatically powers up at 3 00 A M each day and searches for any new information which may be broadcasted and will dow...

Page 16: ... can use this feature only if the broadcaster supports that additional narration track Use or buttons to select an item Then use or buttons to set Audio Description Optional This function enables or disables the audio description feature by pressing the or buttons Preferred Language Optional By pressing the or buttons the preferred audio description language is being changed This setting can be us...

Page 17: ...ot available Installation The Installation menu is mainly intended to help you for creating a Channel Table in the most efficient way Select Installation from the Configuration menu by pressing or buttons This menu includes the following items For Denmark Sweden Norway or Finland Automatic Channel Scan Automatic channel scan is started by pressing OK button while Automatic channel scan item is hig...

Page 18: ...leting all channels and settings By selecting Yes and pressing the OK button the existing channel table will be deleted After factory settings are loaded First Time Installation menu will be displayed The menu which is displayed for language selection appears on the screen at first By using or buttons select the desired language option and press OK button to activate After then First time installa...

Page 19: ...s or button to select Volume Press or button to change the level of the Volume Equalizer Press or button to select Equalizer Press button to view equalizer menu Press or button to change the preset In equalizer menu the preset can be changed to Music Movie Speech Flat Classic and User Select the desired frequency by pressing or button and increase or decrease the frequency gain by pressing or butt...

Page 20: ...und to On By pressing or button select Blue Background Press or button to set Blue Background as On or Off Menu Background Press or button to select Menu Background You can set menu background level by pressing or button Backlight This setting controls the backlight level Select Backlight by pressing or button Press or button to set Backlight to Auto Medium Maximum or Minimum Menu Timeout To set a...

Page 21: ... or OK button to store the settings Stored will be displayed on the screen Install Menu in AV Modes The following screen appears in the install menu when the TV is in AV modes Note that limited options will be available Switch to TV mode for viewing complete version of the Install menu Colour System Press or button to select Colour System Use or button to change the colour system to PAL SECAM PAL6...

Page 22: ...n press the BLUE button When you press OK or RED button for starting automatic tuning all stored programmes will be erased and the TV will search for available channels During the search the following OSD will be displayed Whenever you press the BLUE button APS function stops and Programme Table appears on the screen If you wait until the end of APS Programme Table will be displayed with the progr...

Page 23: ...nding in dot intensive presentations like spreadsheets or paragraphs or text in smaller fonts Select Dot Clock item by using or buttons Use or button to adjust the value PC Picture Menu For adjusting PC picture items do the following Press or button to select the second icon PC Picture menu appears on the screen Brightness Contrast Colour and Colour Temperature settings in this menu are identical ...

Page 24: ...en For 16 9 aspect ratio pictures that have been squeezed into a normal picture 4 3 aspect ratio use the 16 9 mode to restore the picture to its original shape 4 3 Use to view a normal picture 4 3 aspect ratio as this is its original size Panoramic This stretches the left and right sides of a normal picture 4 3 aspect ratio to fill the screen without making the picture appear unnatural The top and...

Page 25: ...le displaying a persistent image LCD TVs image persistence may disappear after a short time Try turning off the TV for a while To avoid this do not leave the screen in still picture for extended periods No Power If your TV system has no power please check the main power cable and connection to the mains socket outlet Poor Picture Have you selected the correct TV system Is your TV set or house aeri...

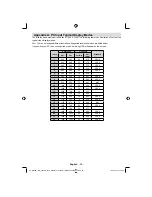
Page 26: ...72 37 9 VESA 3 640 480 75 37 5 VESA 4 800 600 56 35 2 VESA 5 800 600 60 37 9 VESA 6 800 600 70 43 8 7 800 600 72 48 1 VESA 8 800 600 75 46 9 VESA 9 832 624 75 49 7 MAC 10 1024 768 60 48 4 VESA 11 1024 768 70 56 5 VESA 12 1024 768 72 57 7 13 1024 768 75 60 0 14 1152 864 70 64 2 VESA 15 1152 864 75 67 5 VESA 16 1152 870 75 68 9 MAC 17 1280 768 60 47 7 VESA 18 1360 768 60 47 7 19 1280 960 60 60 0 VES...

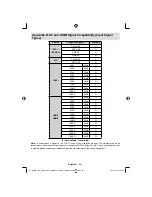
Page 27: ... 720P 60Hz O 1080I 50Hz O 1080I 60Hz O 1080P 24Hz O 1080P 25Hz O 1080P 30HZ O 1080P 50HZ O 1080P 60HZ O X Not Available O Available Note In some cases a signal on the LCD TV may not be displayed properly The problem may be an inconsistency with standards from the source equipment DVD Set top box etc If you do experience such a problem please contact your dealer and also the manufacturer of the sou...

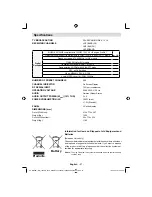
Page 28: ...icam Stereo AUDIO OUTPUT POWER WRMS 10 THD 2 x 6 POWER CONSUMPTION W 150 W max 1 W Standby PANEL 32 wide display DIMENSIONS mm DxLxH With foot 212 x 776 x 567 Weight Kg 12 30 DxLxH Without foot 94 x 776 x 524 Weight Kg 11 60 Specifications Products Battery Information for Users on Disposal of old Equipment and Batteries European Union only These symbols indicate that equipment with these symbols s...

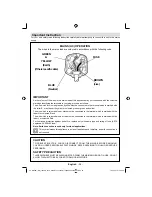
Page 29: ...s coloured brown or red must be connected to the terminal which is marked with the letter L or coloured Red For continued protection against risk of fire replace only with same type and rating of fuse ASTA approved 5A 250VAC fuse Note Earth connection is used only for classI applications This symbol means this appliance is a class II appliance and therefore an earth connection is not required CAUT...

Page 30: ...50164923 ...

Reviews: