background image

WS 6449


GB 4 


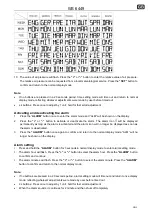
Display / Keys Details:


There are six function buttons:  


DCF Reception icon


with full signal strength will appear on screen if the reception of atomic time is 

successful.  


In normal display mode, press this 

“-/RCC”

 button to start/stop time searching (DCF).  


The tower icon will show solid when the station has received the DCF signal. 


No tower icon displayed. The station was unable to receive a signal at this time. 

Reposition the station for better signal reception and wait an overnight. 

automatically  receive  Hours:  Daily  1:00,2:00,3:00,4:00,5:00  DCF  automatically  receive,  at  any  time  once 

received 3,4,5:00 no longer receive the same day 

Only if the unit receives summer time, it will display the 

“DST” icon.  


If there is no signal or too much interference the receiver will only be on for 2 minutes. 


If the signal is good it may catch a signal in ABOUT 2-3 minutes.   


If the signal is marginal it will try to catch a signal for up to 10 minutes.  


Manual Time Setting: 

1. 

Press and hold the 

“SET”

 button for 3 seconds in normal display mode to enter time setting mode. 

2. 

12Hr or 24Hr will flash. Press the 

“+”

 or 

“-“

 button to select between the 12-hour or 24-hour time format. 

Press the 

“SET”

 button to confirm and continue. 

3. 

The time zone will flash on the display. Press the 

“+”

 or 

“-“ 

button to set the desired time zone( setting 

range is 0~ +12,0~ -12). Press the 

“SET”

 button to confirm and continue. 

4. 

The hour will flash. Press the 

“+” 

or 

“-“

 button to select the hour. Press the 

“SET”

 button to confirm and 

continue. 

5. 

The  minutes  will  flash.  Press  the 

“+”

  or 

“-“

  button  to  select  the  minutes.  Press  the 

“SET”

  button  to 

confirm and continue. 

6. 

The year will flash. Press the 

“+”

 or 

“-“

 button to select the year. Press the 

“SET”

 button to confirm and 

continue. 

7. 

The month will flash. Press the 

“+”

 or 

“-“

 button to select the month. Press the 

“SET”

 button to confirm 

and continue. 

8. 

The date will flash. Press the 

“+”

 or 

“-“

 button to select the date. Press the 

“SET”

 button to confirm and 

continue. The day of the week will set automatically after YEAR, MONTH, DATE.  

9. 

The language will flash, the default is GER. Press the 

“+”

 or 

“-“

 button to select the desire language: GER, 

FRE, ITA, DUT, SPA, DAN, ENG. Press the 

“SET”

 button to confirm and continue. 

Summary of Contents for WS 6449

Page 1: ...e force or shock Do not expose the unit to extreme temperatures direct sunlight dust or humidity Do not immerse in water Avoid contact with any corrosive materials Do not dispose this unit in a fire as it may explode Do not open the inner back case or tamper with any components of this unit Batteries safety warnings Use only alkaline batteries not rechargeable batteries Install batteries correctly...

Page 2: ...eneral household waste when it reaches the end of its useful life Take your unit to your local waste collection point or recycling centre This applies to all countries of the European Union and to other European countries with a separate waste collection system Features Calendar Date month 2000 2099 Default Year 2016 Indoor Temperature and Humidity Outdoor Temperature and Humidity 12 24 h time for...

Page 3: ...or sensor Then press the TX button on the sensor to send signal If it still does not receive the outdoor temperature remove the batteries from the transmitter and go back to step 1 of the set up Sensor Reception Press and hold the CH button for 3 seconds while viewing an empty channel to search for the sensor The strength signal icon will flash until the sensor signal is received or for 3 minutes ...

Page 4: ...and hold the SET button for 3 seconds in normal display mode to enter time setting mode 2 12Hr or 24Hr will flash Press the or button to select between the 12 hour or 24 hour time format Press the SET button to confirm and continue 3 The time zone will flash on the display Press the or button to set the desired time zone setting range is 0 12 0 12 Press the SET button to confirm and continue 4 The...

Page 5: ... long as the alarm is activated and the alarm icon will no longer be displayed as soon as the alarm is deactivated 3 Press the ALARM button once again to confirm and return to the normal display mode ALM will no longer be shown on the display Alarm setting 1 Press and hold the ALARM button for 3 seconds in normal display mode to enter alarm setting mode 2 The alarm hour will flash Press the or but...

Page 6: ... be automatically cleared at every midnight 0 00 Barometer and bar and data of history for the past 12 hour of air pressure Air pressure history can be displayed in hPa for the past 12 hours The bar graph indicates the air pressure history trend over the last 12 hours in 6 intervals 0h 1h 2h 3h 6h and 12h The 0h represents the current full hour air pressure recording The columns represent the hPa ...

Page 7: ...F Resolution 0 1 degree Celsius When above 50 C 122 F the LCD will display HI When below 9 9 C 14 F the LCD will display LO Indoor Humidity Operating humidity range 20 RH to 95 Accuracy 5 RH Resolution 1 RH Outdoor temperature Operating temperature range 40 C to 60 C 40 F to 140 F Accuracy 1 degrees Celsius from 0 C to 50 C 32 F to122 F Accuracy 1 5 degrees Celsius 40 C to 0 C 40 F to 32 F and 50 ...

Reviews: