background image

User manual.............................................................................. 3

Manuale per l’utente.............................................................. 41

Manuel de l’utilisateur............................................................ 79


Benutzerhandbuch............................................................... 117


Gebruikershandleiding......................................................... 155


Manual del usuario............................................................... 193


Guia do usuário.................................................................... 231


ユーザーマニュアル

................................................................. 269


用户指南

...........................................................................................307


Technogym®,. The. Wellness. Company™,. Excite™. and. CPR

.

™. (figurative). are. trademarks. owned. by.

Technogym®.s.p.a..in.Italy.and.other.countries.

“TGS.Key”.refers.to.the.mark.illustrated.here.registered.by.Technogym®.s.p.a..in.Italy.and.
other.countries.

Copyright.©.Technogym®.s.p.a.,.October.2008
Technogym®.is.committed.to.a.policy.of.continuous.improvement.and.reserves.the.right.to.modify.its.
products.and.documentation.without.prior.notice.

Technogym®,. The. Wellness. Company™,. Excite™. e. CPR. ™. (figurativo). sono. marchi. di. proprietà.
Technogym®.s.p.a..in.Italia.e.altri.Paesi.

La.denominazione.“chiave.TGS”.si.riferisce.al.marchio.di.forma.qui.a.fianco.rappresentato.
registrato.da.Technogym®.s.p.a..in.Italia.e.in.altri.Paesi.

Copyright.©.Technogym®.s.p.a.,.ottobre.2008
Technogym®.si.riserva.il.diritto.di.modifiche.ai.prodotti.e.alla.documentazione.senza.obbligo.di.preavviso.

0SM00427AE-M1_02.indd   1

02/07/2010   15.32.36

Summary of Contents for D847M

Page 1: ...a October 2008 Technogym is committed to a policy of continuous improvement and reserves the right to modify its products and documentation without prior notice Technogym The Wellness Company Excite...

Page 2: ...a in Itali en in andere landen geregistreerd is Copyright Technogym s p a oktober 2008 Technogym behoudt het recht wijzigingen aan de producten en de documentatie aan te brengen zonder voorafgaande b...

Page 3: ...d installation 16 7 Moving the equipment 17 8 Levelling 18 9 Electrical connection 19 10 Grounding instructions 21 11 Connection to another device 22 12 Routine maintenance 23 13 Aligning the treadmil...

Page 4: ...nual must be kept in a known accessible place protected against dampness and heat The manual describes transport and maintenance procedures and contains valuable information and useful suggestions abo...

Page 5: ...rom the electrical outlet immediately after using and before cleaning or performing any maintenance tasks WARNING To reduce the risk of burns fire electric shock or injury to person take the following...

Page 6: ...use cord as handle Keep the cord away from heated surfaces Keep hands away from moving parts Never drop or insert any object into any opening Do not use outdoors Do not leave the equipment outdoors e...

Page 7: ...tempt to service RUN yourself other than the maintenance instructions found in the user manual Before starting an exercise make sure your position on the equipment is correct and be careful with any c...

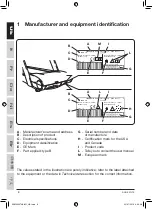
Page 8: ...he values stated in the illustration are purely indicative refer to the label attached to the equipment or the data in Technical data section for the correct information 03056007 03143001 TECHNOGYM S...

Page 9: ...h small strides It contains the sensors F hand sensor to monitor the heart rate E Footrests you can take a short rest by moving your feet from the treadmill to the foot rests in the event of fatigue o...

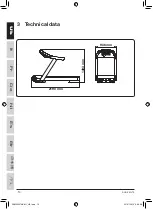
Page 10: ...10 Uk It Fr De Nl Es Br run excite 3 Technical data 03056004 2190 mm 936 mm 1493 mm 0SM00427AE M1_UK indd 10 02 07 2010 9 49 36...

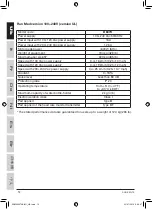
Page 11: ...0 4 25 km h Gradient 0 18 Noise level Less than 80 dB Protection grade IP 20 Operating temperature from 5 C to 30 C Maximum capacity of water bottle holder 2 kg 4 lb Electric isolation class Type I Pa...

Page 12: ...4 16 km h 0 25 10 mph Speed with 120 Vac power supply 0 4 19 km h 0 25 12 mph Speed with 200 240 Vac power supply 0 4 25 km h 0 25 13 7 mph Gradient 0 18 Noise level Less than 80 dB Protection grade I...

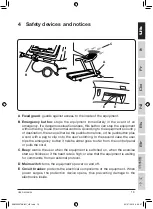
Page 13: ...o clip on to the user s clothing In the second case the user trips the emergency button if he she either goes too far from the control panel or pulls the cord C Beep warns the user when the equipment...

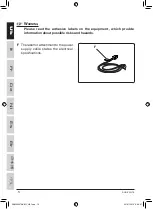
Page 14: ...e read the adhesive labels on the equipment which provide information about possible risks and hazards F The label for attachment to the power supply cable states the electrical specifications 0208206...

Page 15: ...hting is good enough to make the area safe and relaxing place to exercise in plenty of free space around each item of the equipment and a free space of 2x1 m in front of the treadmill as shown in the...

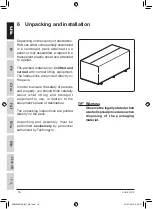
Page 16: ...directly on the pack In order to ensure the safety of persons and property you should think carefully about what lifting and transport equipment to use in relation to the equipment s place of destinat...

Page 17: ...e front frame Given the weight of the equipment we recommend that more than one person be involved in moving it If wheels cannot be used on the floor move the equipment with normal lifting and transpo...

Page 18: ...evelled by adjusting the rear foot on the side shown in the illustration A screw or unscrew the foot until the frame is in a stable position B tighten the lock nut after adjusting 02082032 02082033 8...

Page 19: ...cket must be grounded If not a ground connection must be installed by a qualified electrician before connecting the equipment to the electricity mains The wall socket must be located in a place where...

Page 20: ...ment C Shows the type of switch two fixed positions When switching on for the first time you are requested to specify the power supply voltage the voltage code 230 message scrolls in the control panel...

Page 21: ...must be plugged into an appropriate outlet that is properly installed and grounded in accordance with all local codes and ordinances DANGER Improper connection of the equipment grounding conductor ca...

Page 22: ...2036 RUN with codes D847M and D847U can be connected to other devices conforming to the CSAFE protocol as shown in the figure Accessory equipment connected to the analogue and digital interfaces must...

Page 23: ...n the equipment off by switching the switch to the OFF 0 position unplug the equipment power cable from the wall socket clean the control panel with a damp but not wet cloth Every week clean the equip...

Page 24: ...re starting any job turn the equipment off by switching the switch to the OFF 0 position and unplug the power cable from the wall socket 02082037 A B D Pos Description Type of job Frequency A Treadmil...

Page 25: ...guard against external agents pulled in by the treadmill as it runs Clean the dust panel and the surrounding area every month remove the guard extract the panel from its guides and clean it with a va...

Page 26: ...ioned it needs aligning The alignment is done with the equipment running Turn the adjustment screw A on the side shown in the illustration using the supplied tool B until the writing is equidistant fr...

Page 27: ...the Technogym Technical Support Service Installation problems with the power supply cable Check the connection The control panel connector has been accidentally disconnected Contact the Technogym Tech...

Page 28: ...trical domestic appliance and move it away or move the equipment Worn heart rate monitor chest band Change the chest band Chest band transmitter not making proper skin contact Dampen the inside of the...

Page 29: ...you must give the following information model date of purchase serial number precise description of the problem Warning Workontheequipmentbypersons unauthorised by Technogym invalidates the warranty...

Page 30: ...t cannot become a hazard in any way and do not leave it in places where children play As a precaution when the equipment is unused for a long time or when you want to dispose of it unplug it from the...

Page 31: ...tions are given on the label on the equipment When switched on a beep sounds and all the control panel LEDs light up After a quick system check reset the equipment is ready for use The message does no...

Page 32: ...itched off only at the end of the exercise when in standby If the equipment isn t going to be used for a long time as well as turning it off you should also pull the plug out of the wall socket Warnin...

Page 33: ...a doctor If the beep sounds for 5 seconds during the exercise and the message High Heart Rate appears your heart rate is too high and you should slow the exercise down Incorrect or excessive exercise...

Page 34: ...precautions are observed the equipment must be used as specified the user guide must be read thoroughly throughout the place of installation must meet the requirements stated in the user guide the el...

Page 35: ...nits with heart rate receivers in the same area the recommended minimum distance between them is 80 cm The equipment is able to measure heart rate trends accurately in two different ways with a device...

Page 36: ...eserved to competitive athletes workouts requiring a doctor s certificate Aerobic zone with a primarily cardio circulatory component keep heart rate between 70 and 90 Aerobic zone primarily using fats...

Page 37: ...ate unless you are an athlete engaged in competitive sport Warning The sole function of the heart rate monitor is to display the heart rate during exercise and cannot be used for medical cardiac diagn...

Page 38: ...ands and start walking slowly The two side grips make it safer when your first use RUN later on however it s better to walk or run without any support to improve your balance and posture At a speed of...

Page 39: ...use the nuts of the two adjustment feet B To adjust the height of the lower arms C of the side supports press the lever D and rotate the arm as well as lowering the arm rotates inwards to allow childr...

Page 40: ...changing the support height pull it downwards and rotate To adjust the brachial supports horizontally F loosen the screw H once adjusted tighten the screw Warning The adjustments of the side and brac...

Page 41: ...ne 54 7 Spostamento dell attrezzo 55 8 Livellamento 56 9 Collegamento dell attrezzo 57 10 Istruzioni per la messa a terra 59 11 Collegamento a un altro dispositivo 60 12 Manutenzione ordinaria 61 13 R...

Page 42: ...le e noto al personale addetto protetto da umidit e calore Il testo descrive le operazioni di trasporto e manutenzione e contiene preziose informazioni e utili suggerimenti sui metodi di allenamento r...

Page 43: ...lla presa elettrica subito dopo l uso e prima di effettuare operazioni di pulizia o di manutenzione AVVERTENZE Per ridurre il rischio di ustioni incendi scosse elettriche o danni alle persone adottare...

Page 44: ...re il cavo di alimentazione lontano da superfici riscaldate Non portare le mani in prossimit delle parti in movimento Non far cadere n inserire oggetti nelle aperture Non usare all aperto non lasciare...

Page 45: ...e di eseguire sull attrezzo RUN operazioni di manutenzione diverse da quelle riportate nel presente manuale All inizio di ogni esercizio posizionarsi correttamente sull attrezzo prestando attenzione a...

Page 46: ...le per l utente M Marchio europeo I valori riportati nel disegno sono puramente indicativi per avere le informazioni corrette controllare l etichetta sull attrezzo o i dati riportati al paragrafo Dati...

Page 47: ...e a piccoli passi Vi sono applicati i sensori F hand sensor per la rilevazione della frequenza cardiaca E Poggiapiedi spostando i piedi dal tappeto rotante al poggiapiedi pos sibile fare una breve sos...

Page 48: ...48 Uk It Fr De Nl Es Br run excite 3 Dati tecnici 03056004 2190 mm 936 mm 1493 mm 0SM00427AE M1_IT indd 48 02 07 2010 9 58 45...

Page 49: ...5 lb Velocit 0 4 25 km h Inclinazione 0 18 Rumorosit Inferiore a 80 dB Grado di protezione IP 20 Temperatura operativa da 5 C a 30 C Portata massima del porta borraccia 2 kg 4 lb Classe di isolamento...

Page 50: ...zione 100 Vac 0 4 16 km h 0 25 10 mph Velocit con alimentazione 120 Vac 0 4 19 km h 0 25 12 mph Velocit con alimentazione 200 240 Vac 0 4 25 km h 0 25 13 7 mph Inclinazione 0 18 Rumorosit Inferiore a...

Page 51: ...dumenti Nel secondo caso l utente aziona il pulsante se si allontana troppo dal pannello dei comandi ossia se tira la cordicella C Segnale acustico avvisa l utente dell accensione dell attrezzo che l...

Page 52: ...re attenzione alle etichette autoadesive applicate sull attrezzo perch informano su possibili rischi e pericoli F L etichetta che pu essere applicata sul cavo di alimentazione riporta le caratteristic...

Page 53: ...nte in modo che l esercizio fisico sia praticato in condizioni gradevoli e rilassanti ampia fascia di spazio libero tutto intorno ad ogni attrezzo e uno spazio libero di sicurezza di 2x1 m davanti al...

Page 54: ...direttamente sull imballo Al fine di tutelare l incolumit delle persone e delle cose occorre valutare attentamente in relazione al luogo di destinazione degli attrezzi quali mezzi normali di sollevame...

Page 55: ...l operazione di spostamento si consiglia l intervento di pi persone Se le condizioni del pavimento non consentono l uso delle ruote lo spostamento deve essere effettuato coi normali mezzi di sollevame...

Page 56: ...o si interviene sul piede posteriore del lato indicato in figura A avvitare o svitare il piede fino a portare il telaio in posizione stabile B a regolazione effettuata serrare il controdado 02082032 0...

Page 57: ...provvista di messa a terra Se quest ultima manca deve essere installata da personale specializzato prima del collegamento elettrico dell attrezzo La presa a muro deve essere situata in un luogo che pe...

Page 58: ...etta sull attrezzo C Indica il tipo di interruttore due posizioni stabili Alla prima accensione richiesto di indicare la tensione di alimentazione nel pannello dei comandi scorre il messaggio cod tens...

Page 59: ...terra La spina deve essere inserita in un apposita presa correttamente installata e collegata a terra in conformit ai codici e alle ordinanze locali PERICOLO Un collegamento errato del conduttore per...

Page 60: ...trezzi RUN con codice D847M e D847U possono essere collegati con dispositivi conformi al protocollo CSAFE come illustrato in figura Le apparecchiature aggiuntive collegate alle interfacce analogica e...

Page 61: ...uente spegnere l attrezzo posizionando l interruttore nella posizione OFF 0 staccare la spina di alimentazione dell attrezzo dalla presa a muro pulire il pannello dei comandi con un panno umido ma non...

Page 62: ...tervento necessario spegnere l attrezzo portando l interruttore in posizione OFF 0 e staccare la spina di alimentazione dalla presa 02082037 A B D Pos Descrizione Tipo di intervento Scadenza di interv...

Page 63: ...nati dal tappeto durante il funzionamento Pulire il pannello antipolvere e la zona circostante mensilmente rimuovere il carter ed estrarre il pannello dalle apposite guide poi pulirlo con un aspirapol...

Page 64: ...ione si effettua con l attrezzo in movimento Agire sull apposita vite di registrazione A nel lato indicato in figura mediante la chiave in dotazione B finch le scritte risultano equidistanti dai bordi...

Page 65: ...imentazione danneggiato Rivolgersi al Servizio di Assistenza Tecnica Technogym Problemi di installazione del cavo di alimentazione Controllare il collegamento Il connettore di collegamento del pannell...

Page 66: ...postarla o spostare l attrezzo La fascia del cardiofrequenzimetro logorata Sostituire la fascia I contatti sulla pelle del trasmettitore a fascia non sono corretti Inumidire con acqua la parte interna...

Page 67: ...e i seguenti dati modello dell attrezzo data di acquisto numero di serie indicazioni precise sul problema riscontrato Avvertenze Interventi sull attrezzo effettuati da personale non autorizzato da Tec...

Page 68: ...modo divenire fonte di pericolo ed evitare quindi di abbandonarlo ai giochi dei bambini Per questo durante eventuali lunghi periodi di inattivit o nel caso ci si voglia disfare dell attrezzo occorre...

Page 69: ...ontrollare l etichetta sull attrezzo All accensione si avverte un segnale acustico e tutti i led presenti sul pannello dei comandi si illuminano Dopo un rapido autocontrollo reset l attrezzo pronto pe...

Page 70: ...ne dell esercizio quando in stand by Se l attrezzo non utilizzato per un periodo di tempo prolungato oltre a spegnerlo con l interruttore bene staccare la spina di alimentazione dalla presa a muro Avv...

Page 71: ...te l esercizio si avverte il segnale acustico per circa 5 secondi e compare il messaggio Attenzione FC elevata la frequenza cardiaca troppo elevata e occorre rallentare l esercizio Un allenamento scor...

Page 72: ...sono osservate le seguenti precauzioni l attrezzo sia utilizzato conformemente alle sue specifiche sia stato letto accuratamente in tutte le parti il manuale per l utente il luogo di installazione ris...

Page 73: ...llo stesso ambiente pi attrezzi dotati di ricevitore della frequenza cardiaca la distanza minima raccomandata tra gli stessi di 80 cm L attrezzo consente di monitorare l andamento della frequenza card...

Page 74: ...uto Zona riservata ad allenamento per sportivi dediti ad attivit agonistica con certificato medico Zona aerobica con prevalente componente cardiocircolatoria mantenere il battito tra i valori corrispo...

Page 75: ...o che sia con la fascia o l hand sensor ha la sola funzione di visualizzare il battito cardiaco durante l esercizio ed esclude qualsiasi uso diagnostico a carattere medico non serve per rilevare anoma...

Page 76: ...ggiore sicurezza durante il periodo iniziale di utilizzo dell attrezzo RUN successivamente per meglio camminare o correre senza l appoggio per migliorare equilibrio e postura Intorno ai 6 7 km h di ve...

Page 77: ...i dei due piedi di registro B Per regolare l altezza dei bracci inferiori C dei supporti laterali premere la leva D e ruotare il braccio oltre che abbassarsi il braccio ruota verso l interno per conse...

Page 78: ...del supporto tirarla verso il basso e ruotare Per regolare sul piano orizzontale i supporti brachiali F allentare la vite H a regolazione effettuata serrare nuovamente la vite Avvertenze Le regolazio...

Page 79: ...1 6 D ballage et installation 92 7 D placement de l appareil 93 8 R glage 94 9 Branchement lectrique 95 10 Instructions de mise la terre 97 11 Branchement un autre appareil 98 12 Maintenance r guli re...

Page 80: ...l humidit et la chaleur Le texte d crit les op rations de transport et d entretien et contient des informations importantes et des suggestions sur les m thodes d entra nement il constitue de ce fait u...

Page 81: ...oyage ou de proc der des travaux de maintenance AVertissement Afin de r duire le risque de br lures d incendie d lectrochocs ou de l sions au d triment des personnes prenez les pr cautions suivantes I...

Page 82: ...z ce c ble de toute surface chauff e Eloignez vos mains des pi ces mobiles de l appareil Ne faites jamais tomber et n introduisez jamais d objets dans les ouvertures Ne laissez pas l appareil l ext ri...

Page 83: ...e faire des op rations de maintenance sur l appareil RUN diff rentes de celles indiqu es dans ce manuel Au d but de chaque exercice v rifiez que la position soit correcte et qu aucune partie de l appa...

Page 84: ...rque europ enne Les valeurs figurant sur le dessin ne sont qu indicatives pour obtenir des informations pr cises contr lez l tiquette sur l appareil ou le paragraphe Caract ristiques techniques 030560...

Page 85: ...archer petites foul es Les capteurs F hand sensor pour mesure de la fr quence cardiaque y sont positionn s E Repose pieds ils permettent l utilisateur de faire une br ve pause en cas de danger ou de f...

Page 86: ...86 Uk It Fr De Nl Es Br run excite 3 Caract ristiques techniques 2190 mm 936 mm 1493 mm 0SM00427AE M1_FR indd 86 02 07 2010 10 08 24...

Page 87: ...b Vitesse 0 4 25 km h Inclinaison du tapis 0 18 Niveau sonore Inf rieur 80 dB Indice de protection IP 20 Temp rature de fonctionnement de 5 C 30 C Charge maxi du porte bidon 2 kg 4 lb Classe d isolati...

Page 88: ...n 100 Vac 0 4 16 km h 0 25 10 mph Vitesse avec alimentation 120 Vac 0 4 19 km h 0 25 12 mph Vitesse avec alimentation 200 240 Vac 0 4 25 km h 0 25 13 7 mph Inclinaison du tapis 0 18 Niveau sonore Inf...

Page 89: ...tements Dans ce dernier cas l utilisateur actionnera le bouton s il s loigne trop du panneau de commande c est dire s il tire la cordelette C Signal sonore il signale l utilisateur la mise sous tensi...

Page 90: ...quettes autocollantes qui sont appos es sur l appareil parce qu elles contiennent des informations concernant les risques et les dangers ventuels F L tiquette qui peut tre appos e sur le cordon d alim...

Page 91: ...antir un d roulement des exercices dans des conditions agr ables et relaxantes tout autour de l appareil il y ait un grand espace libre et il y ait un autre espace libre de s curit de 2 x 1 m devant l...

Page 92: ...nt indiqu es sur leur emballage Pour prot ger les personnes et les objets choisissez avec attention les moyens de levage et de transport utilis s en tenant toujours compte de l endroit o vous d sirez...

Page 93: ...son d placement doit tre effectu par au moins deux personnes Si l tat du plancher ne permet pas de d placer l appareil avec les roulettes cette op ration devra tre effectu e avec des appareils de lev...

Page 94: ...ise de niveau r glez le pied arri re du c t indiqu en figure A vissez ou d vissez le pied jusqu ce que le ch ssis soit en position stable B le r glage termin serrez le contre crou 02082032 8 R glage 0...

Page 95: ...tre pourvue d une mise la terre Si ce n est pas le cas l installation de mise la terre doit tre r alis e par un professionnel sp cialis avant d effectuer le branchement lectrique de l appareil La pris...

Page 96: ...tiquette sur l appareil C Indique le type d interrupteur deux positions stables Au premier allumage il est n cessaire d indiquer la tension d alimentation sur le panneau de commande d file le message...

Page 97: ...onnectez la fiche une prise de courant adapt e correctement install e et mise la terre conform ment aux lois et aux r glements en vigueur dans le pays o l appareil est install ATTENTION Une connexion...

Page 98: ...ppareils RUN codes D847M et D847U peuvent tre branch s des dispositifs conformes au protocole CSAFE comme l illustre la figure Lesappareilssuppl mentairesconnect s aux interfaces analogique et num riq...

Page 99: ...panneau de commande proc dez de la mani re suivante teignez l appareil en pla ant l interrupteur sur la position OFF 0 d branchez le c ble d alimentation de l appareil de la prise murale nettoyez le p...

Page 100: ...e intervention il faut teindre l appareil en pla ant l interrupteur sur la position OFF 0 et d brancher le cordon d alimentation de la prise A B D Pos Description Type d intervention Cadence d interve...

Page 101: ...son fonctionnement contre les agents polluants ext rieurs Nettoyez le filtre et la zone adjacente tous les mois Pour le nettoyage du filtre d posez le carter et sortez le filtre des guides appropri s...

Page 102: ...l appareil est en mouvement Agissez sur la vis de r glage A du c t indiqu en figure l aide de la cl fournie B jusqu ce que les inscriptions soient quidistantes des bords ou jusqu ce que le tapis ne so...

Page 103: ...e cordon d alimentation est endommag Adressez vous au Service d Assistance Technique Technogym Probl mes d installation du cordon d alimentation Contr lez le branchement Le connecteur du panneau de co...

Page 104: ...cem tre est us e Remplacez la ceinture Les contacts entre la peau et l metteur de la ceinture ne sont pas corrects Humidifiez avec de l eau l int rieur de la ceinture thoracique Le panneau de commande...

Page 105: ...isez le mod le de l appareil la date d achat le num ro de s rie description d taill e du probl me constat Avertissement Toute r paration op ration de maintenance effectu e par des personnes non agr es...

Page 106: ...jouer avec Pendant les longues p riodes d inactivit ou pour vous d barrasser de l appareil mettez le hors de service en d branchant le cordon d alimentation Il est strictement interdit d abandonner l...

Page 107: ...xacte contr lez l tiquette sur l appareil Quand l appareil se met en marche un signal sonore retentit et toutes les LED du panneau de commande s allument Apr s une rapide r initialisation reset l appa...

Page 108: ...en stand by Si l appareil n est pas utilis pendant une p riode prolong e teignez le avec l interrupteur et d branchez le cordon d alimentation de la prise murale Avertissement L interrupteur sert allu...

Page 109: ...nal sonore pendant environ 5 secondes et que le message Attention FC lev e appara t la fr quence cardiaque est trop lev e et il faut ralentir l exercice Un entra nement mal conduit ou un surentra neme...

Page 110: ...essous sont respect es l appareil est utilis conform ment ses sp cifications l utilisateur a soigneusement pris lecture de toutes les parties du manuel de l utilisateur le lieu d installation est conf...

Page 111: ...cardiaque se trouvent dans la m me pi ce la distance minimale recommand e entre eux est de 80 cm L appareil permet de surveiller avec pr cision le rythme cardiaque de deux fa ons diff rentes par un d...

Page 112: ...ations par minute Zone r serv e l entra nement pour sportifs professionnels avec certificat m dical Zone a robic avec composante cardio pulmonaire pr dominante garder le battement entre les valeurs co...

Page 113: ...e ceinture ou hand sensor a pour seule fonction d afficher les pulsations cardiaques pendant l exercice Toute utilisation diagnostique caract re m dical est exclue il ne peut donc pas tre utilis pour...

Page 114: ...curit durant la phase d utilisation initiale de l appareil Run par la suite il vaut mieux marcher ou courir sans s appuyer pour am liorer l quilibre et la position Aux alentours des 6 7 km h on passe...

Page 115: ...crous des deux pieds de r glage B Pour r gler la hauteur des bras inf rieurs C des supports lat raux appuyez sur le levier D et tournez le bras en plus de s abaisser le bras tourne vers l int rieur p...

Page 116: ...eur du support tirez le vers le bas et tournez le Pour r gler sur le plan horizontal les supports brachiaux F desserrez la vis H le r glage termin resserrez la vis Avertissement Les r glages des suppo...

Page 117: ...es Ger tes 131 8 Niveauregulierung 132 9 Netzanschluss 133 10 Hinweise zur Erdung des Ger tes 135 11 Anschluss an eine andere Vorrichtung 136 12 Routinewartung 137 13 Regulierung des Laufbandes 140 14...

Page 118: ...rt auf an dem es vor Feuchtigkeit und W rme gesch tzt ist Der Text beschreibt die Vorgehensweisen bei Transport und Wartung und enth lt wertvolle Informationen und n tzliche Tipps zu den Trainingsmeth...

Page 119: ...ning beendet haben und bevor Sie Reinigungs oder Wartungsarbeiten durchf hren ACHTUNG Beachten Sie folgende Vorsichtsma nahmen um das Risiko von Verbrennungen Zimmerbr nden Stromschl gen oder Personen...

Page 120: ...en Sie das Netzkabel von erhitzten Oberfl chen fern Halten Sie Ihre H nde von bewegten Teilen fern Stecken Sie keine Gegenst nde in die ffnungen und lassen Sie nichts hineinfallen Verwenden Sie das Ge...

Page 121: ...nicht andere als im vorliegenden Handbuch beschriebenen Wartungsarbeiten am Ger t RUN auszuf hren Stellen Sie sich zu Beginn jeder bung in korrekter Weise auf das Ger t Achten Sie auf die Teile die e...

Page 122: ...ngef hrten Werte sind rein ungef hre F r korrekte Informationen kontrollieren Sie bitte das Etikett auf dem Ger t oder die im Abschnitt Technische Daten angef hrten Daten 03056007 03143001 TECHNOGYM S...

Page 123: ...nden sich die Sensoren F Handsensor f r die Erfassung der Herzfrequenz E Fu st tze Bei Erm dung oder Gefahr kann der Benutzer eine kurze Pause einlegen und hierzu die F e auf den Fu st tze stellen G L...

Page 124: ...124 Uk It Fr De Nl Es Br run excite 3 Technische Daten 03056004 2190 mm 936 mm 1493 mm 0SM00427AE M1_DE indd 124 02 07 2010 10 24 17...

Page 125: ...gkeit 0 4 25 km h Steigung 0 18 Ger uschentwicklung Unter 80 dB Schutzart IP 20 Betriebstemperatur von 5 C bis 30 C Max Tragf higkeit des Trinkflaschenhalters 2 kg 4 lb Elektrische Schutzklasse Typ I...

Page 126: ...0 Vac 0 4 16 km h 0 25 10 mph Geschwindigkeit bei einer Versorgung von 120 Vac 0 4 19 km h 0 25 12 mph Geschwindigkeit bei einer Versorgung von 200 240 Vac 0 4 25 km h 0 25 13 7 mph Steigung 0 18 Ger...

Page 127: ...enden Klammer ausgestattet sein Im zweiten Fall bet tigt der Benutzer den Schalter automatisch wenn er sich zu weit vom Bedienfeld entfernt d h an der Schnur zieht C Signaltongeber Weist den Benutzer...

Page 128: ...rd empfohlen auf die Klebeschilder am Ger t zu achten die ber m gliche Risiken und Gefahren informieren F Das Etikett das auf dem Netzkabel angebracht sein kann enth lt die elektrischen Daten F 020820...

Page 129: ...e Atmosph re f r das Training schafft Ausreichend Abstand rund um das Ger t und einen Sicherheitsabstand von 2x1 m vordem Laufband siehe Abbildung Eine ebene stabile und schwingungsfreie Oberfl che mi...

Page 130: ...sich auf der Verpackung Die blichen Hub und Transportmittel s o l l t e n e n t s p r e c h e n d d e s Aufstellungsortes der Ger te sorgf ltig gew hlt werden um die Unversehrtheit von Personen und Ge...

Page 131: ...wird Da das Ger t ein betr chtliches Gewicht aufweist sollte es von mehreren Personen verschoben werden Wenn der Boden ein Verschieben des Ger tes mit Hilfe der Rollen nicht zul sst muss das Ger t mit...

Page 132: ...der hinteren Stellf e auf der in der Abbildung gezeigten Seite A Schrauben Sie den Stellfu heraus oder hinein bis sich der Rahmen in stabiler Stellung befindet B Ziehen Sie anschlie end die Gegenmutte...

Page 133: ...rdung vorhanden so muss sie vor dem Anschluss des Ger tes von einem spezialisierten Techniker installiert werden Die Wandsteckdose sollte sich an einem Ort befinden der ein leichtes Einstecken und Her...

Page 134: ...ition den Aufkleber auf dem Ger t C Bezeichnet die Art des Schalters zwei stabile Stellungen Beim ersten Einschalten ist die Versorgungsspannung anzugeben Auf dem Bedienfeld die Meldung spannungscode...

Page 135: ...e und korrekt installierte und geerdete Steckdose angeschlossen werden die den rtlichen gesetzlichen Bestimmungen entspricht GEFAHR Ein fehlerhafter Anschluss des Erdkabels kann das Risiko von Stromsc...

Page 136: ...Code D847M und D847U k nnen an Vorrichtungen angeschlossen werden welche das CSAFE Protokoll verwenden wie in der Abbildung dargestellt ist An die analogen und digitalen Schnittstellen angeschlossene...

Page 137: ...er t ab indem Sie den Schalter auf Position OFF 0 stellen Ziehen Sie den Versorgungsstecker des Ger tes aus der Wandsteckdose Reinigen Sie das Bedienfeld mit einem feuchten aber nicht nassen Tuch Rein...

Page 138: ...VorjedemEingriffmussdasGer t ausgeschaltet werden indem der Schalter in die Position OFF 0 gebracht und der Netzstecker aus der Steckdose gezogen wird A B D Pos Beschreibung Art des Eingriffs Frist Ei...

Page 139: ...des Betriebs am Laufband haften bleiben k nnen Reinigen Sie den Staubfilter und seine Umgebung monatlich Nehmen Sie dazu das Schutzgeh use ab und ziehen Sie den Filter aus den F hrungen Reinigen Sie i...

Page 140: ...Ger t vorgenommen Bet tigen Sie die entsprechende Regulierungsschraube A mit dem Schl ssel B aus dem Zubeh r auf der in der Abbildung gezeigten Seite bis die Schriftz ge den gleichen Abstand vom Rahme...

Page 141: ...etzkabel ist besch digt WendenSiesichandenTechnischenKundendienstvonTechnogym Probleme bei der Installation des Netzkabels Pr fen Sie den Anschluss Der Steckverbinder des Bedienfeldes wurde versehentl...

Page 142: ...chieben Sie diese oder das Ger t Der Brustgurt f r den Herzfrequenzmesser ist abgenutzt Ersetzen Sie den Brustgurt durch einen neuen DerHautkontaktdesSendersimBrustgurtistunzureichend Feuchten Sie die...

Page 143: ...n an Ger temodell Kaufdatum Seriennummer G e n a u e B e s c h re i b u n g d e s aufgetretenen Problems Achtung Bei Eingriffen am Ger t durch Personal das nicht von Technogym autorisiert wurde verf l...

Page 144: ...Gefahrenquelle oder zu ungeeignetem Spielzeug f r Kinder werden kann Sollte das Ger t lange Zeit nicht genutzt oder sogar entsorgt werden legen Sie es bitte still indem Sie das Netzkabel entfernen Es...

Page 145: ...r richtigen Position den Aufkleber auf dem Ger t Beim Einschalten ert nt ein akustisches Signal und alle LEDs auf dem Bedienfeld leuchten auf Nach einer schnellen Selbstkontrolle Reset kann das Ger t...

Page 146: ...inings aus wenn es sich in Stand by befindet Wird das Ger t ber einen l ngeren Zeitraum nicht benutzt so schalten Sie es am Schalter aus und ziehen am besten auch den Stecker aus der Wandsteckdose Ach...

Page 147: ...etwa 5 Sekunden langes akustisches Signal auf und erscheint die Meldung Achtung hohe H F bedeutet dies dass die Herzfrequenz zu hoch ist und die bung verlangsamt werden muss Falsches und bertriebenes...

Page 148: ...achtet werden Das Ger t muss bestimmungsgem verwendet werden Das Benutzerhandbuch muss aufmerksam und vollst ndig gelesen werden Der Aufstellungsort muss den im Benutzerhandbuch vorgesehenen Anforderu...

Page 149: ...re Empf ngerger te zur Herzfrequenzmessung vorhanden sind betr gt der empfohlene Mindestabstand zwischen diesen 80 cm Das Ger t erm glicht die Kontrolle der Herzfrequenz auf zwei verschiedene Arten Mi...

Page 150: ...uf System trainiert Alter Herzschl ge pro Minute F r Leistungssportler mit rztlichem Attestat reservierter Trainingsbereich Aerober Bereich mit berwiegend Herz Kreislauf Training die Herzfrequenz bei...

Page 151: ...ler Achtung Der Herzfrequenzmesser dient sowohl mit dem Brustgurt als auch mit dem Handsensor ausschlie lich der Anzeige des Herzschlags w hrend des Trainings und in keinem Fall der Diagnose oder der...

Page 152: ...erheit w hrend der Anfangsphase der Verwendung des Ger tes RUN Danach ist es jedoch besser ohne festhalten zu gehen oder zu laufen um das Gleichgewicht und die Haltung zu verbessern Bei ca 6 7 km h ge...

Page 153: ...er beiden Einstellf e bedienen B Zu Einstellung der H he der unteren Arme C der seitlichen St tzen den Hebel D dr cken und den Arm drehen Au er sich senken kann der Arm auch nach innen gedreht werden...

Page 154: ...u ver ndern nach unten ziehen und drehen Zur horizontalen Einstellung der Armhalter F die Schraube H l sen Nach der Einstellung die Schraube wieder fest ziehen Achtung Die Einstellung der seitlichen S...

Page 155: ...estel 169 8 Recht zetten van het toestel 170 9 Elektrische aansluiting 171 10 Instructies voor de aarding 173 11 Aansluiting op een ander apparaat 174 12 Gewoon onderhoud 175 13 Afstellen van de tapij...

Page 156: ...el bekende toegankelijke plaats worden bewaard beschermd tegen vocht en warmte De tekst beschrijft de handelingen die nodig zijn voor het transport en het onderhoud en geeft nuttige informatie en tips...

Page 157: ...t het stopcontact om de kans op elektrische schokken te beperken WAARSCHUWINGEN Neem voor het verminderen van de kans op brandwonden brand elektrische schokken of ander persoonlijk letsel de volgende...

Page 158: ...abel uit de buurt van verwarmde oppervlaktes Houd de handen uit de buurt van de draaiende delen Steek geen voorwerpen in de openingen of laat ze er niet invallen Niet voor gebruik buiten laat het toes...

Page 159: ...n andere dan de in deze handleiding aangegeven onderhoudswerkzaamheden aan de RUN uit te voeren Neem aan het begin van elke oefening op de juiste manier plaats op het toestel daarbij lettend op die de...

Page 160: ...verwijst naar de gebruikershandleiding M Europees merkteken De in de afbeelding aangegeven waarden zijn slechts indicatief zie voor de juiste informatie het etiket op het toestel of de gegevens in de...

Page 161: ...te lopen Er zijn sensoren F aangebracht om de hartfrequentie te meten handsensor E Steunplanken door de voeten van het loopband op de voetsteun te plaatsen is het mogelijk een korte pauze in te lassen...

Page 162: ...162 Uk It Fr De Nl Es Br run excite 3 Technische gegevens 2190 mm 936 mm 1493 mm 0SM00427AE M1_NL indd 162 02 07 2010 10 48 19...

Page 163: ...485 lb Snelheid 0 4 25 km h Helling 0 18 Lawaai minder dan 80 dB Beschermingsgraad IP 20 Werkingstemperatuur van 5 C tot 30 C Draagvermogen van de drinkfleshouder 2 kg 4 lb Elektrische isolatieklasse...

Page 164: ...voeding van 100 Vac 0 4 16 km h 0 25 10 mph Snelheid bij een elektrische voeding van 120 Vac 0 4 19 km h 0 25 12 mph Snelheid bij een elektrische voeding van 200 240 Vac 0 4 25 km h 0 25 13 7 mph Hell...

Page 165: ...vestigd In het tweede geval wordt de knop geactiveerd als de gebruiker zich te ver van het bedieningspaneel verwijdert ofwel als deze aan het koordje trekt C Geluidssignaal waarschuwt de gebruiker dat...

Page 166: ...ndacht te schenken aan de zelfklevende etiketten die op het toestel zijn aangebracht omdat deze op mogelijke risico s en gevaren wijzen F Het etiket dat op het netsnoer kan worden aangebracht bevat de...

Page 167: ...ngen onder aangename en ontspannende omstandigheden kunnen worden uitgevoerd voldoende vrije ruimte rondom ieder toestel en in verband met de veiligheid een vrije ruimte van 2x1 m voor het tapijt zoal...

Page 168: ...instructies bevinden zich op de verpakking Om de veiligheid van personen en zaken te waarborgen dient men afhankelijk van de plaats van bestemming van de toestellen nauwkeurig na te gaan welke normale...

Page 169: ...zien het gewicht van het toestel is het raadzaam het toestel met meerdere personen te verplaatsen Indien de staat van de vloer het gebruik van de wielen niet toestaat dient het toestel met normale hef...

Page 170: ...het toestel kan met het achterste voetje worden bijgesteld A schroef het voetje vaster of losser totdat het onderstel stabiel staat B Draai na de afstelling de borgmoer aan 8 Recht zetten van het toes...

Page 171: ...dit niet het geval is moet het stopcontact door gespecialiseerd personeel geaard worden voordat het toestel op de elektriciteit wordt aangesloten De wandcontactdoos moet zich op een plaats bevinden wa...

Page 172: ...het toestel C Geeft het type schakelaar aan twee stabiele standen Wanneer het toestel voor het eerst wordt aangezet wordt u gevraagd de stroomtoevoer in te voeren op het bedieningspaneel loopt de meld...

Page 173: ...voor bestemd correct ge nstalleerd stopcontact worden gestoken en geaard worden in overeenstemming met de nationale wetgeving en de plaatselijke voorschriften GEVAAR Als de aansluiting van de aardgele...

Page 174: ...D847M en D847U kunnen worden aangesloten op apparaten die conform het CSAFE protocol zijn zoals in de afbeelding is aangegeven De bijkomende apparatuur die op de analoge en de digitale interface is a...

Page 175: ...te werk gaan schakel het toestel uit door de schakelaar op de stand OFF 0 te zetten haal de netstekker van het toestel uit het wandcontactdoos maak het bedieningspaneel schoon met een vochtige maar ni...

Page 176: ...ng is het noodzakelijk dat het toestel wordt uitgeschakeld door de schakelaar in de stand OFF 0 te zetten en dat de netstekker uit het stopcontact wordt gehaald A B D Pos Beschrijving Soort verrichtin...

Page 177: ...lopen van het tapijt van buitenaf mee worden aangetrokken Reinig het filter en het gebied eromheen maandelijks verwijder de beschermkap en haal het filter uit zijn behuizing maak het vervolgens met e...

Page 178: ...euren terwijl het toestel in beweging is Stel het tapijt bij met de daarvoor bestemde stelschroef A die zich tegenover de steunpilaarrechts bevindt met behulp van de bijgeleverde sleutel B totdat de t...

Page 179: ...neendergelijkgevaltotdeTechnischeAssistentiedienst van Technogym Problemen bij installatie van het netsnoer Controleer de aansluiting De aansluiting van het bedieningspaneel is per ongeluk losgekoppel...

Page 180: ...of het toestel De hartslagband is versleten Vervang de hartslagband De contactpunten van de bandzender maken geen goed contact met de huid Bevochtig de binnenkant van de hartslagband met water Het be...

Page 181: ...gegevens te vermelden model van het toestel aankoopdatum serienummer nauwkeurige omschrijving van het probleem Waarschuwingen Reparatiewerkzaamheden aan het toestel door personen die niet door Technog...

Page 182: ...r kan vormen en voorkom dat kinderen er mee kunnen gaan spelen Om deze reden dient het toestel uitgeschakeld te worden door het netsnoer uit het stopcontact te halen wanneer het lange tijd niet wordt...

Page 183: ...etiket op het toestel Na inschakeling klinkt een signaal en gaan alle controlelampjes leds op het bedieningspaneel branden Na een snelle autocontrole reset van het toestel is deze klaar voor gebruik...

Page 184: ...g wanneer het in stand by staat Indien het toestel lange tijd achtereen niet wordt gebruikt moet na uitschakeling met de schakelaar tevens de netstekker uit de wandcontactdoos verwijderd worden Waarsc...

Page 185: ...en tijdens de oefening een geluidssignaal van ongeveer 5 seconden klinkt en de melding hoge hartslag verschijnt is de hartfrequentie te hoog en dient u de oefening langzamer uit te voeren Eenverkeerdu...

Page 186: ...men het toestel gebruikt is overeenkomstig zijn technische specificaties alle delen van de gebruikershandleiding aandachtig zijn gelezen de installatieruimte voldoet aan de eisen die in de gebruikersh...

Page 187: ...dezelfde ruimte bevinden wordt een minimale onderlinge afstand van 80 cm aanbevolen Met het toestel is het mogelijk om op twee manieren nauwkeurig het verloop van de hartfrequentie te bewaken met een...

Page 188: ...jd Hartslagen per minuut Gereserveerde zone voor de training van personen die aan een wedstrijdsport doen met een medische verklaring A robische zone met een voornamelijk cardiovasculaire component de...

Page 189: ...De hartfrequentiemeter d w z zowel de band als de handsensor heeft als enige taak de hartslag tijdens de oefening weer te geven en sluit elk willekeurig diagnostisch gebruik van medische aard uit het...

Page 190: ...grotere veiligheid aan het begin van het gebruik van de RUN daarna is het echter beter om te wandelen of te hardlopen zonder u vast te houden voor een beter evenwicht en een betere houding Op een sne...

Page 191: ...jsteunen A in de hoogte af te stellen Druk op de hendel D en draai de arm om de onderste armen C van de zijsteunen in de hoogte af te stellen de arm zakt niet alleen maar draait ook naar binnen zodat...

Page 192: ...u de houder niet in de hoogte wilt verplaatsen Draai de schroef H los om de armsteunen F horizontaal wilt afstellen draai de schroef weer vast als de armsteunen zijn afgesteld Waarschuwingen De afstel...

Page 193: ...aci n 206 7 Desplazamiento del equipo 207 8 Regulaci n 208 9 Conexi n el ctrica 209 10 Instrucciones para la toma de tierra 211 11 Conexi n a otro dispositivo 212 12 Mantenimiento ordinario 213 13 Reg...

Page 194: ...guardarse en un lugar conocido accesible y protegido de la humedad y el calor El texto describe las operaciones de transporte y mantenimiento contiene informaci n til sobre los m todos de entrenamient...

Page 195: ...a de la toma el ctrica al terminar de utilizar el equipo y antes de limpiarlo o efectuar su mantenimiento ADVERTENCIAS Para reducir el riesgo de quemaduras incendios descargas el ctricas o da os a per...

Page 196: ...ni lo utilice como manilla Mantenga el cable de alimentaci n lejos de las superficies calientes No acerque las manos a las partes en movimiento No deje caer ni introduzca objetos en las aberturas No u...

Page 197: ...cnica de Technogym No intente realizar operaciones de mantenimiento distintas de las descritas en este manual Antes de empezar cada ejercicio compruebe que su posici n es correcta y que ninguna pieza...

Page 198: ...manual del usuario M Marca europea Los valores de la figura son s lo indicativos para obtener informaci n sobre los valores reales es necesario consultar la etiqueta del equipo o el apartado Datos t...

Page 199: ...a ella cuando quiere dar pasos cortos En la empu adura central est n instalados los sensores F de la frecuencia card aca hand sensor E Reposapi s si el usuario est cansado o se desequilibra puede sal...

Page 200: ...200 Uk It Fr De Nl Es Br run excite 3 Datos t cnicos 2190 936 1493 0SM00427AE M1_ES indd 200 02 07 2010 11 15 11...

Page 201: ...io 220 kg 485 lb Velocidad 0 4 25 km h Pendiente 0 18 Ruido Inferior a 80 dB Grado de protecci n IP 20 Temperatura de trabajo de 5 C a 30 C Capacidad m xima del soporte de la botella 2 kg 4 lb Aislami...

Page 202: ...con alimentaci n a 100 Vac 0 4 16 km h 0 25 10 mph Velocidad con alimentaci n a 120 Vac 0 4 19 km h 0 25 12 mph Velocidad con alimentaci n de 200 a 240 Vac 0 4 25 km h 0 25 13 7 mph Pendiente 0 18 Ru...

Page 203: ...la vestimenta de este modo si el usuario se aleja demasiado del panel de mandos se acciona el pulsador al tirar del cordel C Se al ac stica suena cuando se enciende el equipo cuando se empieza o se te...

Page 204: ...atentamente las etiquetas autoadhesivas contienen informaci n sobre posibles riesgos y peligros F La etiqueta que puede estar aplicada sobre el cable de alimentaci n contiene las caracter sticas el ct...

Page 205: ...naci n suficiente de modo que el ejercicio f sico sea practicado en condiciones agradables y relajantes amplia franja de espacio libre alrededor de cada equipo y una zona de seguridad de 2x1 m delante...

Page 206: ...iones impresas en el embalaje Para proteger la seguridad de las personas y los bienes hay que valorar con atenci n qu medios de elevaci n y transporte se deben utilizar en funci n del lugar de destino...

Page 207: ...o al peso del equipo hay que moverlo entre dos personas Si la rugosidad del suelo impide hacerlo deslizar sobre las ruedas hay que utilizar medios de elevaci n y transporte adecuados Atenci n No agarr...

Page 208: ...hay que regular el pie posterior que hay en lado que indica la figura A enrosque o desenrosque el pie hasta que el bastidor est en horizontal B al terminar de nivelar el equipo apriete la contratuerca...

Page 209: ...te debe tener toma de tierra Si esta ltima falta debe ser instalada por personal especializado antes de conectar el equipo La toma de la pared debe instalarse en un lugar donde la clavija pueda enchuf...

Page 210: ...la etiqueta del equipo C Indica el tipo de interruptor dos posiciones estables Al encenderlo por primera vez el equipo solicita la tensi n de alimentaci n por el panel de mandos se desliza el mensaje...

Page 211: ...ierra Enchufe la clavija a una toma que est instalada y conectada a tierra conforme a las normativas locales PELIGRO Si el conductor est mal conectado a tierra existe el riesgo de descargas el ctricas...

Page 212: ...equipos RUN con c digo D847M y D847U pueden conectarse a dispositivos conformes al protocolo CSAFE como ilustra la figura Los equipos conectados a las interfaces anal gica y digital deben ser conforme...

Page 213: ...gue el equipo poniendo el interruptor en la posici n OFF 0 desenchufe el cable de alimentaci n del equipo de la toma de la pared pase sobre el panel de mandos un pa o h medo pero no mojado Limpie todo...

Page 214: ...hnogym Antes de realizar cualquier tipo de operaci n apague el equipo colocando el interruptor en OFF 0 y desconecte el enchufe A B D Pos Descripci n Tipo de intervenci n Frecuencia A Cinta Control de...

Page 215: ...ara proteger el equipo contra la suciedad que arrastra la cinta durante el funcionamiento Se debe limpiar todos los meses Quite la protecci n extraiga el filtro de las gu as y l mpielo con una aspirad...

Page 216: ...arla Regule la cinta de correr mientras est en movimiento Regule el tornillo A que se encuentra en el lado indicado en la figura con la llave de serie B hasta que las leyendas sean equidistantes con r...

Page 217: ...con el Servicio de Asistencia T cnica de Technogym El cable de alimentaci n est mal instalado Controle la conexi n El conector del panel de mandos se ha desconectado P ngase en contacto con el Servici...

Page 218: ...ha desgastado Sustituya la banda Los transmisores no hacen buen contacto sobre la piel Humedezca con agua la parte interna del puls metro El panel de mandos no funciona correctamente P ngase en conta...

Page 219: ...es datos del equipo modelo del equipo fecha de compra n mero de serie indicaciones precisas acerca del problema que se ha verificado Advertencias Las intervenciones en el equipo realizadas por persona...

Page 220: ...una fuente de peligro por esta raz n no puede ser abandonado para que los ni os jueguen con l Si el per odo de inactividad previsto es relativamente largo o se piensa desechar el equipo hay que desen...

Page 221: ...del equipo Al encenderse el equipo se oye una se al ac stica y los leds del panel de mandos se encienden Despu s de un r pido autocontrol reinicio el equipo est preparado para comenzar El mensaje no...

Page 222: ...l ejercicio y de que se haya puesto en Espera Si el equipo debe permanecer inutilizado largo tiempo se aconseja apagarlo accionando el interruptor y adem s desenchufarlo de la red Advertencias El inte...

Page 223: ...amente el ejercicio y consulte a un m dico Si durante el ejercicio se oye una se al ac stica de 5 segundos y aparece el mensaje Atenci n F C elevada significa que las pulsaciones son demasiado altas y...

Page 224: ...si el equipo se utiliza conforme al uso especificado el usuario ha le do atentamente todos los apartados del manual del usuario el lugar de instalaci n cumple los requisitos indicados en el manual del...

Page 225: ...con puls metros la distancia m nima entre los mismos debe ser 80 cm El equipo dispone de dos m todos para monitorizar la frecuencia card aca con un dispositivo aplicado a las empu aduras hand sensor...

Page 226: ...e cardiocirculatoria Edad Pulsaciones por minuto Trabajo reservado a deportistas muy entrenados o profesionales con certificado m dico Trabajo aer bico preferentemente cardiocirculatorio las pulsacion...

Page 227: ...funci n del puls metro y el hand sensor es visualizar la frecuencia card aca durante el ejercicio No son instrumentos de diagn stico ni para uso m dico tampoco sirven para detectar anomal as o disfun...

Page 228: ...es garantizan mayor seguridad al empezar a usar RUN posteriormente es mejor caminar o correr sin apoyarse para mejorar el equilibrio y la postura A los 6 7 km h de velocidad se pasa del ejercicio de m...

Page 229: ...tuercas de los dos pies de regulaci n B Para regular la altura de los brazos inferiores C de los soportes laterales pulse la palanca D y gire el brazo ste desciende y gira hacia el interior para que e...

Page 230: ...del soporte tire de ella hacia abajo y g rela Para regular los soportes braquiales F sobre el plano horizontal afloje el tornillo H una vez regulados los soportes vuelva a apretar el tornillo Adverten...

Page 231: ...m e instala o 244 7 Deslocamento do aparelho 245 8 Nivelamento 246 9 Liga o el trica 247 10 Instru es para a liga o terra 249 11 Liga o a outro dispositivo 250 12 Manuten o ordin ria 251 13 Regula o d...

Page 232: ...to do pessoal encarregado protegida contra umidade e calor O texto descreve as opera es de transporte e manuten o e cont m informa es importantes e sugest es teis sobre os m todos de treinamento repre...

Page 233: ...e imediatamente depois do uso e antes de efetuar opera es de limpeza ou de manuten o ADVERT NCIAS Para reduzir o risco de queimaduras inc ndios choques el tricos ou danos s pessoas adote as seguintes...

Page 234: ...e cabo como al a Mantenha o cabo de alimenta o distante de superf cies aquecidas N o coloque as m os nas proximidades de pe as em movimento N o deixe cair nem insira objetos nas aberturas N o use ao a...

Page 235: ...uar em RUN opera o de manuten o diferentes daquelas indicadas no presente manual No come o de cada exerc cio posicione corretamente sobre os aparelhos prestando aten o aos componentes que possam repre...

Page 236: ...rca europ ia Os valores indicados no desenho s o somente indicativos para obter as informa es corretas verifique a etiqueta no aparelho ou os dados indicados no par grafo Dados t cnicos 03056007 TECHN...

Page 237: ...passos curtos Est oaplicadosossensores F hand sensor para a detec o da frequ ncia card aca E Estribos deslocando os p s da esteira rolante para os estribos poss vel dar uma breve pausa se estiver cans...

Page 238: ...238 Uk It Fr De Nl Es Br run excite 3 Dados t cnicos 2190 936 1493 0SM00427AE M1_BR indd 238 02 07 2010 14 23 24...

Page 239: ...lb Velocidade 0 4 25 km h Inclina o 0 18 Ru do Inferior a 80 dB Grau de prote o IP 20 Temperatura operacional de 5 C a 30 C Capacidade m xima do porta cantil 2 kg 4 lb Classe de isolamento el trico T...

Page 240: ...nta o 100 Vac 0 4 16 km h 0 25 10 mph Velocidade com alimenta o 120 Vac 0 4 19 km h 0 25 12 mph Velocidade com alimenta o 200 240 Vac 0 4 25 km h 0 25 13 7 mph Inclina o 0 18 Ru do Inferior a 80 dB Gr...

Page 241: ...tor a ser fixado na roupa No segundo caso o usu rio acionar o bot o se seafastar demais do painel de comandos ou seja se puxar o cord o C Sinal ac stico avisa o usu rio que o aparelho foi ligado que o...

Page 242: ...restar aten o nas etiquetas auto adesivas colocadas no aparelho porque informam sobre poss veis riscos e perigos F A etiqueta que pode ser aplicada no cabo de alimenta o indica as caracter sticas el t...

Page 243: ...exerc cio f sico seja realizado em condi es agrad veis e relaxadas ampla faixa de espa o livre ao redor de cada aparelho e um espa o livre de seguran a de 2x1 m na frente da esteira como indicado na...

Page 244: ...dicadas diretamente na embalagem Com o objetivo de evitar danos pessoais e materiais necess rio avaliar com aten o em rela o ao lugar de destino do aparelho quais meios normais de levantamento e trans...

Page 245: ...para a opera o de deslocamento aconselh vel a interven o de mais pessoas Se as condi es do pavimento n o permitirem a utiliza o das rodas o deslocamento dever ser efetuado com os meios normais de lev...

Page 246: ...nivelamento utiliza se o p dianteiro do lado indicado na figura A aparafuse ou desaparafuse o p at colocar o chassi em uma posi o est vel B depois de realizar esta regula o aperte a contraporca 8 Nive...

Page 247: ...deve possuir liga o terra Se n o houver esta liga o dever ser instalada por pessoal especializado antes da liga o el trica do aparelho A tomada na parede deve ser situada em um local que permeia a rem...

Page 248: ...fique a etiqueta colocada sobre o aparelho C Indica o tipo de interruptor duas posi es est veis No primeiro acendimento solicitada a indica o da tens o de alimenta o no painel dos comandos corre a men...

Page 249: ...lugue deve ser conectado em uma tomada apropriada instalada de forma adequada e ligada terra de acordo com todas as normas e regulamenta es locais PERIGO Uma conex o inadequada do fio de liga o terra...

Page 250: ...RUN com c digo D847M e D847U podem ser ligados a dispositivos compat veis com o protocolo CSAFE como ilustrado na figura Os aparelhos adicionais conectados s interfaces anal gica e digital devem ser...

Page 251: ...ligue o aparelho posicionando o interruptor na posi o OFF 0 remova o plugue de alimenta o do aparelho da tomada na parede limpe o painel de comandos com um pano mido mas n o molhado Semanalmente limpe...

Page 252: ...ogym Antes de cada interven o necess rio desligar o aparelho colocando o interruptor na posi o OFF 0 e remover o plugue de alimenta o da tomada A B D Pos Descri o Tipo de interven o Periodicidade A Es...

Page 253: ...s coletados pela esteira durante o funcionamento Limpe o filtro para poeira e a regi o ao redor mensalmente remova o painel de prote o e tire o filtro das guias respectivas limpe o com um aspirador de...

Page 254: ...ealiza se com o equipamento em movimento Regule mediante o respectivo parafuso de regula o A no lado indicado na figura usando a chave B fornecida com o equipamento at as escritas ficarem na mesma dis...

Page 255: ...Contate o Servi o de Assist ncia T cnica da Technogym Problemas de instala o do cabo de alimenta o Verifique a liga o A conex o de liga o do painel de comandos soltou se acidentalmente Contate o Servi...

Page 256: ...de freq ncia card aca est gasta Substitua a faixa Mau contato entre o sensor e a pele Umede a com gua a parte interior da faixa tor cica O painel de comandos n o est funcionando bem Contate o Servi o...

Page 257: ...t ncia T cnica da Technogym modelo do aparelho data de aquisi o n mero de s rie indica es detalhadas sobre o problema Advert ncias Qualquer interven o no aparelho efetuada por pessoal n o autorizado p...

Page 258: ...nte de perigo e portanto evite que crian as brinquem com o mesmo Para isto durante eventuais longos per odos de inatividade ou se desejar eliminar o aparelho ser necess rio desativ lo tirando o cabo d...

Page 259: ...relho Ao ser ligado escuta se um sinal ac stico e todos os indicadores luminosos no painel de comandos acendem se Depois de uma r pida reinicializa o o aparelho est pronto para utiliza o A mensagem n...

Page 260: ...fim do exerc cio e quando estiver em Espera Se durante um longo tempo n o for utilizar o aparelho al m de desligar o aparelho com o interruptor bom tirar o plugue de alimenta o da tomada da parede Ad...

Page 261: ...exerc cio e consulte o m dico Se durante o exerc cio ouvir o sinal sonoro por cerca de 5 segundos e aparecer a mensagem Aten o FC elevada a frequ ncia card aca excessivamente elevada e preciso desace...

Page 262: ...em obedecidas as seguintes precau es o equipamento for utilizado em conformidade com as suas especifica es tiverem sido lidas cuidadosamente todas as partes do manual do usu rio o lugar de instala o a...

Page 263: ...ais de um aparelho com receptor da freq ncia card aca a dist ncia m nima recomendada entre os mesmos dever ser de 80 cm O aparelho permite monitorar o andamento da frequ ncia card aca de duas maneiras...

Page 264: ...ao treinamento para esportistas dedicados a atividade de competi o com atestado m dico Parte aer bia com predominante componente cardiocirculat ria mant m a batida entre valores correspondentes a 70...

Page 265: ...cias O cardiofreq enc metro a faixa ou o hand sensor t m somente a fun o de visualizar a freq ncia card aca durante o exerc cio e excluem quaisquer utiliza es de diagn stico de car ter m dico n o serv...

Page 266: ...inicial de utiliza o do aparelho RUN ma sucessivamente melhor caminhar ou correr sem segurar nas mesmas o apoio para melhorar o equil brio e a postura A aproximadamente 6 a 7 km h de velocidade passe...

Page 267: ...cas dos dois p s de regulagem B Para regular a altura dos bra os inferiores C dos apoios laterais aperte a alavanca D e rode o bra o al m de abaixar se o bra o roda para o interno para permitir o uso...

Page 268: ...a do suporte puxe a para baixo e rode Para regular a superf cie horizontal dos suportes braquiais F afrouxe o parafuso H feita regula o aperte novamente o parafuso Advert ncias As regula es dos suport...

Page 269: ...Nl De Fr It Uk 270 271 1 274 2 275 3 276 4 279 5 281 6 282 7 283 8 284 9 285 10 287 11 288 12 289 13 292 14 293 15 295 16 296 17 296 18 297 19 Run 299 20 301 21 304 0SM00427AE M1_JP indd 269 02 07 201...

Page 270: ...270 Uk It Fr De Nl Es Br run excite 0SM00427AE M1_JP indd 270 02 07 2010 14 43 23...

Page 271: ...271 Br Es Nl De Fr It Uk RUN RUN D847M D847U RUN RUN RUN 0SM00427AE M1_JP indd 271 02 07 2010 14 43 23...

Page 272: ...272 Uk It Fr De Nl Es Br run excite RUN Technogym RUN RUN 0SM00427AE M1_JP indd 272 02 07 2010 14 43 23...

Page 273: ...273 Br Es Nl De Fr It Uk RUN RUN RUN I 0 RUN Technogym RUN 0SM00427AE M1_JP indd 273 02 07 2010 14 43 23...

Page 274: ...0 240 Vac 2200 VA 50 60 Hz PesoMax 150kg class IA 200 240 Vac 2200 VA 50 60 Hz MAN TECHNOGYM L I B A C H G D F TECHNOGYM S p A Gambettola FC MADE IN ITALY RUN MED CE 200 240 Vac 2200 VA 50 60 Hz PesoM...

Page 275: ...275 Br Es Nl De Fr It Uk 2 A B C D F E G H I TGS TGS L 900 700 G B E C A E H F H F I D L L 0SM00427AE M1_JP indd 275 02 07 2010 14 43 24...

Page 276: ...276 Uk It Fr De Nl Es Br run excite 3 03056004 2190 mm 936 mm 1493 mm 0SM00427AE M1_JP indd 276 02 07 2010 14 43 24...

Page 277: ...Nl De Fr It Uk Run Med 200 240V D847M 200 240 Vac 50 60 Hz 2200 VA 194 kg 428 lb 220 kg 485 lb 0 4 25 km h 0 18 80 dB IP 20 5 C 30 C 2 kg 4 lb I B BF 120 kg 265 lb 0SM00427AE M1_JP indd 277 02 07 2010...

Page 278: ...0 120 Vac 16A 200 240 Vac 12 5A 4400W 6Hp 194 kg 428 lb 220 kg 485 lb 100 Vac 0 4 16 km h 0 25 10 mph 120 Vac 0 4 19 km h 0 25 12 mph 200 240 Vac 0 4 25 km h 0 25 13 7 mph 0 18 80 dB IP 20 5 C 41 F 30...

Page 279: ...279 Br Es Nl De Fr It Uk 4 A B C D847M D847U D E A B C D E 0SM00427AE M1_JP indd 279 02 07 2010 14 43 24...

Page 280: ...280 Uk It Fr De Nl Es Br run excite F F 0SM00427AE M1_JP indd 280 02 07 2010 14 43 24...

Page 281: ...281 Br Es Nl De Fr It Uk 5 RUN 10 C 25 C 20 90 2x1 m 1 m 2 m 0SM00427AE M1_JP indd 281 02 07 2010 14 43 24...

Page 282: ...282 Uk It Fr De Nl Es Br run excite RUN 6 0SM00427AE M1_JP indd 282 02 07 2010 14 43 24...

Page 283: ...283 Br Es Nl De Fr It Uk 7 0SM00427AE M1_JP indd 283 02 07 2010 14 43 24...

Page 284: ...284 Uk It Fr De Nl Es Br run excite A B 8 0SM00427AE M1_JP indd 284 02 07 2010 14 43 24...

Page 285: ...285 Br Es Nl De Fr It Uk 9 A OFF 0 A 0SM00427AE M1_JP indd 285 02 07 2010 14 43 24...

Page 286: ...286 Uk It Fr De Nl Es Br run excite 2 A B ON OFF I 0 ON I OFF 0 C 2 230 100 100 Vac 120 120 Vac 230 200 240 Vac A B C 0SM00427AE M1_JP indd 286 02 07 2010 14 43 24...

Page 287: ...287 Br Es Nl De Fr It Uk 10 0SM00427AE M1_JP indd 287 02 07 2010 14 43 24...

Page 288: ...288 Uk It Fr De Nl Es Br run excite 11 D847M D847U RUN CSAFE 0SM00427AE M1_JP indd 288 02 07 2010 14 43 24...

Page 289: ...289 Br Es Nl De Fr It Uk 12 2 OFF 0 0SM00427AE M1_JP indd 289 02 07 2010 14 43 24...

Page 290: ...290 Uk It Fr De Nl Es Br run excite C B OFF 0 A B D A B C D 0SM00427AE M1_JP indd 290 02 07 2010 14 43 25...

Page 291: ...291 Br Es Nl De Fr It Uk r 0SM00427AE M1_JP indd 291 02 07 2010 14 43 25...

Page 292: ...292 Uk It Fr De Nl Es Br run excite 13 B A 2 1 4 1 2 B A 0SM00427AE M1_JP indd 292 02 07 2010 14 43 25...

Page 293: ...293 Br Es Nl De Fr It Uk 14 2 0SM00427AE M1_JP indd 293 02 07 2010 14 43 25...

Page 294: ...294 Uk It Fr De Nl Es Br run excite 2 80 cm 0SM00427AE M1_JP indd 294 02 07 2010 14 43 25...

Page 295: ...295 Br Es Nl De Fr It Uk Technogym 105 0011 2 10 1 6F 0120 061282 15 0SM00427AE M1_JP indd 295 02 07 2010 14 43 25...

Page 296: ...296 Uk It Fr De Nl Es Br run excite 16 10 C 70 C 20 90 17 Run Med 0SM00427AE M1_JP indd 296 02 07 2010 14 43 25...

Page 297: ...297 Br Es Nl De Fr It Uk 18 TGS ON I ON I OFF 0 TGS TGS TGS 03056011 18 0SM00427AE M1_JP indd 297 02 07 2010 14 43 25...

Page 298: ...298 Uk It Fr De Nl Es Br run excite OFF 0 ON I OFF 0 OFF 0 03056007 0SM00427AE M1_JP indd 298 02 07 2010 14 43 25...

Page 299: ...299 Br Es Nl De Fr It Uk 19 Run Run 5 CD R 0SM00427AE M1_JP indd 299 02 07 2010 14 43 25...

Page 300: ...300 Uk It Fr De Nl Es Br run excite Technogym s p a 0SM00427AE M1_JP indd 300 02 07 2010 14 43 25...

Page 301: ...301 Br Es Nl De Fr It Uk 20 Polar T31 80 cm 2 0SM00427AE M1_JP indd 301 02 07 2010 14 43 25...

Page 302: ...40 136 5 133 129 5 126 122 5 119 115 5 112 108 5 143 5 140 136 5 133 129 5 126 122 5 119 115 5 112 108 5 184 5 180 175 5 171 166 5 162 157 5 153 148 5 144 139 5 184 5 180 175 5 171 166 5 162 157 5 153...

Page 303: ...303 Br Es Nl De Fr It Uk 30 114 60 133 70 133 70 171 90 90 0SM00427AE M1_JP indd 303 02 07 2010 14 43 25...

Page 304: ...304 Uk It Fr De Nl Es Br run excite 21 RUN 6 7km h 2 0SM00427AE M1_JP indd 304 02 07 2010 14 43 25...

Page 305: ...305 Br Es Nl De Fr It Uk A 2 B C D B D C A 0SM00427AE M1_JP indd 305 02 07 2010 14 43 25...

Page 306: ...306 Uk It Fr De Nl Es Br run excite F G F H H G H F 0SM00427AE M1_JP indd 306 02 07 2010 14 43 26...

Page 307: ...Nl De Fr It Uk 308 309 1 312 2 313 3 314 4 317 5 319 6 320 7 321 8 322 9 323 10 325 11 326 12 327 13 330 14 331 15 333 16 334 17 334 18 335 19 Run 337 20 339 21 342 0SM00427AE M1_ZH indd 307 02 07 201...

Page 308: ...308 Uk It Fr De Nl Es Br run excite 0SM00427AE M1_ZH indd 308 02 07 2010 15 30 06...

Page 309: ...309 Br Es Nl De Fr It Uk RUN D847M D847U RUN RUN RUN RUN Technogym RUN 0SM00427AE M1_ZH indd 309 02 07 2010 15 30 06...

Page 310: ...310 Uk It Fr De Nl Es Br run excite RUN 0SM00427AE M1_ZH indd 310 02 07 2010 15 30 06...

Page 311: ...311 Br Es Nl De Fr It Uk RUN RUN I ON 0 OFF RUN Technogym RUN 0SM00427AE M1_ZH indd 311 02 07 2010 15 30 06...

Page 312: ...40 Vac 2200 VA 50 60 Hz PesoMax 150kg class IA 200 240 Vac 2200 VA 50 60 Hz MAN TECHNOGYM L I B A C H G D F TECHNOGYM S p A Gambettola FC MADE IN ITALY RUN MED CE 200 240 Vac 2200 VA 50 60 Hz PesoMax...

Page 313: ...313 Br Es Nl De Fr It Uk 2 A B C D F E G H I TGS TGS L 900 700 G B E C A E H F H F I D L L 0SM00427AE M1_ZH indd 313 02 07 2010 15 30 07...

Page 314: ...314 Uk It Fr De Nl Es Br run excite 3 2190 mm 936 mm 1493 mm 0SM00427AE M1_ZH indd 314 02 07 2010 15 30 07...

Page 315: ...315 Br Es Nl De Fr It Uk Run Med 200 240V D847M 200 240 50 60 2200 194 428 220 485 0 4 25 0 18 80 IP 20 5 C 30 C 2 4 I B BF 120 265 0SM00427AE M1_ZH indd 315 02 07 2010 15 30 07...

Page 316: ...d 100 240V UL D847U 100 240 50 60 100 120 16 200 240 12 5 4400 6 194 428 220 485 100 0 4 16 0 25 10 120 0 4 19 0 25 12 200 240 0 4 25 0 25 13 7 0 18 80 IP 20 5 C 41 F 30 C 86 F 2 4 I B BF 120 265 0SM0...

Page 317: ...317 Br Es Nl De Fr It Uk 4 A B C D E A B C D E 0SM00427AE M1_ZH indd 317 02 07 2010 15 30 07...

Page 318: ...318 Uk It Fr De Nl Es Br run excite F F 0SM00427AE M1_ZH indd 318 02 07 2010 15 30 07...

Page 319: ...319 Br Es Nl De Fr It Uk 5 RUN 10 C 25 C 20 90 2x1 2 m 1 m 0SM00427AE M1_ZH indd 319 02 07 2010 15 30 07...

Page 320: ...320 Uk It Fr De Nl Es Br run excite RUN Technogym 6 0SM00427AE M1_ZH indd 320 02 07 2010 15 30 07...

Page 321: ...321 Br Es Nl De Fr It Uk 7 0SM00427AE M1_ZH indd 321 02 07 2010 15 30 07...

Page 322: ...322 Uk It Fr De Nl Es Br run excite A B 8 0SM00427AE M1_ZH indd 322 02 07 2010 15 30 07...

Page 323: ...323 Br Es Nl De Fr It Uk 9 A OFF 0 A 0SM00427AE M1_ZH indd 323 02 07 2010 15 30 07...

Page 324: ...324 Uk It Fr De Nl Es Br run excite A B ON OFF I 0 ON I OFF 0 C 230 100 100 120 120 230 200 240 A B C 0SM00427AE M1_ZH indd 324 02 07 2010 15 30 07...

Page 325: ...325 Br Es Nl De Fr It Uk 10 0SM00427AE M1_ZH indd 325 02 07 2010 15 30 07...

Page 326: ...326 Uk It Fr De Nl Es Br run excite 11 D847M D847U RUN CSAFE 0SM00427AE M1_ZH indd 326 02 07 2010 15 30 07...

Page 327: ...327 Br Es Nl De Fr It Uk 12 Technogym OFF 0 0SM00427AE M1_ZH indd 327 02 07 2010 15 30 08...

Page 328: ...328 Uk It Fr De Nl Es Br run excite C B Technogym OFF 0 A B D A B C D 0SM00427AE M1_ZH indd 328 02 07 2010 15 30 08...

Page 329: ...329 Br Es Nl De Fr It Uk r 0SM00427AE M1_ZH indd 329 02 07 2010 15 30 08...

Page 330: ...330 Uk It Fr De Nl Es Br run excite 13 A B B A 0SM00427AE M1_ZH indd 330 02 07 2010 15 30 08...

Page 331: ...331 Br Es Nl De Fr It Uk 14 Technogym Technogym Technogym Technogym Technogym 0SM00427AE M1_ZH indd 331 02 07 2010 15 30 08...

Page 332: ...332 Uk It Fr De Nl Es Br run excite 80 Technogym Technogym Technogym 0SM00427AE M1_ZH indd 332 02 07 2010 15 30 08...

Page 333: ...hnogym Technogym Technogym Technogym Technogym Technical Support Service via G Perticari 20 47035 Gambettola Forl ITALY tel 0547 650650 fax 0547 650150 email service technogym com 15 0SM00427AE M1_ZH...

Page 334: ...334 Uk It Fr De Nl Es Br run excite 16 10 C 70 C 20 90 17 Run Med 0SM00427AE M1_ZH indd 334 02 07 2010 15 30 08...

Page 335: ...335 Br Es Nl De Fr It Uk 18 TGS ON I ON I OFF 0 TGS TGS TGS 0SM00427AE M1_ZH indd 335 02 07 2010 15 30 08...

Page 336: ...336 Uk It Fr De Nl Es Br run excite OFF 0 ON I OFF 0 OFF 0 03056007 0SM00427AE M1_ZH indd 336 02 07 2010 15 30 08...

Page 337: ...337 Br Es Nl De Fr It Uk 19 Run Run 5 CD R 0SM00427AE M1_ZH indd 337 02 07 2010 15 30 08...

Page 338: ...338 Uk It Fr De Nl Es Br run excite Technogym s p a Technogym 0SM00427AE M1_ZH indd 338 02 07 2010 15 30 08...

Page 339: ...339 Br Es Nl De Fr It Uk 20 Polar T31 80 0SM00427AE M1_ZH indd 339 02 07 2010 15 30 09...

Page 340: ...40 136 5 133 129 5 126 122 5 119 115 5 112 108 5 143 5 140 136 5 133 129 5 126 122 5 119 115 5 112 108 5 184 5 180 175 5 171 166 5 162 157 5 153 148 5 144 139 5 184 5 180 175 5 171 166 5 162 157 5 153...

Page 341: ...341 Br Es Nl De Fr It Uk 30 114 60 133 70 133 70 171 90 90 0SM00427AE M1_ZH indd 341 02 07 2010 15 30 09...

Page 342: ...342 Uk It Fr De Nl Es Br run excite 21 Run 6 7 0SM00427AE M1_ZH indd 342 02 07 2010 15 30 09...

Page 343: ...343 Br Es Nl De Fr It Uk A B C D B D C A 0SM00427AE M1_ZH indd 343 02 07 2010 15 30 09...

Page 344: ...344 Uk It Fr De Nl Es Br run excite F G F H H G H F 0SM00427AE M1_ZH indd 344 02 07 2010 15 30 09...
Reviews: