background image

GB 5 

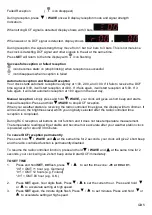
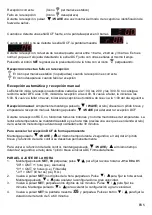
Failed Reception  

(  

  icon disappear)  

 
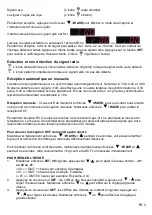
During reception, press  


 / 

WAVE

 once will display reception mode and signal strength 

Indication:- 

When strong DCF signal is detected, display shows with 3 bars 


When weak or no DCF signal is detected, display shows  

  or 


During reception, the signal strength may move from 1 bar to 2 bars to 3 bars. This is normal since 
the clock is detecting DCF signal and other signals in the air at the same time. 

Press 

SET

 will return to the time display with 

 icon flashing.  


Successful reception or failed reception 

  icon becomes static on (stop blinking) when reception is successful 

  icon disappears when reception is failed 


Automatic reception and Manual Reception 

Your clock starts automatic reception everyday at 1:00, 2:00, and 3:00. If it fails to receive the DCF 
time signal at 3:00, it will start reception at 4:00.  If it fails again, it will start reception at 5:00.  If it  
fails again, it will start automatic reception at 1:00 again in the next day.   


Manual reception

: simply press and hold 

/ WAVE, 

your clock will gives a short beep and starts 

manual reception. Press and hold 

/ WAVE

 to stop DCF reception.  

When your weather station is receiving the radio controlled time signal, the display will turn dimmer. It 
will resume to the brightness level which you originally selected after the radio controlled time 
reception is completed. 
 
During RCC reception, all buttons do not function and it does not take temperature measurement. 
The temperature readings will get stable and become more accurate after your weather station clock 
is powered up for around 30 minutes. 

 
To cancel DCF reception permanently  

Press and hold 

 /  WAVE

  and 


at the same time for 2 seconds, your clock will give 2 short beep 

and the radio controlled function is permanently disabled.  


To resume the radio controlled function, press and hold 

 /  WAVE

 and 


at the same time for 2 

seconds, your clock will give 2


short beep and will start DCF immediately.  

 
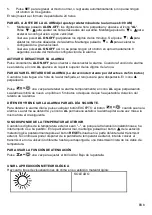
TO SET TIME 

1. 

Press and hold 

SET

00

 flash, press  

 /  

    to set the time zone: 

-01 or 00 or 01

“00” = GMT +1 hour (e.g. Germany) 
“01” = GMT +2 hours (e.g. Finland) 
“-01” = GMT 00 hour (e.g. U.K.) 
 

2. 

Press 

SET 

again, hour digits flash. Press 

 /  

 to set the current hour.  Press and hold   


or  

  to accelerate setting at high speed.  

3. 

Press 

SET

 again, the minute digits flash. Press 

 /  

  to set minutes. Press and hold   

 or  

  to accelerate setting at high speed.  

Summary of Contents for WS 6832

Page 1: ...DE 1 WS 6832...

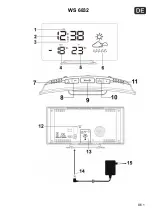
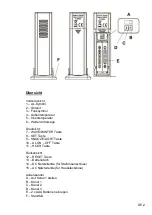
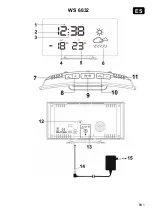
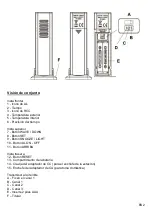
Page 2: ...raufsicht 7 WAVE RUNTER Taste 8 SET Taste 9 SNOOZE LIGHT Taste 10 AL ON OFF Taste 11 HOCH Taste R ckansicht 12 RESET Taste 13 Batteriefach 14 DC Netzteilende f r Stationsanschluss 15 AC Netzteilende f...

Page 3: ...ndteile des Ger ts Batteriehinweise Verwenden Sie nur Knopfzellen keine Akkus Legen Sie die Batterien unter Beachtung der richtigen Polarit t ein Entfernen Sie ersch pfte Batterien sofort Entfernen Si...

Page 4: ...Sie das Batteriefach 4 Entfernen Sie die Schutzfolie vom Wecker Ihr Ger t ist jetzt Einsatzbereit 5 Die Wetterstation wird in einigen Sekunden das Funksignal vom Au ensender empfangen Positionieren S...

Page 5: ...d halten Sie die WAVE Taste der Wecker gibt einen kurzen Signalton und startet den manuellen Suchlauf Dr cken und halten Sie die WAVE Taste um den Suchlauf zu beenden Wenn Ihr Wecker das Funkzeitsigna...

Page 6: ...llung schneller vorzunehmen 3 Dr cken Sie erneut die AL ON OFF Taste oder warten Sie 8 Sekunden ohne eine Taste zu dr cken um den Modus zu verlassen Ein und Ausschalten des Alarms Dr cken Sie einmal d...

Page 7: ...en Sie die Taste auf dem Wecker dann entnehmen Sie die Batterien des Au ensenders und setzen diese wieder ein Bekommt Ihr Wecker weiterhin keine Daten vom Au ensender versuchen Sie ihn an einem andere...

Page 8: ...GB 1 WS 6832...

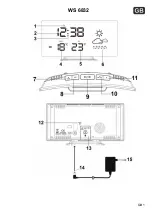
Page 9: ...7 WAVE DOWN button 8 SET button 9 SNOOZE LIGHT button 10 AL ON OFF button 11 UP button Back view 12 RESET button 13 Battery compartment 14 DC adapter plug for station socket 15 AC adapter plug for hou...

Page 10: ...ies not rechargeable batteries Install batteries correctly by matching the polarities Remove exhausted batteries immediately Remove batteries when not in use Do not recharge and do not dispose of batt...

Page 11: ...outdoor sensor in few seconds Then place your outdoor sensor in a dry and shaded area outdoor 4 Peel off the protective label on the front Your alarm clock is ready to work for you 5 After your alarm...

Page 12: ...nual reception Press and hold WAVE to stop DCF reception When your weather station is receiving the radio controlled time signal the display will turn dimmer It will resume to the brightness level whi...

Page 13: ...s to exit alarm setting mode TO TURN ON OR OFF YOUR ALARM Single press AL ON OFF to turn on or off the alarm When the alarm function is turned on the AL icon appears on top of the time digits TO USE S...

Page 14: ...nstall batteries to your outdoor transmitter If you continue to lose the outdoor temperature display try placing the transmitter in a different location until you have smooth transmission of temperatu...

Page 15: ...FR 1 WS 6832 FR...

Page 16: ...ssus 7 Bouton WAVE DOWN 8 Bouton SET 9 Bouton SN OOZE LIGHT 10 Bouton AL ON OFF 11 Bouton UP Vue arri re 12 Bouton RESET 13 Compartiment piles 14 Fiche adaptateur DC pour prise de station 15 Fiche ada...

Page 17: ...ant le sens des polarit s Remplacez toujours toutes les piles en m me temps Ne combinezpas des piles usag es avec des piles neuves Retirezimm diatement les piles d charg es de l appareil Retirezles pi...

Page 18: ...condes que la station re oi ve le signal de donn es de son d tecteur d ext rieur Placez ensuite le d tecteur l ext rieur dans un endroit sec et ombrag 4 Retirez le film pr otecteur sur le devant La st...

Page 19: ...fit de maintenir enfonc e W AVE pour que votre r veil mette un bip court et commence l a r ception manuelle Maintenez enfonc e W AVE pour arr ter la r ception DCF Pendant la r ception RCC toutes l es...

Page 20: ...nutes Lorsque l heure correspond celle du r veil programm votre horloge sonne pour vous r veiller Le symbole AL se met clignoter Appuyez une fois sur une fois pour arr ter temporairement l alarme l ic...

Page 21: ...auxconditi ons m t o actuelles l ext rieur EN CAS D E PANNE Si le r veil indique des i nfor mations ou des chiffres erron s il peut tre affect par des d charges lectrostatiques ou des interf rences p...

Page 22: ...ES 1 WS 6832 ES...

Page 23: ...Bot n WAVE DOWN 8 Bot n SET 9 Bot n SNOOZE LIGHT 10 Bot n AL ON OFF 11 Bot n ARRIBA Vista trasera 12 Bot n RESET 13 Compartimiento de la bater a 14 Clavija del adaptador de CC para el enchufe de la es...

Page 24: ...er as Coloque las bater as correctamente haciendo coincidirla polaridad Reemplace siempre el juego completo de bater as Nunca mezcle bater as usadas y nuevas Quite las bater as gastadas inmediatamente...

Page 25: ...S lo un sensor es admisible por la estaci n La estaci n recibir se al de datos procedente del sensor de exteriores en unos cuantos segundos Entonces coloque el sensor de exteriores en un rea en el ext...

Page 26: ...l reloj ofrecer un piti do breve y empezar la recepci n manual Mantenga pulsado W AVE para detener la recepci n DCF Durante la recepci n RCC no funcionan todos los botones y no toma mediciones de temp...

Page 27: ...a la hora de la alar ma fijada el rel oj sonar para despertarlo El icono AL parpadear Pulse una vez para detener l a alar ma temporalmente el icono AL sigue parpadeando La alarma emitir de nuevo un p...

Page 28: ...PROBLEM AS En el caso de que su reloj muestre i nfor maci n o d gitos sin sentido puede ser que est siendo afectado por descargas el ectroest ticas o por interfer encias de otros dispositi vos Pulse...

Page 29: ...NL 1 WS 6832 NL...

Page 30: ...venaanzicht 7 WAVE DOWN knop 8 SET knop 9 SNOOZE LIGHT knop 10 AL ON OFF knop 11 UP knop Achter aanzicht 12 RESET knop 13 Batterijvak 14 DC adapterstekker voor stationstekker 15 Adapterstekker voor hu...

Page 31: ...aadbare batterijen Installeer batterijen correct volgens de pol ariteitmar keringen Vervang altijd een volledige set batterijen Combi neer nooit gebrui kte en nieuwe batterijen Verwijder onmiddellijk...

Page 32: ...sensor wordt ontvangen door het station Het stati on zal binnen enkele seconden het gegevenssignaal vanaf de buitensensor ontvangen Plaats de bui tensensor ver volgens buitenshuis op een dr oge plek i...

Page 33: ...5 00 Als het nog een keer mislukt zal de automatische ontvangst weer om 1 00 de volgende dag gestart Handmatige ontvangst u hoeft sl echts W AVE ingedrukt te houden uw klok zal een korte pieptoon lat...

Page 34: ...al het AL pictogram verschijnen boven de tijdsgetallen HET SLUIMERALARM GEBRUIKEN standaard sluimerduur is 5 minuten Wanneer de tijd uw ingestelde alarmtijd berei kt zal uw kl okhet alarm l aten klink...

Page 35: ...iten PROBLEEMOPLOSSING In het geval dat uw kl okonver klaarbare i nfor mati e of cijfers weergeeft kan dit liggen aan elektrostatische ontlading of i nterferenti e door andere apparatuur Druk op de to...

Page 36: ...IT 1 WS 6832 IT...

Page 37: ...e WAVE DOWN 8 Pulsante SET 9 Pulsante SNOOZE LIGHT 10 Pulsante AL ON OFF 11 pulsante UP Vista posteriore 12 Pulsante R ESET 13 Scomparto della batteria 14 Spina adattatore CC per presa di stazione 15...

Page 38: ...Installare le batterie correttamente rispettando le polarit Sostituire sempre il set completo di batterie Non mescol are mai batterie usate e nuove Rimuovere immediatamente l e batterie scariche Rimu...

Page 39: ...io del van o b atteria Un solo sensore ricevibile da parte della stazione La stazione ricever il segnal e dati dal sensore esterno i n pochi secondi Quindi posizionare il sensore esterno in un area as...

Page 40: ...cezione manuale basta premere e tenere premuto W AVE l orologio emetter un breve bip e avvier la ricezione manuale Premere e tenere premuto W AVE per sospendere l a ricezione DCF Durante la ricezione...

Page 41: ...SNOOZE la durata predefinita dello snooze di 5 minuti Quando l orario raggiunge l orario impostato per la sveglia l orologio emette un bi p per svegliarti L icona AL l ampegger Premere una volta per...

Page 42: ...RISOLUZIONE DEI PROBLEMI Nel caso i n cui l orologio mostri delle i nfor mazioni o cifr e errate ci potrebbe essere influenzato da interferenze o scariche elettrostatiche provenienti da altri disposit...

Page 43: ...CZ 1 WS 6832 CZ...

Page 44: ...WAVE DOWN 8 Tla tko SET 9 Tla tko SNOOZE LIGHT 10 Tla tko AL ON OFF 11 Tla tko UP Zp tn pohled 12 Tla tko RESET 13 Prostor pr o baterie 14 Konektor DC adapt ru pro z suvku stanice 15 z str ka s ov ho...

Page 45: ...lick baterie Nepou vejte dob jec baterie Baterie vkl dejte spr vn odpov daj c pol aritou V dy vym te kompletn sadu bateri Nikdy nem chejte pou it a nov baterie Okam it odstra te vybit baterie Baterie...

Page 46: ...ouze jedno idlo je pohled vkou u stanice 4 Stanice za ne za p r sekund p ij mat datov sign l z venkovn ho idla Potom um st te venkovn idlo na such a sti nn venkovn m sto 5 Jakmile bud k p ijme informa...

Page 47: ...em stiskn te a podr te tla tko W AVE bud k kr tce p pne a spust se r e im manu l n ho p jmu Stiskem a podr en m tl a tka W AVE zastav te DCF p jem B hem p jmu RCC r diem ovl dan hodiny nefunguj dn tla...

Page 48: ...pnete nebo vypnete Kdy je funkce bud ku zapnut objev se nad slicemi asu i kona AL POU IT OPAKOVAN HO BUZEN v choz doba opakovan ho buzen je 5 minut Jakmile bud k dos hne nastaven ho asu buzen ozve se...

Page 49: ...shodovat se sou asn m stavem venkovn ho po as E EN PROBL M V p pad e hodiny ukazuj irelevantn i nfor mace nebo slice mohou b t ovlivn ny elektrostatick m v bojem nebo ru en m z jin ch p stroj Stiskn t...

Page 50: ...PL 1 WS 6832 PL...
Page 51: ...7 Przycisk WAVE DOWN 8 Przycisk SET 9 Przycisk SNOOZE LIGHT 10 PrzyciskAL ON OFF 11 PrzyciskUP Widokz ty u 12 PrzyciskRESET 13 Komora baterii 14 Wtyczka adaptera pr du sta ego dla gniazda stacji 15 W...

Page 52: ...ia do ognia gdy mo e wybuchn Nie otwiera obudowy i nie i ngeruj w wewn trzne cz ci urz dzeni a Ostrze enia bezpiecze st wa dot ycz ce baterii U ywa tyl ko baterii alkalicznych Nie wolno u ywa akumulat...

Page 53: ...i z ty u czujni ka zewn trznego Upewni si e przycisk wybieraj cy kana u j est ustawiony w pozycji 1 pozycja g rna nast pnie w o y 2 x baterie AAA nie znajduj si w dostawi e do czujni ka zewn trznego p...

Page 54: ...z 1 00 2 00 i 3 00 Je li nie uda si odbi r sygna u DCF o godz 3 00 kol ejny odbi r rozpocznie si o godz 4 00 Je li nie uda si ponownie kol ejny odbi r rozpocznie si o godz 5 00 Je li znowu si nie uda...

Page 55: ...I W Y CZANIE ALARMU Nacisn jednokrotnie przycisk AL ON OFF aby w czy lub wy czy alarm Gdy budzi kjest w czony i konka AL jest widoczna nad cyframi godziny KORZYSTANIE Z ALARMU DRZEMKI domy lny czas dr...

Page 56: ...osferycznymi na zewn trz ROZW I ZYW ANIE PROBLEM W Je li zegar pokazuj e nieprawid owe informacj e lub cyfr y mo e to oznacza wp yw roz adowania elektrostatycznego lub zak ce ze stronyi nnych urz dze...

Reviews: