background image


15

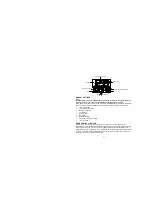
TO INSTALL AND REPLACE BATTERIES IN THE MOONPHASE WALL CLOCK 

The Moonphase wall clock uses 2 x AA, IEC LR6, 1.5V batteries. To install and replace the 
batteries, please follow the steps below:  
1. 

Insert finger or other solid object in the space at the bottom center of the battery 
compartment and lift up to remove the cover. 

2. 

Insert batteries observing the correct polarity (see marking inside battery compartment). 

3. 

Replace compartment cover. 

DO NOT SET THE CLOCK. 


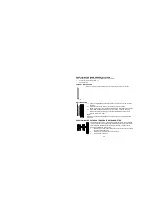
TO INSTALL AND REPLACE BATTERIES IN THE TEMPERATURE 
TRANSMITTER 

The transmitter uses 2 x AAA, IEC LR3, 1.5V batteries. To install and replace the batteries, 
please follow the steps below: 
1. 

Remove the cover. 

2. 

Insert the batteries, observing the correct polarity (see marking inside battery 
compartment).


3. 

Replace the battery cover on the unit. 

Alkaline batteries are recommended for use in both units. Avoid using rechargable 
batteries. 


SETTING UP: 

1. 

Insert the 2 x AAA, IEC LR3, 1.5V batteries into the transmitter (See 

“To install and 

replace batteries in the Temperature Transmitter”

 above). 

2. 

Within 3 minutes, insert 2 x AA, IEC LR6, 1.5V batteries into the Moonphase wall clock as 
indicated above (see "

To install and replace batteries in the Moonphase wall clock

“ 

above). 

3. 

Once the batteries are in place, all segments of the LCD will light up briefly and “03” will 
appear on LCD 1.  Then the indoor and outdoor temperature - -.-°C, the time as -:--, the 
date as 1/1, and weekday will be displayed. 

4. 

Do not press any buttons for 10 minutes 

5. 

The Moonphase wall clock will start receiving data from the transmitter. The remote 
temperature will then be displayed on the Moonphase wall clock. If the outdoor 
temperature is not displayed 90 seconds after inserting the batteries into the receiver, all 
batteries are needed to be removed and wait for at least 1 minute for reset from step 1. 


6. 

The DCF time code reception will automatically start. This takes typically between 3 - 5 
minutes in good conditions. This time period is an excellent opportunity to locate the 

Summary of Contents for WS-8118

Page 1: ...snooze function Calendar display Weekday display 4 languages to choose from German English French and Spanish Display 12 Moon phases throughout the year Time zone setting C or F temperature display s...

Page 2: ...TING UP 1 Insert the 2 x AAA IEC LR3 1 5V batteries into the transmitter See To install and replace batteries in the Temperature Transmitter above 2 Within 3 minutes insert 2 x AA IEC LR6 1 5V batteri...

Page 3: ...ent of changing batteries of the unit ensure that the batteries do not spring free from the contacts Always wait at least 1 minute after removing the batteries before reinserting otherwise start up an...

Page 4: ...ekday setting 12 24 hour time display setting C or F setting RADIO CONTROLLED TIME The time base for the radio controlled time is a Cesium Atomic clock operated by the Physikalisch Technische Bundesan...

Page 5: ...ankfurt transmitter During nighttime the atmospheric disturbances are usually less severe and reception is possible in most cases A single daily reception is adequate to keep the accuracy deviation be...

Page 6: ...t setting 1 Set the desired month by use of the key 2 Press and release the SET key to move to the mode Date Setting DAY SETTING 1 The digits for the day will start flashing on LCD2 Default setting 1...

Page 7: ...ing mode 1 Hold the ALM key for 2 seconds The hour digits start flashing 2 Press the key to set the hour 3 Press and release the ALM key to set the minutes The minute digits start flashing 4 Press and...

Page 8: ...e cold temperatures 433MHz RECEPTION CHECK FOR OUTDOOR TEMPERATURE TRANSMITTER The Moonphase wall clock will receive the temperature data within 4 minutes If the temperature data is not being received...

Page 9: ...hird time and the display will now show the indoor temperature outdoor temperature date seconds 4 Press the key a fourth time and the display will return to the normal display of indoor temperature ou...

Page 10: ...hase wall clock onto the screws using the hanging holes on the backside Gently pull the Moonphase wall clock down to lock the screws into place Note Always ensure that the Moonphase wall clock locks o...

Page 11: ...Avoid placing the units in areas prone to vibration and shock as these may cause damage Avoid areas where the units can be exposed to sudden changes in temperature i e direct sunlight extreme cold and...

Page 12: ...in unauthorized grounds strongly damages the environment Please contact your local or and regional authorities to retrieve the addresses of legal dumping grounds with selective collection All electron...

Page 13: ...d without written consent of the manufacturer R TTE DIRECTIVE 1999 5 EC Summary of the Declaration of Conformity We hereby declare that this wireless transmission device does comply with the essential...

Reviews: