background image


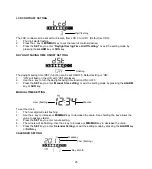
25 

Weekday


Year (flashing)


Day. Month.


LCD CONTRAST SETTING 


The LCD contrast can be set within 8 levels, from LCD 0 to LCD 7 (Default is LCD 3):  
1. 

The digit starts flashing 

2. 

Press the 

+

 key or 

MIN/MAX

 key to set the level of contrast desired.  

3. 

Press the 

SET

 key to enter 

“Daylight Saving Time On/Off setting,” 

or exit the setting mode by 

pressing the 

ALARM

 key or 

SUN

 key. 


DAYLIGHT SAVING TIME ON/OFF SETTING 


The daylight saving time (DST) function 

can be set ON/OFF. Default setting is “ON”:


1. 

“ON” will flash on the LCD with "dSt" displayed. 

2. 

Use the 

+

 key to turn the daylight saving time function ON or OFF. 

3. 

Press the 

SET

 key to enter


Manual Time setting

” or exit the setting mode by pressing the 

ALARM


key or 

SUN

 key. 


MANUAL TIME SETTING


To set the clock: 
1. 

The hour digit will start flashing.  

2. 

Use the 

+

 key to increase or 

MIN/MAX

 key to decrease the value. Keep holding the key allows the 

value to advance faster. 

3. 

Press the 

SET

 key to enter


minute setting.  

4. 

The minute will be flashing. Use the 

+

 key to increase or 

MIN/MAX

 key to decrease the value. 

5. 

Press the 

SET

 key to enter


Calendar Setting

” or exit the setting mode by pressing the 

ALARM

 key 

or 

SUN

 key. 


CALENDAR SETTING 


Minutes


Hour (flashing)


Digit flashing 


Flashing 


Summary of Contents for WS 9257

Page 1: ...ing of the weather station together with the optimum benefit of all its features FEATURES The weather station 24 hour time display seconds displayed by pressing the SUN key Weekday day and month displ...

Page 2: ...ies need to be replaced the low battery symbol will appear on the LCD To install and replace the batteries please follow the steps below 1 Remove the cover 2 Insert batteries observing the correct pol...

Page 3: ...nformation are not displayed on the LCD after 60 seconds remove the batteries and wait for at least 60 seconds before reinserting them Once the indoor data is displayed user may proceed to the next st...

Page 4: ...nd hold the key for 3 seconds to reset ALL indoor outdoor MAX MIN temperature recordings to current readings To stop the alarm sound ALARM key To activate deactivate the alarm and display alarm time P...

Page 5: ...e now MANUAL SETTINGS The following settings can be changed when pressing the SET key LCD contrast Daylight saving time DST ON OFF Manual time Calendar Relative air pressure reference value Press and...

Page 6: ...CD with dSt displayed 2 Use the key to turn the daylight saving time function ON or OFF 3 Press the SET key to enter Manual Time setting or exit the setting mode by pressing the ALARM key or SUN key M...

Page 7: ...R PRESSURE REFERENCE VALUE SETTING The default relative pressure value is 1013 hPa 29 92 inHg This can be manually set to another value within the range of 960 1040 hPa 28 35 30 72 inHg for a better r...

Page 8: ...ay 2 Press the SUN key again will display the City selected See LOCATION SETTNG FOR SUNRISE SUNSET TIME 3 Press the SUN key again to go back to normal date display ALARM SETTING To set the daily alarm...

Page 9: ...ation to collect air pressure data at a constant altitude and therefore result in a more accurate forecast Common to weather forecasting absolute accuracy cannot be guaranteed The weather forecasting...

Page 10: ...eather is expected to get worse from the present time 0h Note For accurate barometric pressure trends the weather station should operate at the same altitude for recordings i e it should not be moved...

Page 11: ...al reception indicator TO VIEW THE MIN MAX TEMPERATURE DATA Press the MIN MAX key several times to view the MIN MAX indoor and outdoor temperature sequentially Note the outdoor MIN MAX temperature rec...

Page 12: ...ximity of metal window frames 3 Using other electrical products such as headphones or speakers operating on the same signal frequency 868 MHz may prevent correct signal transmission and reception 4 Ne...

Page 13: ...e location POSITIONING THE THERMO HYGRO TRANSMITTER Mounting at a sheltered place Avoid direct rain and sunshine The thermo hygro transmitter can be placed onto any flat surface or wall mount using th...

Page 14: ...erature measuring range Indoor 9 9 C to 59 9 C with 0 1 C resolution 14 2 F to 139 8 F with 0 2 F resolution OF L displayed if outside this range Outdoor 39 9 C to 59 9 C with 0 1 C resolution 39 8 F...

Page 15: ...nual is highly recommended for the benefit of the user This product must however not be thrown in general rubbish collection points The manufacturer and supplier cannot accept any responsibility for a...

Reviews: