C
Copyright Technolog Ltd. 2017. All rights reserved.
Information contained in this document subject to
change without prior notice.
Sheet 43 of 43
Technolog Limited,
Ravenstor Road,
Wirksworth,
DE4 4FY,
United Kingdom
T: +44 (0) 1629 823611
E: techsupport@technolog.com
www.technolog.com
DMR No.: 7504
2099PM9000 Rev. B
Installation / maintenance: Local Wi-Fi communications
Step 2
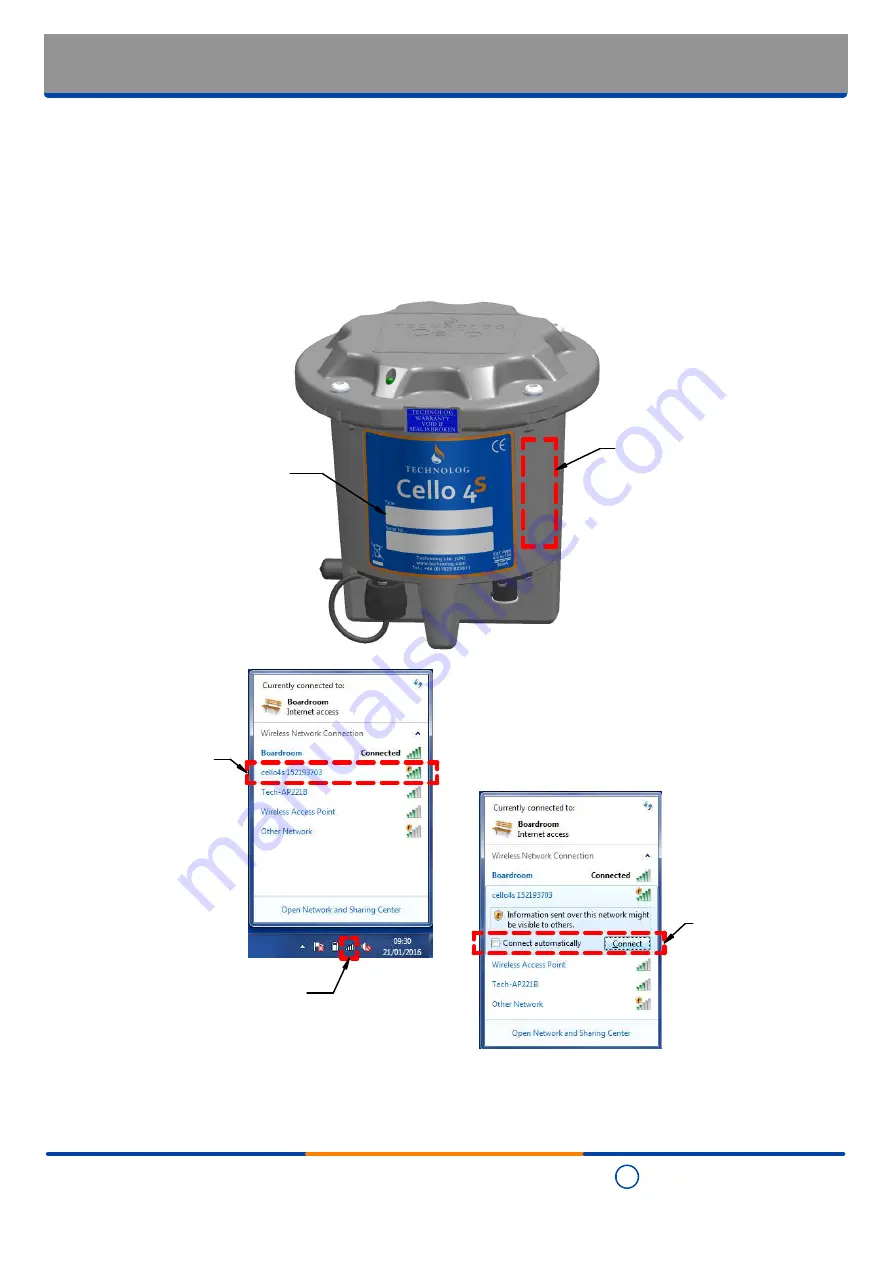
Swipe a magnet along this
section of the Cello 4S
enclosure - this should
activate the Wi-Fi
functionality
Cello 4S can be supplied with the ability to wirelessly communicate locally with any device that has Wi-Fi connectivity
and a browser, for instance PCs, laptops, smart phones, tablets and other similar communcations devices - no
special software or 'apps' are needed for the basics.
If you are unsure whether or not a particular Cello 4S features the Wi-Fi build option check the 'Type' code on the
main product label - if it indicates ".../WF..." then that product does feature Wi-Fi functionality
Be aware that depending on territory, due to regulatory compliance issues it may not be possible to supply the
Cello 4S with the 'Wi-Fi' build option.
•
•
•
2
Step 3
On the communcations device,
click on the wireless network
icon to display available Wi-Fi
connections in the vicinity
Step 4
Select the "Cello 4s"
connection - note
there is a 120 second
(2 minutes) default
timeout for making the
initial connection (this
can be adjusted in
software between
0 - 255 seconds)
Step 5
Click on "Connect"
- the device will
now connect to the
Cello 4S via the
Wi-Fi network - note
there is a default
30 second inactivity
timeout (this can be
adjusted in software
between 0 - 255
seconds)
Step 1
If you are unsure whether
or not a particular Cello 4S
features the Wi-Fi build
option check the 'Type' code
on the main product label -
if it indicates ".../WF..." then
that product does feature
Wi-Fi functionality


