background image

6

CONNECTIONS

CAUTION : When you pull the plug out, make sure that the
unit has been turned to POWER STANDBY first.
Never disconnect the power with the unit on.

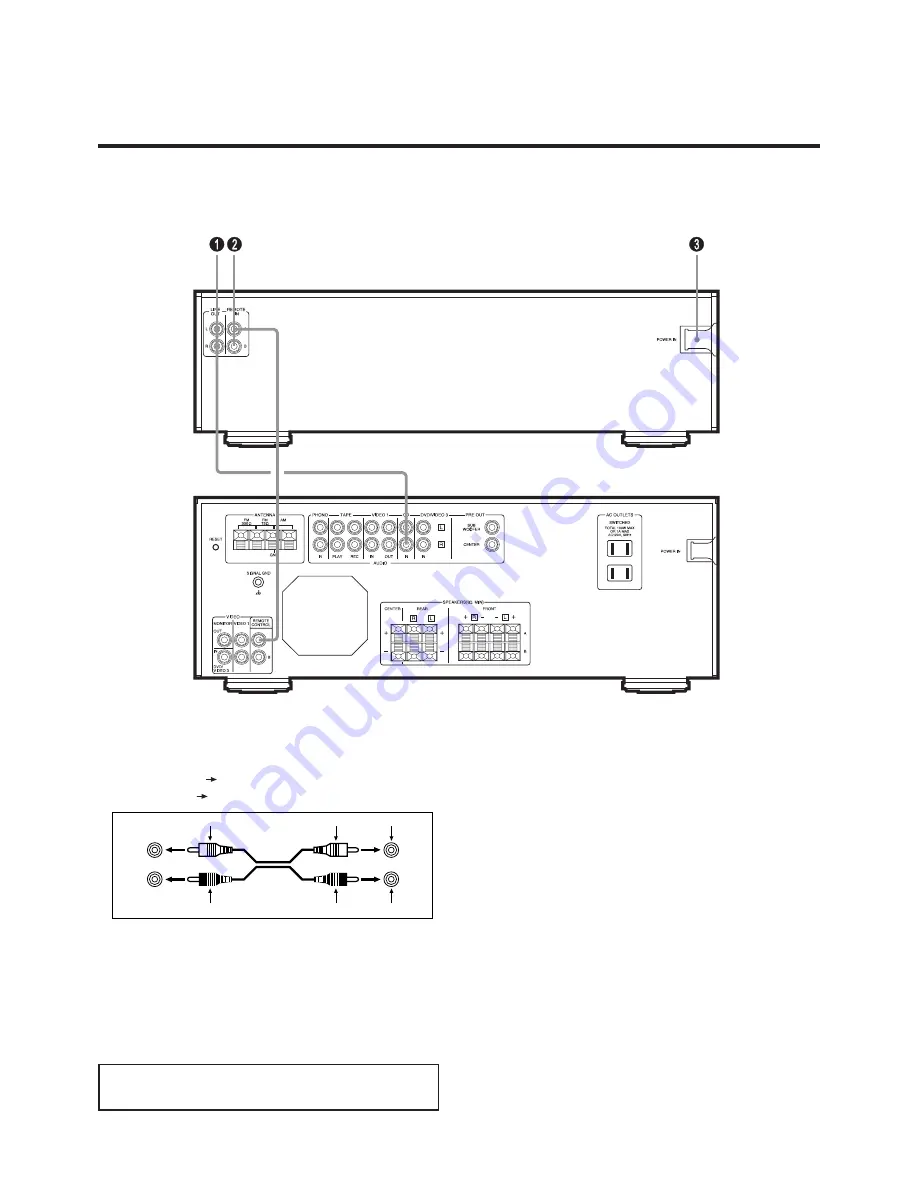
1. LINE OUT jacks

Connect these iacks to the CD input jacks on the amplifier :
White pin-plug

White jack (left)

Red pin-plug

Red jack (right)

2. REMOTE CONTROL jacks

Connect the supplied remote control cable to the REMOTE
CONTROL jacks as shown in the above diagram, Connect
the other end of the cable to the rear of the matching STR-
84 or PLR-85 receiver. The remote control functions of this
tape deck will only operate when connected to a matching
Techwood STR-84 or PLR-85 receiver.

3. AC power cord

Plug this AC power cord into a 120 Volt, 60 cycle grounded
AC wall socket or the AC OUTLETS on the rear of the
STR-84 or PLR-85 receiver.

IMPORTANT :

A remote control is not included with this CD changer.

White

L

White

L

White

Red

R

Red

R

Red

Summary of Contents for CDC-85

Page 1: ...age within the product s enclosure that may be of sufficient magnitude to constitute a risk of electric shock to persons The exclamation point within an equilateral triangle is intended to alert the user to the presence of important operating and maintenance servicing instructions in the litera ture accompanying the appliance WARNING TO PREVENT FIRE OR SHOCK HAZARD DO NOT EXPOSE THIS APPLIANCE TO ...

Page 2: ...ngs or placed in a built in installation such as a bookcase or cabinet that may impede the flow of air through the ventilation openings 14 Power Sources This product should be connected to a power supply only of the type described in the operating instructions or as marked on the appliance 15 Grounding or Polarization This product may be equipped with a polarized alternating current line plug a pl...

Page 3: ... used replacement parts specified by the manufacturer or have the same charac teristics as the original part Unauthorized substitutions may result in fire electric shock or other hazards 29 Safety Check Upon completion of any service or repairs to this product ask the service technician to perform safety checks to determine that the product is in proper operating condition 30 Heat The product shou...

Page 4: ...d This Before Operating 5 Handling the Discs 5 CONNECTIONS 6 CONTROLS AND INDICATORS 7 Front Panel 7 Display 8 OPERATIONS 9 Basic Operations 9 Repeat Play 9 Program Play 10 Time Display 11 Search function 12 Direct access to a track 12 TROUBLESHOOTING 13 SPECIFICATIONS 14 ...

Page 5: ...compact discs bearing the mark No other discs can be reproduced Always place the compact disc in the disc tray with the label facing upward compact discs can be played only on one side To remove a disc from its storage case press down on the center of the case and lift the disc out holding it care fully by the edges Fingermarks and dust should be carefully wiped off the disc s recorded surface wit...

Page 6: ...control cable to the REMOTE CONTROL jacks as shown in the above diagram Connect the other end of the cable to the rear of the matching STR 84 or PLR 85 receiver The remote control functions of this tape deck will only operate when connected to a matching Techwood STR 84 or PLR 85 receiver 3 AC power cord Plug this AC power cord into a 120 Volt 60 cycle grounded AC wall socket or the AC OUTLETS on ...

Page 7: ...isc compartment opens for disc loading With another touch the compart ment closes 11 Disc Skip button The Disc Skip button located inside on top of the disc tray is used to rotate the disc tray to its next disc playing position in a clockwise direction With each press of this button the tray will advance one disc position Ex 1 2 3 4 5 1 12 Play button Pressing the Play button will start playback o...

Page 8: ...d track time remaining on the disc or total time of the disc being played What type of time indica tion is selected by the time button 7 REPEAT play indicator ONE This lights up when repeat play of a single track is engaged This lights up when repeat play of one entire disc is engaged TTL This lights up when repeat play of all discs in the tray is engaged 8 OVER MARK This indicator lights up when ...

Page 9: ...s the button once more to cancel the repeat play function 1 Press the open close button The disc tray will slide out 2 Load a disc with its label side facing up 3 Press Disc Skip button to select another Tray 4 Load another disc to Tray Repeat as desired for up to 5 discs 5 Press the open close button to close the DISC TRAY 6 Press the Disc Skip button to select a disc 7 Select the track you want ...

Page 10: ...The programmed play sequence is not lost even if the unit is turned off The unit will stop automatically when all programmed tracks have finished playing and the programmed con tents disappear from the display It is possible to program with the disc tray opened Note If you press the program button while programming pro gramming will cease and change into the program recall mode If you stop playbac...

Page 11: ... disappears from the display Adding to any position 1 Select the program number which you want to add a new track to by pressing the program button 2 Enter the new track in the same way as normal programming Time Display Status of the display This unit can display four types of time mode on the time counter in the display 1 The elapsed time of the current track is automatically displayed when play...

Page 12: ...t 1 4 of the current volume Search is possible during pause mode but no sound is heard The CD changer will not search beyond the beginning or the end of the disc 2 Press the stop button to end normal play The play indicator goes off The time display shows total time of the disc Note The unit will stop when the last track on disc number 5 has finished playing Direct access to a Track Select a disc ...

Page 13: ...cable connections Incorrect amplifier operation The CD changer is subject to vibration or physical shock Defective or deeply scratched disc The CD changer is in the normal play mode Loose cable connections Remote cable is not connected to changer and or receiver Changer is not being used with compatible receiver Insert the power plug firmly into the AC outlet Reload the disc with the label side up...

Page 14: ... CIRC Demodulation 1 bit Pick up Section Type Non contact optical reading Lighting Source Semi conductor laser Wave Length 780 nm General Power Requirements 120 V AC 60 Hz Power Consumption 13 W Dimensions W x H x D 435 x 132 x 396 mm Weight net 6 8 kg Standard Accessories Audio Connection Cord x 1 Owner s manual x 1 Remote Control connection Cable x 1 Improvements may result in specifications and...

Page 15: ...WELTON U S A 11625 COLUMBIA CENTER DR SUITE 100 DALLAS TEXAS 75229 PHONE 972 243 5602 FAX 972 243 5958 KQX1A445Z ...

Reviews: