background image


   Operation/installation/service manual 

                                                MACERATOR TOILETS       

  Manuale di utilizzo / installazione / manutenzione                          

 TOILET MACERATRICI 

X-light / Privilege / Evolution / Breeze / E-Breeze / Silence Plus / Elegance / Saninautico / Prestige 


126 

www.thetfordmarine.com

  / 

TECMA SRL – Via Flaminia / Loc Castel delle Formiche/  05030 Otricoli (TR) /  Italy 

Manual rev 25.2014 


                                          ©TECMA SRL 


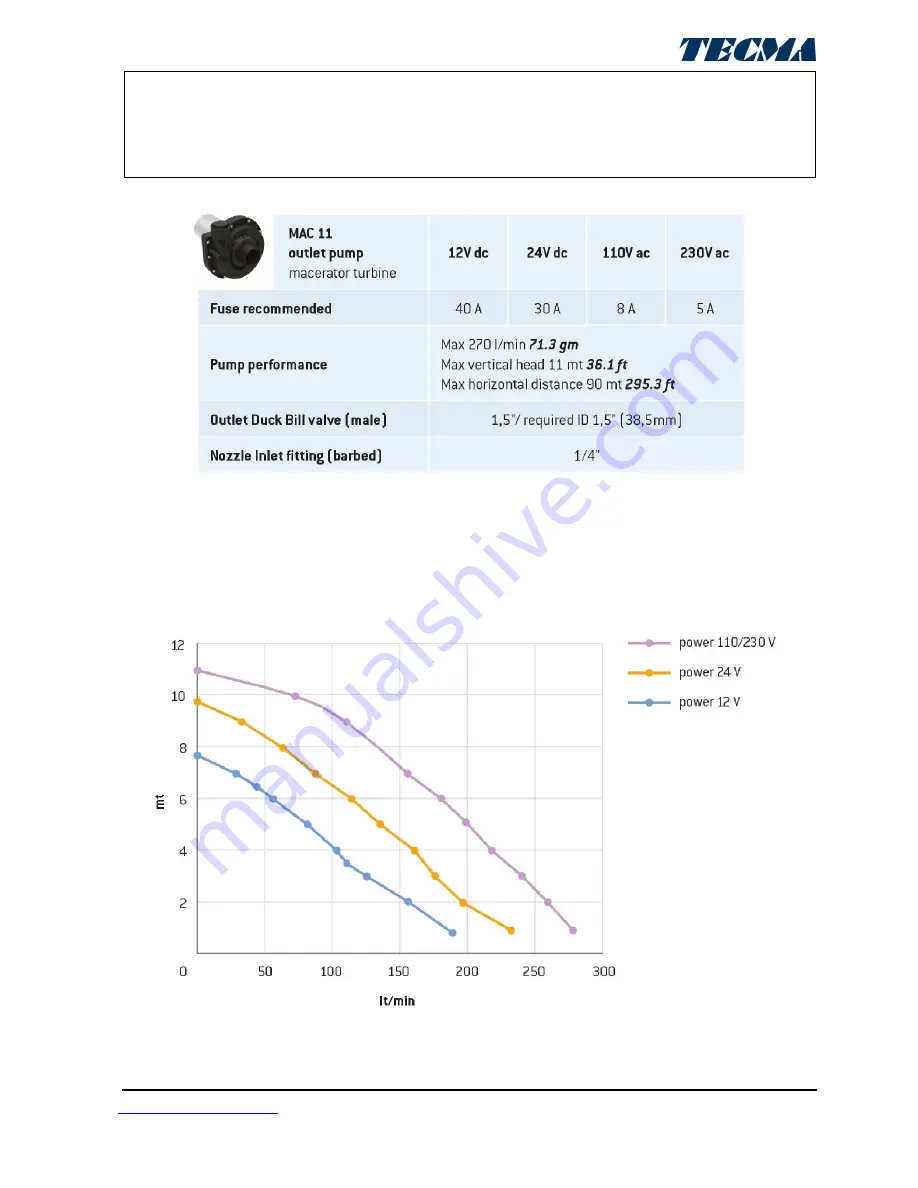
Nominal data – when designing the system consider the loss due to 90° elbows and other system particularities.                                   
The system should be as linear as possible.


V

alori nominali – tenere conto delle perdite di carico dovute alle curve a 90° e alle caratteristiche dell’impianto.   Mantenere l’impianto il 

più lineare possibile 


Summary of Contents for Breeze

Page 1: ...25 2014 TECMA SRL MANUALE D USO INSTALLAZIONE MANUTENZIONE Italiano 2 OPERATION INSTALLATION SERVICE MANUAL English 32 BEDIENUNGS INSTALLATIONS WARTUNGSHANDBUCH Deutsch 62 MANUEL D EMPLOI INSTALLATION MAINTENANCE Français 92 Toilette Maceratrici Macerator Toilets Mazerationstoiletten Sanitaires dilacérateurs ...

Page 2: ... 1 Un Pulsante pag 7 2 2 2 Due Pulsanti pag 7 2 3 Pannello di comando Argent pag 8 2 3 1 Un Pulsante pag 8 2 3 2 Due Pulsanti pag 8 2 4 Pannello di comando Touch pag 9 2 4 1 Un Pulsante pag 9 2 4 2 Due Pulsanti pag 9 2 5 Pannelli di comando con tecnologia SMART FLUSH pag 10 2 5 1 Premium pag 10 2 5 2 Premium Touch pag 11 2 5 3 Programmazione funzioni SMART FLUSH pag 12 2 5 3 1 Modalità navigazione...

Page 3: ...comando è sempre rosso pag 30 4 7 Gorgoglio pag 30 4 8 Perdite pag 30 4 9 Cattivi odori pag 30 5 0 DOMANDE FREQUENTI pag 31 5 1 Posso connettere più WC sulla stessa linea pag 31 5 2 Che tipo di manutenzione è richiesta pag 31 5 3 Che tipo di prodotti si possono utilizzare per la pulizia pag 31 5 4 Che tipo di tubo posso utilizzare pag 31 5 5 Che tipo di ricambi dovrei tenere a bordo pag 31 6 0 ELE...

Page 4: ... delle acque nere e di una pompa di immissione o di un elettrovalvola per il carico di acqua pulita Tutte le ceramiche contengono al loro interno una potente pompa maceratrice che provvede a spingere le acque nere negli appositi serbatoi di raccolta La triturazione avviene in una cavità apposita provvista di lame di acciaio posizionata prima della girante della pompa Il ciclo di scarico è azionato...

Page 5: ... intaccare irreversibilmente l integrità delle componenti in gomma del sistema pompa maceratrice valvole di non ritorno Si consiglia di utilizzare i prodotti Thetford in quanto specificatamente testati per questo tipo di sistemi Sui prodotti in carbonio o personalizzati in colori diversi dal bianco o pergamon evitare di utilizzare spugne abrasive o prodotti troppo aggressivi si consiglia di fare s...

Page 6: ... avvertenze c è il rischio di malfunzionamento infortunio danni ed eventuale perdita dell imbarcazione folgorazione Non apportare nessun cambiamento al prodotto Tecma ciò potrebbe comportare una eventuale perdita dell imbarcazione infortunio o folgorazione 2 0 FUNZIONAMENTO ED UTILIZZO 2 1 Pannello di comando All in one 2 1 1 Un pulsante Azionando il pulsante AFTER USE dopo l utilizzo si avvierà u...

Page 7: ... ciclo di lavaggio automatico al termine del quale il vaso sarà riempito con una piccola quantità d acqua pronta per il prossimo uso 2 2 2 Due pulsanti Azionare il pulsante BEFORE USE prima dell utilizzo Questo riempirà il vaso con una piccola quantità d acqua Azionare il pulsante AFTER USE dopo l utilizzo si avvierà un ciclo di lavaggio automatico al termine del quale il vaso rimarrà vuoto NOTA S...

Page 8: ...co al termine del quale il vaso sarà riempito con una piccola quantità d acqua pronta per il prossimo uso 2 3 2 Due pulsanti Azionare il pulsante BEFORE USE prima dell utilizzo Questo riempirà il vaso con una piccola quantità d acqua Azionare il pulsante FLUSH dopo l utilizzo si avvierà un ciclo di lavaggio automatico al termine del quale il vaso rimarrà vuoto NOTA Se si desidera sarà possibile re...

Page 9: ...tità d acqua Azionare il pulsante touch AFTER USE dopo l utilizzo si avvierà un ciclo di lavaggio automatico al termine del quale il vaso rimarrà vuoto NOTA Se si desidera sarà possibile regolare la quantità di acqua che viene utilizzata durante ogni ciclo di scarico direttamente sulla centralina di controllo remota ad esso collegata Infatti nella parte posteriore di quest ultima c è un apposito r...

Page 10: ...vaso rimarrà vuoto se in modalità marine rimarrà una piccola quantità d acqua se in modalità ormeggio Per passare da modalità ormeggio a modalità marine tenere premuto i due pulsanti contemporaneamente fino a che la spia LOCK OUT inizia a lampeggiare Questo vi farà cambiare modalità Il pannello di comando è equipaggiato di una spia a tre colori che indica il livello di riempimento del serbatoio ac...

Page 11: ...in modalità navigazione rimarrà una piccola quantità d acqua se in modalità ormeggio Per passare da modalità ormeggio a modalità navigazione tenere premuti i due pulsanti contemporaneamente fino a che la spia LOCK OUT inizia a lampeggiare Ciò vi farà cambiare modalità Il pannello di comando è equipaggiato di una spia a tre colori che indica il livello di riempimento del serbatoio acque nere Se il ...

Page 12: ...o In questo modosieviterannofuoriuscited acquaaccidentalidovutealmovimentodellabarcadurantelanavigazione Se si prevede di restare ormeggiati a lungo impostare il sistema in modalità ormeggio Dopo l utilizzo rimarrà una piccola quantità d acqua nella toilette in questo modo sarà sufficiente utilizzare un solo bottone per scaricare 2 Toccare il pulsante BEFORE USE PRIMA DELL USO prima di utilizzare ...

Page 13: ...ta per il prossimo utilizzo Cambiare la modalità di scarico dalla modalità navigazione alla modalità ormeggio Fig 1 Per impostazione predefinita il sistema è impostato in modalità navigazione Per passare dalla modalità navigazione alla modalità ormeggio 1 Premere contemporaneamente i pulsanti BEFORE USE PRIMA DELL USO e AFTER USE DOPO L USO per circa 3 secondi Il LED con la chiave lampeggerà per i...

Page 14: ... con la chiave lampeggerà per indicare che è stata attivata la modalità programmazione 2 Una volta raggiunto il livello d acqua desiderato rilasciare i pulsanti 3 Ora il sistema è in modalità navigazione NOTA al termine del ciclo se il sistema è in modalità navigazione la toilette rimarrà vuota se il sistema è in modalità ormeggio rimarrà una piccola quantità d acqua nella toilette MODALITÀ NAVIGA...

Page 15: ...a mano sul pannello per 15 secondi come illustrato fino a che la retroilluminazione inizia a lampeggiare 2 Si può pulire il pannello con un panno 3 Dopo 15 secondi i pulsanti verranno automaticamente riabilitati E possibile programmare il pannello Touch per avere la retroilluminazione a Sempre accesa b Sempre spenta c Attivata da un sensore di prossimita default Istruzioni per passare da un progra...

Page 16: ... per un breve periodo di tempo ATTENZIONE a non forzare la chiusura del coperchio in caso il vostro vaso fosse dotato di un sistema soft closing Il sistema è progettato per la chiusura automatica e una forza esterna potrebbe danneggiare irreversibilmente il meccanismo ATTENZIONE se il vostro vaso è munito di funzione bidet non oltrepassare il livello massimo di capienza del vaso stesso non è previ...

Page 17: ...tificata competenza e affidabilità Il rispetto delle norme vigenti in materia di impianti è necessario ATTENZIONE Pericoli di corto circuito incendio o allagamento Non considerare questi pericoli può portare alla perdita dell imbarcazione l infortunio o la morte Raccomandazioni Utilizzare sempre un fusibile dimensionato adeguatamente nei circuiti elettrici Prima di iniziare qualsiasi intervento di...

Page 18: ...sempre i gommini salvaceramica forniti Eventuali errori nel montaggio del vaso potrebbero nel tempo provocare movimenti impropri della ceramica con eventuali danni a cose o persone La toilet è stata disegnata per disporre solamente di rifiuti organici umani e carta igienica Non buttare mai altre tipologie di materiale ad esempio panno carta salviette umide profilattici assorbenti filo interdentale...

Page 19: ...cientemente al di sopra del wc Nel caso di wc installato al di sotto della linea di galleggiamento accertarsi ci sia spazio per installare una valvola di ventilazione necessaria all immissione e scarico ad una quota sufficientemente superiore ad essa nelle versioni SHORT ci sia spazio sufficiente per alloggiare il motore che fuoriesce al di sotto del vaso per 100 mm nel modello SANINAUTICO ci sia ...

Page 20: ...ltro dell elettrovalvola pulito Non far leva sulla valvola durante l avvitatura Non ostruire il foro pilota all uscita della valvola Deve essere disponibile l intera sezione della tubazione senza strozzamenti Osservare il campo di pressioni raccomandato vedi sezione 7 0 3 3 Pompa di immissione Montare la pompa di immissione in un luogo asciutto ventilato La pompa non può essere sommersa o esposta ...

Page 21: ...OUT Pannelli di comando A parte il pannello di comando All in One tutto integrato tutti i pannelli le altre versioni hanno una centralina di controllo che si può installare sia direttamente nel vaso sia in un recesso all esterno dove sia più conveniente Tutti pannelli di comando sono predisposti con appositi connettori elettrici Per gli schemi di connessioni di tutti i components si veda par 8 6 8...

Page 22: ...CI X light Privilege Evolution Breeze E Breeze Silence Plus Elegance Saninautico Prestige 22 www thetfordmarine com TECMA SRL Via Flaminia Loc Castel delle Formiche 05030 Otricoli TR Italy Manual rev 25 2014 TECMA SRL 3 4 4 Incasso per pannello di comando Touch Premium Touch 3 4 5 Incasso per pannello di comando premium ...

Page 23: ...ntralina tramite il cavo grigio nero Nel caso ci siano più centraline a bordo è necessario cablare insieme tutte le centraline e poi connettersi al sensore In caso di utilizzo di sensore con pressostato e pannello di comando premium è necessario installare per ogni toilet un adattatore STA Single Toilet Adapter Tutti I cavi dello STA sono 16awg 1 55mm lunghezza 25 cm La tensione nei cavi che prove...

Page 24: ...a Se non ci sono sensori installati connettere solamente D E alla centralina Se lo STA è vicino alla cassa è possibile estendere i cavi D E F G fino a 40mt Se lo STA è vicino alla toilet è possibile estendere i cavi A B C fino a 100mt Il led connected si accenderà ad intermittenza quando le connessioni sono eseguite correttamente Dipende sempre dal tipo di configurazione dell impianto elettrico AT...

Page 25: ...ssaria Avvitatore elettrico con inserto appropriato o cacciavite per le fascette inox Avvitatore elettrico o cacciavite per il serraggio delle viti di montaggio Seghetto alternativo per l esecuzione dello scasso per l alloggiamento del pannello di comando Chiave inglese regolabile per il serraggio dell elettrovalvola 3 7 IMPIANTI Alimentazione Ogni prodotto è provvisto sul retro di un apposita eti...

Page 26: ...RL ATTENZIONE Configurazione Wc B Vaso installato sopra il livello di galeggiamento è raccomandato montare UNA VALVOLA DI VENTILAZIONE per evitare fenomeni di sifonaggio che potrebbero generare cattivi odori Vedi esempio fig 1 Fig 1 ATTENZIONE La linea di galleggiamento presa in esame dovrà essere calcolata tenendo in considerazione i vari assetti durante la navigazione Vedi esempio fig 2 Fig 2 AT...

Page 27: ...avandini docce e altre utenze Quando si aziona il wc il pannello di comando attraverso la centralina apre l elettrovalvola e l acqua viene approvvigionata tramite l autoclave che dà pressione a tutto l impianto idraulico di bordo Schema in sezione 8 5 ATTENZIONE L impianto deve lavorare a una pressione interna consigliata di 3 bar ATTENZIONE Mantenere puliti i filtri di ogni elettrovalvola 3 7 1 2...

Page 28: ...da personale qualificato Per la scelta della sezione dei cavi tenere conto della lunghezza e dell assorbimento vedi sezione 7 0 Utilizzare i connettori forniti con il sanitario TECMA 3 7 2 IMPIANTO SINGOLO E MULTIPLO ACQUA SALATA 3 7 2 1 Impianto idraulico Il ciclo di scarico dei wc nautico TECMA utilizza acqua proveniente dall esterno tramite una presa a mare Schemi in sezione 8 1 8 2 Quando si a...

Page 29: ...e parzialmente bloccata Provare a scaricare ripetutamente se il problema persiste è necessario aprire ed ispezionare la pompa maceratrice Rivolgersi ad un service centre TECMA per assistenza qualificata Se il passaggio dell acqua è molto rumoroso specialmente alla fine dello scarico controllare la posizione dei manicotti 4 2 L acqua viene aggiunta ma la pompa non scarica Potrebbe essere un problem...

Page 30: ...nsore sia installato correttamente e cablato correttamente Qualora utilizzati i sensori TECMA pneumatici se la ventilazione del serbatoio acque nere non è dimensionato adeguatamente ad ogni scarico aumenterà la pressione all interno del serbatoio innescando il sensore Se il led rimane acceso dopo aver staccato il connettore grigio nero che collega il sensore alla centralina vuol dire che c è un pr...

Page 31: ...e il Thetford Tank Freshner per la pulizia dei serbatoi e delle tubature è consigliato 5 3 Si possono utilizzare prodotti acidi o aggressivi Le componenti plastiche del prodotto TECMA sono state testate con molti prodotti per la pulizia in commercio Evitare prodotti come aceto acetone trielina In generale evitare i solventi per non indebolire le gomme i gel e le schiume per non ostruire la valvola...

Page 32: ...s page 36 2 2 Multiframe control panel page 37 2 2 1 One button page 37 2 2 2 Two buttons page 37 2 3 Argent control panel page 38 2 3 1 One button page 38 2 3 2 Two buttons page 38 2 4 Touch control panel page 39 2 4 1 One button page 39 2 4 2 Two buttons page 39 2 5 Control panel with SMART FLUSH technology page 40 2 5 1 Premium page 40 2 5 2 Premium Touch page 41 2 5 3 SMART FLUSH function prog...

Page 33: ...ater left in the toilet page 60 4 6 The control panel LED is always red page 60 4 7 Gurgling page 60 4 8 Leaks page 60 4 9 Unpleasant odours page 60 5 0 F A Q page 61 5 1 Is it possible to connect several toilets to the same line page 61 5 2 What kind of maintenance is required page 61 5 3 What kind of products can I use for cleaning page 61 5 4 What kind of tube must be used page 61 5 5 Which spa...

Page 34: ...f a macerator pump to discharge blackwater and an inlet pump or solenoid valve for the clean water inlet All the ceramic toilets have an in built macerator pump which pushes blackwater to the blackwater tanks Shreddingoccursinaspecificcavityequippedwithsteelbladespositionedbeforethepumpimpeller The flushing cycle is activated from different models of control panels There are specific options avail...

Page 35: ...damage the rubber components of the pump macerator check valves We recommend using Thetford products as they are specifically tested for this type of systems Do not use aggressive products or abrasive sponges on carbon or coloured products other than white or pergamon We recommend applying a small amount of product to the rear of the toilet first to check its suitability WARNING Comply with the en...

Page 36: ... may result in loss of the property injuries or electrocution 2 0 OPERATING THE SYSTEM 2 1 All in one control panel 2 1 1 One button Press the AFTER USE button to start the automatic flush cycle after which the toilet will be refilled with a small amount of water ready for the next use 2 1 2 Two buttons Press the BEFORE USE button before using the toilet This will fill the toilet with a small amou...

Page 37: ...the next use 2 2 2 Two buttons Press the BEFORE USE button before using the toilet This will fill the toilet with a small amount of water Press the AFTER USE button after using the toilet This will start the automatic flush cycle which will empty the toilet NOTE It is also possible to adjust the amount of water used during every flushing cycle directly from the connected remote control unit A spec...

Page 38: ...h the toilet will be refilled with a small amount of water ready for the next use 2 3 2 Two buttons Press the BEFORE USE button before using the toilet This will fill the toilet with a small amount of water Press the FLUSH button after using the toilet This will start the automatic flush cycle which will empty the toilet NOTE It is also possible to adjust the amount of water used during every flus...

Page 39: ... fill the toilet with a small amount of water Press the AFTER USE touch button after using the toilet This will start the automatic flush cycle which will empty the toilet NOTE It is also possible to adjust the amount of water used during every flushing cycle directly from the connected remote control unit A specific regulator placed on its rear increases the amount of water if turned clockwise or...

Page 40: ...if the marine mode is enabled Alternatively a small amount of water will remain in the toilet if the mooring mode is enabled To switch from mooring mode to marine mode press and hold the two buttons at the same time until the LOCK OUT LED starts blinking This will change the mode The control panel is equipped with a 3 colour LED which indicates the blackwater tank level Refer to par 3 5 As soon as...

Page 41: ...tic flush cycle after which the toilet will be emptied if the sailing mode is enabled Alternatively a small amount of water will remain in the toilet if the mooring mode is enabled To switch from mooring mode to sailing mode press and hold both buttons until the LOCK OUT LED starts blinking This will change the mode The control panel is equipped with a 3 colour LED which indicates the blackwater t...

Page 42: ...r will be added to create a water trap This will avoid accidental water spilling caused by motion of the vessel during navigation Set the system to mooring mode if you plan on docking for a long period of time Water will remain in the toilet after use allowing you to flush by pressing a single button 2 Press the BEFORE USE button before using the toilet The solenoid valve will let in the desired a...

Page 43: ... next use 2 Using the toilet 4 Some water remains in the bowl ready for the next use Change flushing mode from sailing mode to mooring mode Fig 1 The system is set on sailing mode by default To switch from sailing mode to mooring mode 1 Press and hold the BEFORE USE and AFTER USE buttons simultaneously for approximately 3 seconds The lock LED will flash indicating that the programming mode is enab...

Page 44: ...r approximately 3 seconds The lock LED will flash indicating that the programming mode is enabled 2 Release both buttons when the desired water level has been reached 3 The system is now set to sailing mode NOTE at the end of the cycle the toilet remains empty if the system is set in sailing mode Alternatively a small amount of water remains in the toilet if the system is set in mooring mode SAILI...

Page 45: ...clean the Touch control panel 1 Place your hand on the panel for 15 seconds as shown in the figure until the backlight starts blinking 2 Clean the panel with a cloth 3 The buttons will be automatically enabled again after 15 seconds You can program the Touch panel to have the backlight a Always on b Always off c Activated with a proximity sensor default Instructions to switch from one program to a...

Page 46: ...at is unattended even for a short time WARNING do not force the cover to close if the toilet is equipped with a soft closing system The system is designed to close automatically and applying external force may irreversibly damage the mechanism WARNING if the toilet is equipped with a bidet function make sure not to exceed the toilet maximum level as there is no overflow drain Enable the macerator ...

Page 47: ...lified personnel with installing the hydraulic and electrical systems Comply with the system standards in force WARNING Danger of electric shock fire or flooding Failure to comply with these warnings may result in loss of property injury or death Recommendations Always use a fuse sized according to the electric circuits Before starting any maintenance operation make sure that the power supply is d...

Page 48: ...d ceramic protection rubber inserts Any toilet assembly errors may result in improper movements which may damage objects or injure persons The toilet is designed to dispose of human waste and toilet paper Never flush other types of materials e g paper towel wet wipes condoms sanitary pads dental floss etc Always use the screw caps ceramic protection rubber inserts and connectors supplied with the ...

Page 49: ...ng and rolling of the boat there is sufficient room for a vent valve to be installed above the toilet In the event the toilet is installed below the floating line make sure there is room for a vent valve to be installed above it The SHORT versions have enough room for the motor which extends 100 mm below the bowl The SANINAUTICO model has a minimum of 3 cm available to allow the cover to be opened...

Page 50: ...resulting from water impurities We recommend cleaning the solenoid valve filter regularly Do not force the solenoid valve when tightening it Do not obstruct the pilot hole at the valve outlet The entire piping section must be free from bottlenecks Comply with the recommended pressure range refer to section 7 0 3 3 Inlet pump Install the inlet pump in a dry and ventilated place The pump cannot be s...

Page 51: ...tricoli TR Italy Manual rev 25 2014 TECMA SRL 3 4 CUT OUT control panels Apart from the control panel All in One which integrates the controller in the wall interface all panels are equipped with a control unit that can be installed either directly in the toilet or in a recess outside if more convenient All control panels are fitted with specific electric connectors 3 4 1 Cut out for All in one co...

Page 52: ...ERATRICI X light Privilege Evolution Breeze E Breeze Silence Plus Elegance Saninautico Prestige 52 www thetfordmarine com TECMA SRL Via Flaminia Loc Castel delle Formiche 05030 Otricoli TR Italy Manual rev 25 2014 TECMA SRL 3 4 4 Cut out for Touch Premium Touch control panel 3 4 5 Cut out for Premium control panel ...

Page 53: ...control unit with the grey black wire In the presence of several control units on board you must wire all the control units together before connecting the sensor If a sensor with a pressure switch and premium control panel is used each toilet must be equipped with an STA Single Toilet Adapter adapter All STA wires are 16awg 1 55mm length equal to 25 cm The voltage of the cables coming from the sen...

Page 54: ...nstalled only connect D E to the control unit If STA is near the tank it is possible to extend wires D E F and G up to 40 m If STA is near the toilet it is possible to extend wires A B and C up to 100 m When properly connected the LED light CONNECTED will flash It always depends on the type of electrical system configuration WARNING In order to run properly the control unit of the premium control ...

Page 55: ... The sensor has a removable cover over the pressure sensitive adhesive pad 3 6 Equipment required Electric drill with insert or screwdriver for the stainless steel straps Electric drill or screwdriver to tighten the assembly screws Jig saw to make the control panel housing Adjustable wrench to tighten the solenoid valve 3 7 SYSTEM Power supply On the rear side of the product there is a label that ...

Page 56: ...ormiche 05030 Otricoli TR Italy Manual rev 25 2014 TECMA SRL WARNING Toilet configuration B Toilet installed above the floating level Install a VENT VALVE to prevent siphoning phenomena that may cause unpleasant odours See fig 1 Fig 1 WARNING The floating line must be calculated taking into consideration the various sailing trims See fig 2 Fig 2 WARNING Comply with the standards in force when desi...

Page 57: ...owers and other utilities When the toilet is used the control panel opens the solenoid valve through the control unit The water is supplied via the autoclave which pressurises the entire hydraulic system on board Diagram in section 8 5 WARNING The recommended system operating pressure is equal to 3 bar WARNING Keep the filters of every solenoid valve clean 3 7 1 2 12V 24V electrical system Diagram...

Page 58: ...er control unit WARNING electrical systems must be connected by qualified personnel To choose the wire section consider the length and power consumption see section 7 0 Use the connectors provided with the TECMA sanitary system 3 7 2 SINGLE AND MULTIPLE SYSTEM SALT WATER 3 7 2 1 hydraulic system The flushing cycle of the TECMA marine toilet uses external water via a sea cock Diagrams in section 8 ...

Page 59: ...1 Toilet is noisy The pump may be partially blocked if a solid object or paper other than toilet paper has been flushed Flush repeatedly If the problem persists open and inspect the macerator pump Contact a TECMA service centre which will provide qualified assistance Check the position of the sleeves if the water flow generates excessive noise especially at the end of flushing 4 2 Water is added b...

Page 60: ... mooring mode 4 6 The control panel LED is always red Make sure that the sensor is installed and wired properly In case are used TECMA pneumatic sensors if ventilation of the blackwater tank is not sized properly the pressure inside the tank will increase triggering the sensor at every flush If the LED remains on after having removed the grey black connector which connects the sensor to the contro...

Page 61: ... We recommend cleaning the tanks and pipes with Thetford Tank Freshener 5 3 Is it possible to use acid or aggressive products Plastic components of the TECMA toilet have been tested with several marketed cleaning products Avoid using products such as vinegar acetone trichlorethylene Avoid using solvents so as not to affect the rubber components Moreover avoid using gel and foams in order not to ob...

Page 62: ...tafel Multiframe S 67 2 2 1 Eine Taste S 67 2 2 2 Zwei Tasten S 67 2 3 Bedientafel Argent S 68 2 3 1 Eine Taste S 68 2 3 2 Zwei Tasten S 68 2 4 Bedientafel Touch S 69 2 4 1 Eine Taste S 69 2 4 2 Zwei Tasten S 69 2 5 Bedientafeln mit SMART FLUSH Technologie S 70 2 5 1 Premium S 70 2 5 2 Premium Touch S 71 2 5 3 Programmierung der SMART FLUSH Funktionen S 72 2 5 3 1 Navigations oder Hafenmodus S 72 ...

Page 63: ...errauschen S 90 4 8 Leckagen S 90 4 9 Unangenehme Gerüche S 90 5 0 HÄUFIG GESTELLTE FRAGEN S 91 5 1 Können mehrere Toiletten an die gleiche Leitung angeschlossen werden S 91 5 2 Welche Art von Wartung ist erforderlich S 91 5 3 Welche Produkte können für die Reinigung verwendet werden S 91 5 4 Welcher Rohrtyp soll benutzt werden S 91 5 5 Welche Ersatzteile sollten an Bord sein S 91 6 0 LISTE DER ER...

Page 64: ... eines Magnetventils für die Frischwasserzufuhr vor Alle Keramiktoiletten verfügen über eine eingebaute Zerkleinerungspumpe die das Schmutzwasser in die entsprechenden Sammeltanks ableitet Die Zerkleinerung erfolgt in einem speziellen vor dem Pumpenrad positionierten Hohlraum der mit Stahlmessern versehen ist Der Spülzyklus wird über die verschiedenen Bedientafelmodelle aktiviert Je nach Bedientaf...

Page 65: ...en des Systems Pumpe Zerkleinerungsvorrichtung Rückschlagventile verursachen können Die Verwendung von Thetford Produkten wird empfohlen da diese speziell für diese Systeme getestet wurden Verwenden Sie auf Produkten aus Kohlenstoff oder auf personalisierten Produkten die weder weiß noch pergamonfarben sind niemals scheuernde Schwämme oder aggressive Produkte außerdem wird empfohlen das Produkt im...

Page 66: ...n oder Eingriffe daran vornehmen Sollten diese Warnungen nicht befolgt werden kann dies zu Funktionsstörungen Verletzungen Beschädigungen dem eventuellen Verlust des Bootes oder Stromschlägen führen Nehmen Sie keine Änderungen am TECMA Produkt vor denn dies könnte eventuell zum Verlust des Bootes Verletzungen oder Stromschlägen führen 2 0 FUNKTION UND VERWENDUNG 2 1 Bedientafel All in one 2 1 1 Ei...

Page 67: ... Touch 2 2 1 Eine Taste Die Taste AFTER USE drücken wodurch automatisch ein Spülzyklus gestartet wird Am Ende des Zyklus wirddieToilettemiteinergeringenWassermengegefülltundistfürdennächstenGebrauchbereit 2 2 2 Zwei Tasten Vor Benutzung der Toilette die Taste BEFORE USE drücken Dadurch wird die Toilette mit einer geringen Wassermenge gefüllt Nach Benutzung der Toilette die Taste AFTER USE drücken ...

Page 68: ...ch gestartet Am Ende des Zyklus wird die Toilette mit einer geringen Wassermenge gefüllt und ist für den nächsten Gebrauch bereit 2 3 2 Zwei Tasten Vor Benutzung der Toilette die Taste BEFORE USE drücken Dadurch wird die Toilette mit einer geringen Wassermenge gefüllt Nach Benutzung der Toilette die Taste FLUSH drücken wodurch automatisch ein Spülzyklus gestartet wird Am Ende des Zyklus bleibt die...

Page 69: ...h wird die Toilette mit einer geringen Wassermenge gefüllt Nach Benutzung der Toilette die Taste AFTER USE drücken wodurch automatisch ein Spülzyklus gestartet wird Am Ende des Zyklus bleibt die Toilette leer ANMERKUNG Bei Bedarf kann die während des Spülzyklus verwendete Wassermenge direkt auf der externen Steuereinheit reguliert werden Auf der Rückseite der Bedientafel befindet sich ein Regler D...

Page 70: ...ine mode befindet Befindet sie sich hingegen im Hafenmodus residential mode so bleibt eine geringe Wassermenge in der Toilette zurück Um vom Navigationsmodus auf den Hafenmodus umzuschalten die beiden Tasten gleichzeitig gedrückt halten bisdie Kontrollleuchte LOCK OUT zu blinkenbeginnt Dadurchwird der Modusgeändert Diese Bedientafel ist mit einer dreifarbigen Kontrollleuchte zur Standanzeige im Sc...

Page 71: ... wodurch automatisch ein Spülzyklus gestartet wird Am Ende des Zyklus bleibt die Toilette leer wenn sie sich im Navigationsmodus befindet Befindet sie sich hingegen im Hafenmodus so bleibt eine geringe Wassermenge in der Toilette zurück Um vom Hafenmodus auf den Navigationsmodus umzuschalten die beiden Tasten gleichzeitig gedrückt halten bis die Kontrollleuchte LOCK OUT zu blinken beginnt Dadurch ...

Page 72: ...MART FLUSH Funktionen 2 5 3 1 Navigationsmodus oder Hafenmodus Wenn Sie vorhaben häufig zu segeln das System auf den Navigationsmodus einstellen Die Toilette bleibt nach der Verwendung leer es wird nur eine geringe Wassermenge nachgefüllt um eine Wassersperre zu bilden Dadurch wird verhindert dass während der Navigation durch die Bewegungen des Bootes unbeabsichtigt Wasser austritt 2 Vor Benutzung...

Page 73: ...en für längere Zeit im Hafen zu bleiben das System auf den Hafenmodus einstellen Nach der Benutzung bleibt eine geringe Wassermenge in der Toilette zurück dadurch muss für die Spülung nur eine Taste verwendet werden Änderung des Spülmodus vom Navigationsmodus zum Hafenmodus Abb 1 Standardmäßig ist das System auf den Navigationsmodus eingestellt Übergang vom Navigationsmodus auf den Hafenmodus 1 Gl...

Page 74: ...ekunden lang gedrückt halten Die LED beginnt zu blinken und zeigt an dass der Programmiermodus aufgerufen wurde 2 Beide Tasten loslassen wenn die gewünschte Wassermenge erreicht wurde 3 Nun ist das System auf den Navigationsmodus eingestellt ANMERKUNG Am Ende des Zyklus bleibt die Toilette leer wenn sie auf den Navigationsmodus eingestellt ist Befindet sie sich hingegen im Hafenmodus so bleibt ein...

Page 75: ...gebildet die Bedientafel berühren bis die Hintergrundbeleuchtung zu blinken beginnt 2 Die Bedientafel kann mit einem Tuch gereinigt werden 3 Nach 15 Sekunden werden die Tasten automatisch wieder aktiviert Für die Bedientafel Touch kann eine Hintergrundbeleuchtung programmiert werden a Immer aktiviert b Immer deaktiviert c Über einen Näherungssensor aktiviert Standard Anleitung für den Übergang von...

Page 76: ...ssen wird ACHTUNG Niemals den Toilettendeckel mit Kraftaufwendung schließen wenn Ihre Toilette mit einer Absenkautomatik ausgestattet ist Das System wurde für die automatische Schließung entworfen und eine äußere Kraft könnte den Mechanismus unwiederbringlich beschädigen ACHTUNG Wenn Ihre Toilette über eine Bidetfunktion verfügt niemals das maximale Fassungsvermögen der Toilette überschreiten da k...

Page 77: ...u lassen Die geltenden Normen in Bezug auf Anlagenbau müssen eingehalten werden ACHTUNG Stromschlag Brand oder Überschwemmungsgefahr Wenn diese Gefahren nicht in Betracht gezogen werden kann dies zu einem Verlust des Bootes Verletzungen oder Todesfällen führen Empfehlungen Für die Stromkreise immer korrekt bemessene Sicherungen verwenden Vor Beginn von Wartungstätigkeiten muss immer sichergestellt...

Page 78: ...egungen der Keramik und daraus folgenden Personen oder Sachschäden führen Die Toilette wurde nur für die Entsorgung organischer Abfälle und Toilettenpapier entworfen Niemals andere Materialien in die Toilette werfen wie z B Papiertücher Feuchttücher Präservative Damenbinden Zahnseide etc Immer die mit der Toilette mitgelieferten Schraubenabdeckungen Vorrichtungen zum Schutz der Keramik und Verbind...

Page 79: ...den ist das in entsprechender Höhe für die notwendige Einleitung bzw den Auslass sorgt Für die Version SHORT muss genügend Raum für die Unterbringung des Motors der unterhalb der Toilette um 100 mm vorsteht vorhanden sein Für das Modell SANINAUTICO muss ein Raum von mindestens 3 cm vorhanden sein um ein ungehindertes Öffnen des Deckels gewährleisten zu können Außerdem muss genügend Raum für die Un...

Page 80: ...s Anschraubens nicht auf das Ventil einwirken Während Die Aufnahmeöffnung am Ventilausgang nicht verstopfen Der gesamte Rohrleitungsquerschnitt muss ohne Drosselstellen verfügbar sein Den empfohlenen Druckbereich berücksichtigen siehe Abschnitt 7 0 3 3 Einlasspumpe Die Einlasspumpe an einem trockenen und belüfteten Ort installieren Die Pumpe darf nicht unter Wasser liegen oder Wasserspritzern ausg...

Page 81: ... Otricoli TR Italy Manual rev 25 2014 TECMA SRL 3 4 AUSSPARUNGEN für die Bedientafeln Neben dem Bedientafel All in One der das Steuergerät integriert sind alle Bedientafeln mit einem Steuergerät ausgestattet der entweder direkt in der Toilette oder separat eingebaut werden kann Sämtliche Bedientafeln sind mit den entsprechenden elektrischen Verbindern versehen 3 4 1 Aussparung für Bedientafel All ...

Page 82: ...RATRICI X light Privilege Evolution Breeze E Breeze Silence Plus Elegance Saninautico Prestige 82 www thetfordmarine com TECMA SRL Via Flaminia Loc Castel delle Formiche 05030 Otricoli TR Italy Manual rev 25 2014 TECMA SRL 3 4 4 Aussparung für Bedientafel Touch Premium Touch 3 4 5 Aussparung für Bedientafel Premium ...

Page 83: ...en über das grau schwarze Kabel mit der Steuereinheit verbunden werden Sollten mehrere Steuereinheiten an Bord vorhanden sein so müssen zuerst alle Steuereinheiten miteinander verkabelt und anschließend an den Sensor angeschlossen werden Bei Verwendung eines Sensors mit Druckwächter und einer Bedientafel Premium muss für jede Toilette ein STA Adapter Single Toilet Adapter installiert werden Alle K...

Page 84: ...nsoren installiert sind nur D E mit der Steuereinheit verbinden Wenn sich der STA in der Nähe des Sammeltanks befindet können die Kabel D E F G bis auf 40 m verlängert werden Wenn sich der STA in der Nähe der Toilette befindet können die Kabel A B C bis auf 100 m verlängert werden Wenn die Anschlüsse korrekt vorgenommen wurden beginnt die LED connected zu blinken Immer vom Konfigurationstyp der El...

Page 85: ...druckempfindlichen Klebefläche 3 6 Erforderliches Werkzeug Elektrobohrer mit geeignetem Einsatz oder Schraubenzieher für die Edelstahl Schellen Elektrobohrer oder Schraubenzieher zum Anziehen der Befestigungsschrauben Stichsäge zur Herstellung der Aussparungen für die Installation der Bedientafel Verstellbarer Schraubenschlüssel für den Anzug des Magnetventils 3 7 ANLAGE Versorgung Jedes Produkt v...

Page 86: ...Italy Manual rev 25 2014 TECMA SRL ACHTUNG Toiletten Konfiguration B Die Toilette ist oberhalb der Meereslinie installiert Die Installation eines BELÜFTUNGSVENTILS in entsprechender Höhe über der Meereslinie wird empfohlen um einen Wasserrücklauf zu vermeiden der unangenehme Gerüche verursachen könnte Siehe Beispiel Abb 1 Abb 1 ACHTUNG Bei der Berechnung der in Erwägung gezogenen Wasserlinie müsse...

Page 87: ...ird öffnet die Bedientafel über die Steuereinheit das Magnetventil und das Wasser wird über den Autoklav der für die Druckversorgung der gesamten Hydraulikanlage an Bord sorgt zugeführt Schema in Abschnitt 8 5 ACHTUNG Der empfohlene Betriebsdruck für das System beträgt 3 bar ACHTUNG Die Filter aller Magnetventile müssen immer sauber gehalten werden ACHTUNG Wenn das Magnetventil in die Toilettensch...

Page 88: ... Bei der Wahl des Kabelquerschnitts müssen Länge und Stromaufnahme berücksichtigt werden siehe Abschnitt 7 0 Es müssen die mit den TECMA Sanitäranlagen mitgelieferten Verbinder verwendet werden 3 7 2 EINZEL UND MEHRFACHANLAGE SALZWASSER 3 7 2 1 Hydraulikanlage Für die Spülzyklen der TECMA Toiletten für die Schifffahrt wird Wasser verwendet das von außen über ein Seeventil aufgenommen wird Schemen ...

Page 89: ...in Toilettenpapier ist in die Toilette geworfen wurden so könnte die Pumpe teilweise blockiert sein Versuchen Sie wiederholt zu spülen Wenn das Problem weiterhin besteht muss die Zerkleinerungspumpe geöffnet und überprüft werden Für eine qualifizierte Hilfeleistung wenden Sie sich bitte an eine Kundendienststelle von TECMA Wenn ein starkes Wasserrauschen zu hören ist vor allem am Ende der Spülung ...

Page 90: ...icherstellen dass der Sensor sachgemäß installiert und verkabelt wurde TECMA verwendet pneumatische Sensoren Wenn die Belüftung des Schmutzwassertanks nicht entsprechend bemessen wurde steigt bei jedem Spülvorgang der Druck im Inneren des Tanks wodurch der Sensor ausgelöst wird Wenn die LED weiterhin leuchtet nachdem der grau schwarze Verbinder zwischen Sensor und Steuereinheit getrennt wurde so b...

Page 91: ... Tank Freshner für die Reinigung der Tanks und Rohrleitungen wird empfohlen 5 3 Dürfen säurehaltige oder aggressive Produkte für die Reinigung benutzt werden Die Kunststoffkomponenten des TECMA Produkts wurden mit zahlreichen handelsüblichen Reinigungsmitteln getestet Die Verwendung von Produkten wie Essig Aceton oder Trichloräthylen vermeiden Allgemein sollten keine Lösungsmittel verwendet werden...

Page 92: ...7 2 3 Tableau de commande Argent page 98 2 3 1 Un Bouton page 98 2 3 2 Deux Boutons page 98 2 4 Tableau de commande Touch page 99 2 4 1 Un Bouton page 99 2 4 2 Deux Boutons page 99 2 5 Tableaux de commande avec technologie SMART FLUSH page 100 2 5 1 Premium page 100 2 5 2 Premium Touch page 101 2 5 3 Programmation des fonctions SMART FLUSH page 102 2 5 3 1 Mode navigation ou amarrage page 102 2 5 ...

Page 93: ...4 7 Gargouillement page 120 4 8 Fuites page 120 4 9 Mauvaises odeurs page 120 5 0 QUESTIONS FRÉQUENTES page 121 5 1 Puis je brancher plusieurs WC sur la même ligne page 121 5 2 Quel type de maintenance est requise page 121 5 3 Quel type de produits peuvent être utilisés pour le nettoyage page 121 5 4 Quel type de tube puis je utiliser page 121 5 5 Quel type de pièces de rechange devrais je avoir à...

Page 94: ... usées et d une pompe de remplissage ou d une électrovanne pour le chargement de l eau propre Toutes les céramiques contiennent dans leur partie interne une pompe dilacératrice puissante qui pousse les eaux usées dans les réservoirs de récupération spécifiques Le broyage a lieu dans une cavité spéciale fournie de lames en acier positionnée avant le rotor de la pompe Le cycle de vidage est actionné...

Page 95: ...ts en caoutchouc du système pompe dilacérateur clapets de non retour Il est conseillé d utiliser les produits Thetford car ils ont été testés de manière spécifique pour ce type de systèmes Sur les produits en carbone ou personnalisés en différentes couleurs du blanc ou pergamon éviter d utiliser des éponges abrasives ou des produits trop agressifs il faut toujours faire un test sur la partie posté...

Page 96: ...ces mises en garde il y a un risque de dysfonctionnement accident dommages et éventuelle perte de l embarcation électrocution N effectuer aucun changement au produit Tecma ceci pourrait comporter une éventuelle perte de l embarcation accident ou électrocution 2 0 FONCTIONNEMENT ET UTILISATION 2 1 Tableau de commande All in One 2 1 1 Un bouton En actionnant le bouton AFTER USE après l utilisation u...

Page 97: ...vage automatique démarrera au terme duquel la cuvette sera remplie avec une petite quantité d eau prête à la prochaine utilisation 2 2 2 Deux boutons Actionner le bouton BEFORE USE avant l utilisation Il remplira la cuvette avec une petite quantité d eau Actionner le bouton AFTER USE après l utilisation un cycle de lavage automatique démarrera au terme duquel la cuvette restera vide REMARQUE Si on...

Page 98: ...duquel la cuvette sera remplie avec une petite quantité d eau prête à la prochaine utilisation 2 3 2 Deux boutons Actionner le bouton BEFORE USE avant l utilisation Il remplira la cuvette avec une petite quantité d eau Actionner le bouton FLUSH après l utilisation un cycle de lavage automatique démarrera au terme duquel la cuvette restera vide REMARQUE Si on le souhaite il est possible de régler l...

Page 99: ...ntité d eau Actionner le bouton Touch AFTER USE après l utilisation un cycle de lavage automatique démarrera au terme duquel la cuvette restera vide REMARQUE Si on le souhaite il est possible de régler la quantité d eau utilisée lors de chaque cycle de vidage directement sur la centrale de contrôle à distance qui lui est raccordée En effet sur la partie arrière de cette dernière il y a un régulate...

Page 100: ...quel la cuvette restera vide si on est en mode navigation il restera une petite quantité d eau si on est en mode amarrage Pour passer du mode amarrage au mode marine maintenir les deux boutons appuyés simultanément jusqu à ce que le voyant LOCK OUT commence à clignoter Cela vous fera changer de mode Le tableau de commande est équipé d un voyant à trois couleurs qui indique le niveau de remplissage...

Page 101: ...sation un cycle de lavage automatique démarrera au terme duquel la cuvette restera vide si l on est en mode navigation il restera une petite quantité d eau si l on est en mode amarrage Pour passer du mode amarrage au mode navigation tenir les deux boutons appuyés simultanément jusqu à ce que le voyant LOCK OUT commence à clignoter Cela vous fera changer de mode Le tableau de commande est équipé d ...

Page 102: ...tions SMART FLUSH 2 5 3 1 Mode Navigation ou Amarrage Monter le système en modalité navigation su vous prévoyez de naviguer souvent Les WC resteront vides après usage seule une petite quantité d eau sera ajoutée pour créer un piège à eau Pendant la navigation celaéviteradesfuitesd eau causéespar lesmouvementsde l embarcation 2 Toucher l emplacement BEFORE USE avant d utiliser les WC Le solénoïde p...

Page 103: ...tème en modalité sivousavezl intention derester longtemps Lacuvette desWC contiendra unpeud eauaprèsusage cequipermettrad appuyersurunseulboutonpourfaireaffluerl eau Changer le mode d écoulement de la modalité navigation à la modalité amarrage Fig 1 Le système est réglé en modalité navigation par défaut Pour passer de la modalité navigation à la modalité amarrage 1 Appuyer simultanément sur les bo...

Page 104: ...E et AFTER USE pendant environ 3 secondes LaLEDde verrouillage clignotera indiquant que vousêtesen mode programmation 2 Relâcher les deux boutons quand le niveau d eau désiré a été atteint 3 Le système est maintenant réglé en modalité navigation REMARQUE à la fin du cycle la cuvette des WC sera vide si le système est en modalité navigation et une petite quantité d eauresteradans lacuvette silesWC ...

Page 105: ...usqu à ce que le rétroéclairage commence à clignoter 2 On peut nettoyer le tableau avec un chiffon 3 Les boutons seront automatiquement réactivés au bout de 15 secondes Il est possible de programmer le tableau Touch pour avoir le rétroéclairage a Toujours allumé b Toujours éteint c Activé par un capteur de proximité par défaut Instructions pour passer d un programme à un autre 1 Presser et mainten...

Page 106: ...TION ne pas forcer la fermeture du couvercle si votre cuvette est équipée d un système soft closing Le système est conçu pour la fermeture automatique et une force externe pourrait endommager en manière irréversible le mécanisme ATTENTION si votre cuvette est munie de la fonction bidet ne pas dépasser le niveau maximum de capacité de la cuvette un canal d écoulement pour le trop plein n est pas pr...

Page 107: ...st nécessaire ATTENTION Dangers de court circuit incendie ou inondation Ne pas considérer ces dangers peut porter à la perte de l embarcation l accident ou la mort Recommandations Toujoursutiliser un fusible dimensionné de manière adéquatedanslescircuitsélectriques Avant de commencer toute intervention de maintenance s assurer qu il n y ait pas de tension dansl installation électriqueet que lespri...

Page 108: ...x choses ou aux personnes Le sanitaire a été dessiné pour disposer seulement de déchets organiques humains et de papier hygiénique Ne jamais jeter d autres typologies de matériau par exemple chiffon en papier lingettes préservatifs serviettes hygiéniques fil interdentaire etc Toujours utiliser les couvre vis les protège céramique et les connecteurs fournis avec le sanitaire En cas de doutes contac...

Page 109: ... il y ait assez d espace pour installer une soupape de ventilation nécessaire au remplissage et au vidage à une hauteur suffisamment supérieure àcelle ci dans les versions SHORT il y a un espace suffisance pour loger le moteur qui dépasse sous la cuvette de 100 mm dans le modèle SANINAUTICO il y a un espace libre d au moins 3 cm pour garantir l ouverture correcte du couvercle et l espace pour loge...

Page 110: ...ltre de l électrovanne propre Ne pas faire levier sur la vanne pendant le vissage Ne pas boucher le trou pilote à la sortie de la vanne Toute la section de la tuyauterie doit être disponible sans étranglements Observer le champ de pressions recommandé voir la section 7 0 3 3 Pompe de remplissage Installer la pompe de remplissage dans un lieu sec aéré La pompe ne peut pas être immergée ou exposée à...

Page 111: ...4 CUT OUT Tableaux de commande Outre le panneau de commande All in One tout intégré tous les tabeaux ont une unité de contrôle qui peut être installé directement dans la cuvette ou dans une cavité extérieur Tous les tableaux de commande sont prévus avec des connecteurs électriques spécifiques Pour les schémas de connexions de tous les composants voir par 08 06 au 08 11 3 4 1 Encastrement pour le t...

Page 112: ... Privilege Evolution Breeze E Breeze Silence Plus Elegance Saninautico Prestige 112 www thetfordmarine com TECMA SRL Via Flaminia Loc Castel delle Formiche 05030 Otricoli TR Italy Manual rev 25 2014 TECMA SRL 3 4 4 Encastrement pour le tableau de commande Touch Premium Touch 3 4 5 Encastrement pour le tableau de commande premium ...

Page 113: ... Ils doivent être connectés à la centrale par le câble gris noir S il y a plusieurs centrales à bord il faut les câbler toutes ensembles et se brancher au capteur En cas d utilisation de capteur avec pressostat et tableau de commande premium il faut installer pour chaque sanitaire un adaptateur STA Single Toilet Adapter Tous les câbles du STA sont 16awg 1 55mm longueur 25 cm La tension dans les câ...

Page 114: ...eulement D E à la centrale Si le STA est près de la caisse il est possible d étendre les câbles D E F G jusqu à 40 m Si le STA est près des toilettes il est possible d étendre les câbles A B C jusqu à 100 m La LED connected s allumera à intermittence quand les connexions sont effectuées correctement Dépend toujours du type de configuration de l installation électrique ATTENTION Pour fonctionner co...

Page 115: ...se électrique avec compartiment approprié ou tournevis pour les colliers inox Visseuse électrique ou tournevis pour le serrage des vis de montage Scie sauteuse pour l exécution du défoncement pour le logement du tableau de commande Clé anglaise réglable pour le serrage de l électrovanne 3 7 INSTALLATION Alimentation Chaque produit est équipé sur la partie postérieure d une étiquette spéciale qui s...

Page 116: ...30 Otricoli TR Italy Manual rev 25 2014 TECMA SRL supérieure à la ligne Voir l exemple fig 1 ATTENTION Configuration WC B Cuvette installée au dessus du niveau de flottaison il est recommandé de monter UNE SOUPAPE DE VENTILATION pour éviter des phénomènes de siphonagequipourraientengendrerdemauvaisesodeurs Voirl exemplefig 1 Fig 1 ATTENTION La ligne de flottaison en question devra être calculée en...

Page 117: ...ations Lorsque l on actionne le WC le tableau de commande à travers la centrale ouvre l électrovanne et l eau est approvisionnée par l autoclave qui donne de la pression à tout le circuit hydraulique debord Schémaen section 8 5 ATTENTION L installation doit fonctionner à une pression interne conseillée de 3 bar ATTENTION Maintenir propres les filtres de chaque électrovanne ATTENTION Pour l install...

Page 118: ...r le choix de la section des câbles tenir compte de la longueur et de l absorption voir la section 7 0 Utiliser les connecteurs fournis avec le sanitaire TECMA 3 7 2 INSTALLATION SIMPLE ET MULTIPLE EAU SALÉE 3 7 2 1 Circuit électrique Le cycle de vidage du WC nautique TECMA utilise l eau provenant de l extérieur par une prise d eau de mer Schémas en sections 8 1 8 2 Quand on actionne le cycle de d...

Page 119: ...différent du papier hygiénique sont jetés dans le WC la pompe pourrait être partiellement bloquée Essayer de télécharger à nouveau si le problème persiste il faut ouvrir et inspecter la pompe dilacératrice S adresser à un service centre TECMA pour l assistance qualifiée Si le passage de l eau est très bruyant surtout à la fin du vidage contrôler la position des manchons 4 2 L eau est ajoutée mais ...

Page 120: ...de est toujours rouge Contrôler que le capteur soit installé correctement et câblé correctement TECMA utilise des capteurs pneumatiques si la ventilation du réservoir des eaux usées n est pas dimensionnée de manière adéquate la pression à l intérieur du réservoir augmentera à chaque vidage en amorçant le capteur Si la LED reste allumée après avoir détaché le connecteur gris noir qui raccorde le ca...

Page 121: ...ner pour le nettoyage des réservoirs et des tuyauteries est conseillé 5 3 Peut on utiliser des produits acides ou agressifs Lesélémentsen plastique du produit TECMA ont été testésavec de nombreux produitspour le nettoyage en commerce Éviter des produits tels que l acétone l acétone trichloréthylène En général éviter les solvants pour ne pas affaiblir les caoutchoucs les gels et les mousses pour ne...

Page 122: ...om nella sessione United States To order parts in North America please refer to the list of spare parts and codes available on www thetfordmarine com in the session United States Para solicitar piezas en América del Norte por favor consulte la lista de piezas de repuesto y los códigos disponibles en istas www thetfordmarine com en sesión United States Pour commander des pièces en Amérique du Nord ...

Page 123: ...NTE T PF P11M1 MULTIFRAME 1 BUTTON CONTROL PANEL T PF P11M2 MULTIFRAME 2 BUTTONS CONTROL PANEL T PF P11A1 ARGENT 1 BUTTON CONTROL PANEL T PF P11A2 ARGENT 2 BUTTONS CONTROL PANEL T PF P11T1 TOUCH 1 BUTTON CONTROL PANEL T PF P11T2 TOUCH 2 BUTTONS CONTROL PANEL T PF P11T T PREMIUM CONTROL PANEL KIT WALL SWITCH CONTROLLER STA T PF P11T T TOUCH PREMIUM TOUCH CTRL PANEL KIT TOUCH WALL SWITCH CONTROLLER ...

Page 124: ...ORE PNEUMATICO T PF P07B ARCADIA PNEUMATIC TANK SENSOR T PF P07C DOUBLE PNEUMATIC TANK SENSOR T PF P07D 3 CONTACTS TANK SENSOR T PF P36 12 24 v LEVEL SENSOR T PF PE18 FULL TANK INDUCTIVE SENSOR SENSORE AD INDUZIONE T PF PE19 MID TANK INDUCTIVE SENSOR T PF P53 GENERAL REPARATION KIT KIT RIPARAZIONI GENERALE X LIGHT CARBON PAINTED T 475 T 684 CARBON FIBRE SEAT AND COVER If painted specify RAL PRIVIL...

Page 125: ...SYSTEM SANINAUTICO L 39 cm WHITE BONE BLACK T 051 T 051B T 051N POLYESTER SEAT AND COVER T 051FR T 051BFR T 051NFR POLYESTER SEAT AND COVER SOFT CLOSING T 051TB T 051TP THERMOSETTING SEAT AND COVER T 051TBFR T 051TPFR THERMOSETTING SEAT AND COVER WITH SOFT CLOSING SYSTEM T 595 HINGES ELEGANCE WITH POLYESTER SEAT AND COVER T 595 F HINGES ELEGANCE WITH POLYESTER SEAT AND COVER SOFT CLOSING T 597 HIN...

Page 126: ...ordmarine com TECMA SRL Via Flaminia Loc Castel delle Formiche 05030 Otricoli TR Italy Manual rev 25 2014 TECMA SRL Nominal data when designing the system consider the loss due to 90 elbows and other system particularities The system should be as linear as possible Valori nominali tenere conto delle perdite di carico dovute alle curve a 90 e alle caratteristiche dell impianto Mantenere l impianto ...

Page 127: ...dmarine com TECMA SRL Via Flaminia Loc Castel delle Formiche 05030 Otricoli TR Italy Manual rev 25 2014 TECMA SRL Mantenere Wire Gauge Size Chart Voltage distance from source is 0 1 2 m 2 4 m 12 VOLT Install 11 AWG 4 17mm2 9 AWG 6 63mm2 24 VOLT Install 13 AWG 2 63mm2 11 AWG 4 17mm2 110 VOLT Install 18 AWG 0 82mm2 18 AWG 0 82mm2 230 VOLT Install 18 AWG 0 82mm2 18 AWG 0 82mm2 Distance measured assum...

Page 128: ... Flaminia Loc Castel delle Formiche 05030 Otricoli TR Italy Manual rev 25 2014 TECMA SRL 8 0 SYSTEM DIAGRAMS DIAGRAMMI DEGLI IMPIANTI 8 1 SINGLE SYSTEM IMPIANTO SINGOLO Y SELECTION VALVE HOLDING TANK with TECMA sensor HOLDING TANK DISCHARGE PUMP BLACK WATER OUTLET HULL BLACK WATER OUTLET DECK 6 7 8 9 10 RAW WATER INTAKE ball valve seacock RAW WATER STRAINER TECMA RAW WATER PUMP TECMA VENTILATION V...

Page 129: ... TECMA SRL Via Flaminia Loc Castel delle Formiche 05030 Otricoli TR Italy Manual rev 25 2014 TECMA SRL 8 2 MULTIPLE SINGLE SYSTEM IMPIANTO SINGOLO MULTIPLO Y SELECTION VALVE HOLDING TANK with TECMA sensor HOLDING TANK DISCHARGE PUMP BLACK WATER OUTLET HULL BLACK WATER OUTLET DECK 6 7 8 9 10 RAW WATER INTAKE ball valve seacock RAW WATER STRAINER TECMA RAW WATER PUMP TECMA VENTILATION VALVE siphon b...

Page 130: ...tenzione TOILET MACERATRICI X light Privilege Evolution Breeze E Breeze Silence Plus Elegance Saninautico Prestige 130 www thetfordmarine com TECMA SRL Via Flaminia Loc Castel delle Formiche 05030 Otricoli TR Italy Manual rev 25 2014 TECMA SRL 8 3 SINGLE SYSTEM WIRING CABLAGGIO IMPIANTO SINGOLO ...

Page 131: ...enzione TOILET MACERATRICI X light Privilege Evolution Breeze E Breeze Silence Plus Elegance Saninautico Prestige 131 www thetfordmarine com TECMA SRL Via Flaminia Loc Castel delle Formiche 05030 Otricoli TR Italy Manual rev 25 2014 TECMA SRL 8 4 MULTIPLE SYSTEM WIRING CABLAGGIO IMPIANTO MULTIPLO ...

Page 132: ...ine com TECMA SRL Via Flaminia Loc Castel delle Formiche 05030 Otricoli TR Italy Manual rev 25 2014 TECMA SRL 8 5 CENTRALIZED FRESH WATER SYSTEM IMPIANTO CENTRALIZZATO ACQUA DOLCE TECMA VENTILATION VALVE Y SELECTION VALVE HOLDING TANK with TECMA sensor HOLDING TANK DISCHARGE PUMP BLACK WATER OUTLET HULL BLACK WATER OUTLET DECK 6 7 8 9 10 11 FRESH WATER TANK FRESH WATER PUMP ACCUMULATOR SOLENOID TE...

Page 133: ...ET MACERATRICI X light Privilege Evolution Breeze E Breeze Silence Plus Elegance Saninautico Prestige 133 www thetfordmarine com TECMA SRL Via Flaminia Loc Castel delle Formiche 05030 Otricoli TR Italy Manual rev 25 2014 TECMA SRL 8 6 CENTRALIZED FRESH WATER WIRING CABLAGGIO CENTRALIZZATO ACQUA DOLCE 12V 24V ...

Page 134: ... MACERATRICI X light Privilege Evolution Breeze E Breeze Silence Plus Elegance Saninautico Prestige 134 www thetfordmarine com TECMA SRL Via Flaminia Loc Castel delle Formiche 05030 Otricoli TR Italy Manual rev 25 2014 TECMA SRL 8 7 CENTRALIZED FRESH WATER WIRING CABLAGGIO CENTRALIZZATO ACQUA DOLCE 110 V 230 V ...

Page 135: ...t Privilege Evolution Breeze E Breeze Silence Plus Elegance Saninautico Prestige 135 www thetfordmarine com TECMA SRL Via Flaminia Loc Castel delle Formiche 05030 Otricoli TR Italy Manual rev 25 2014 TECMA SRL 8 8 CENTRALIZED FRESH WATER WIRING CABLAGGIO CENTRALIZZATO ACQUA DOLCE 12V 24V WITH MULTIFRAME ARGENT TOUCH WALL SWITCH ...

Page 136: ...I X light Privilege Evolution Breeze E Breeze Silence Plus Elegance Saninautico Prestige 136 www thetfordmarine com TECMA SRL Via Flaminia Loc Castel delle Formiche 05030 Otricoli TR Italy Manual rev 25 2014 TECMA SRL 8 9 CENTRALIZED FRESH WATER WIRING CABLAGGIO CENTRALIZZATO ACQUA DOLCE 12V 24V WITH PREMIUM WALL SWITCH ...

Page 137: ...CI X light Privilege Evolution Breeze E Breeze Silence Plus Elegance Saninautico Prestige 137 www thetfordmarine com TECMA SRL Via Flaminia Loc Castel delle Formiche 05030 Otricoli TR Italy Manual rev 25 2014 TECMA SRL 8 10 CENTRALIZED FRESH WATER WIRING CABLAGGIO CENTRALIZZATO ACQUA DOLCE 230V WITH PREMIUM WALL SWITCH ...

Page 138: ... light Privilege Evolution Breeze E Breeze Silence Plus Elegance Saninautico Prestige 138 www thetfordmarine com TECMA SRL Via Flaminia Loc Castel delle Formiche 05030 Otricoli TR Italy Manual rev 25 2014 TECMA SRL 8 11 CENTRALIZED FRESH WATER WIRING CABLAGGIO CENTRALIZZATO ACQUA DOLCE 12V 24V WITH PREMIUM TOUCH WALL SWITCH ...

Reviews: