background image

MAINTENANCE

• VARIABLE SHADE CONTROL

After turn on the lens, short press “FUNC” button to choose “SHADE”, and adjust the lens 

shade number. Use “   ” and “    ” buttons to select the lens shade in the dark state. The shade 

range for each mode are as follows:

Cutting Mode


 Shade 5 ~ 8 (See fig.15a)  

Weld Mode

 − 

Shade 9 ~ 13 (See fig.15b)

Grind Mode


 No. 4 only (See fig.15c)

Select the proper shade number for your welding / cutting process, by referring to the “Shade 

Guide Table” on page 19.

• SENSITIVITY CONTROL


Press “FUNC” button to choose “SENSITIVITY”. Use “    ” and “    ” buttons to make the lens 

more or less sensitive to arc light of different welding processes. Sensitivity setting 5-10 is 

the normal setting for everyday use. The sensitivity ranges for each mode are as follows:

Cutting Mode 

(Shade 5 ~ 8) / 

Weld Mode 

(Shade 9 ~ 13) 

 Sensitivity 0 ~ 10 (See fig.16a / 

16b)

Grind Mode

 − No sensitivity adjustment

As a simple rule for optimum performance, it is recommended to set sensitivity to the 

maximum at the beginning and then gradually reduce it, until the filter reacts only to the 

welding light flash and without annoying spurious triggering due to ambient light conditions 

(direct sun, intensive artificial light, neighbouring welder's arcs etc.).

It may be necessary to adjust helmet sensitivity to accommodate different lighting conditions 

or if lens is flashing On and Off. Adjust helmet sensitivity as follows: Adjust helmet sensitivity 

in lighting conditions helmet will be used in.

• Press “   ” button to lower setting to 0.

• Face the helmet in the direction of use, exposing it to the surrounding light conditions.

• Press “   ” button repeatedly until the lens darkens, then press “   ” button until 

lens clears. 

Helmet is ready for use. Slight readjustment may be necessary for certain applications or if 

lens is flashing on and off.

• DELAY CONTROL

Press “FUNC” button to choose “DELAY”, begin lens delay adjustments. Use the Lens Delay 

Control “   ” and “   ” buttons to adjust the time for the lens to switch to the clear state after 

welding or cutting.

Cutting Mode 

(Shade 5 ~ 8) / 

Weld Mode 

(Shade 9 ~ 13) 

 Delay 0 ~ 10 (See fig.17a / 17b)

Grind Mode

 − No sensitivity adjustment

The delay is particularly useful in eliminating bright after-rays present in higher amperage 

applications where the molten puddle remains bright momentarily after welding. Use the 

Lens Delay Control buttons to adjust delay from 0 to 10 (0.1 to 1.0 second). When welding 

stopped, the viewing window automatically changes from dark back to light but with a 

pre-set delay to compensate for any bright afterglow on the workpiece. The delay time / 

response can be set from Level 0 to level 10. It is recommended to use a shorter delay 

with spot welding applications and a longer delay with applications using higher currents. 

Longer delays can also be used for low current TIG welding, and TIG / MIG / MAG pulse.

• 

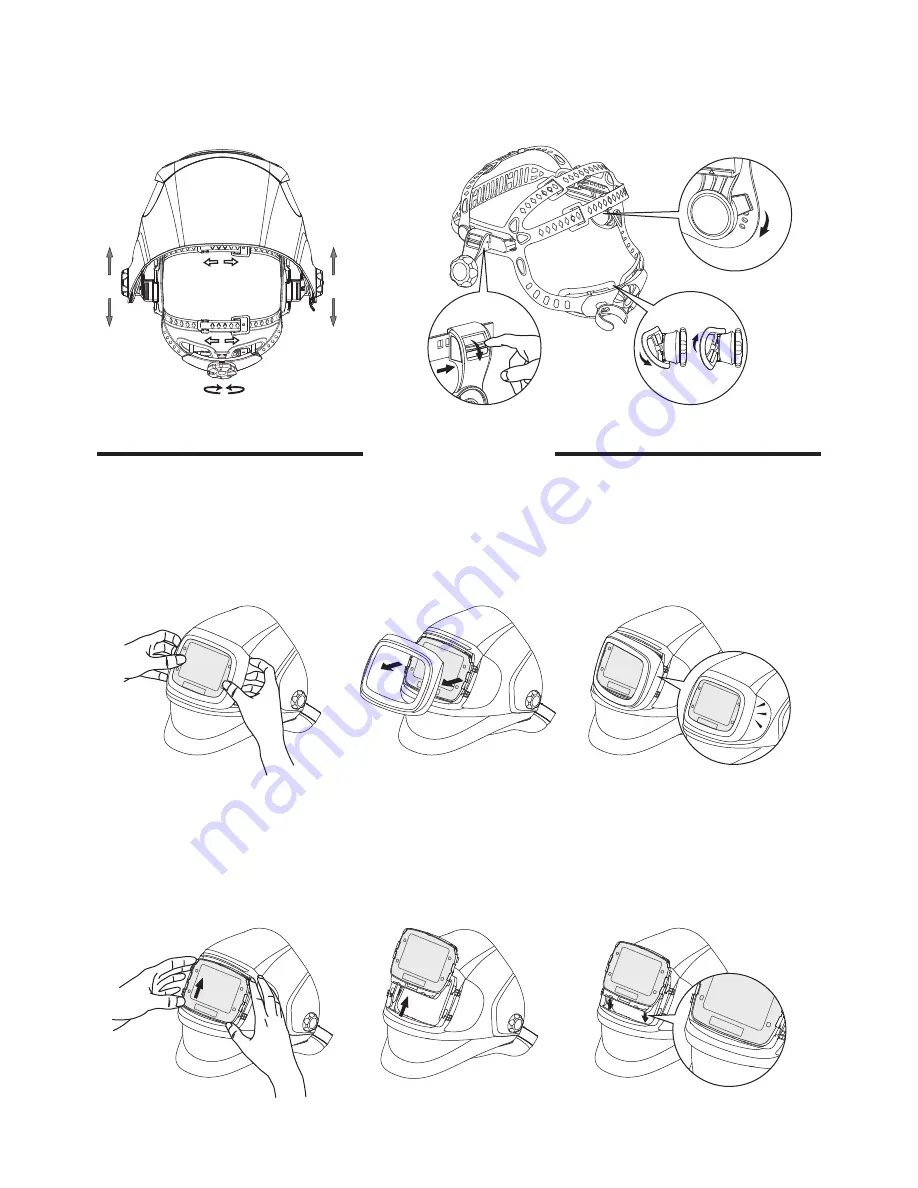
ADJUSTING THE FIT OF THE HELMET

The overall circumference of the headband can be made larger or smaller by rotating the 

knob on the back of the headband (See adjustment “Y” in fig.18). This can be done while 

wearing the helmet and allows just the right tension to be set to keep the helmet firmly on 

the head without it being too tight.

• 

If the headband is riding too high or too low on your head, adjust the strap which passes 

over the top of your head. To do this release the end of the band by pushing the locking pin 

out of the hole in the band. Slide the two portions of the band to a greater or lesser width 

as required and push the locking pin through the nearest hole (See adjustment “W” in 

fig.18).

• 

Front and back bands will automatically self-adjust according to headform, and soft pads 

suit forehead and back of head perfectly, which will bring more comfort (See fig.19a). Test 

the fit of the headband by lifting up and closing down the helmet a few times while wearing 

it. If the headband moves while tilting, re-adjust it until it is stable.

• 

ADJUSTING THE DISTANCE BETWEEN THE HELMET AND THE FACE

Step 1: Press down and hold the “LOCK” latch on both sides (See fig.19b) and it can be 

slide back and forth.

Step 2: Loosen the “LOCK” latch and keep it snap into slots. Please make sure the 

distance between the lens to both eyes are equal, to avoid uneven darkness.

• ADJUSTING VIEW ANGLE POSITION

Tilt adjustment is located on right side of helmet. Loosen the right headgear tension knob 

and adjust the lever forward or back to the proper position. Re-tighten the right headgear 

tension knob (See fig.19c).

fig.19b

fig.19a

fig.19c

‘W’

‘Y’

‘T’

‘T’

TOP

fig.18

fig.20a

fig.20b

fig.20c

fig.21a

fig.21b

fig.21c

REPLACING THE SHELL COVER

Place 

fingertips

 into the gap around the shell cover and flex the shell cover upwards until it 

releases from the helmet (See fig.20a / 20b). When installing the new shell cover, put the 

side of lug boss of shell cover into the slot and then lock the other side into the helmet. When 

hearing “click”,the shell cover is completely fixed (See fig.20c).

REPLACING THE AUTO DARKENING FILTER

Press the thumb on the bottom sides of the auto darkening filter and push it upward

 (See 

fig.21a), remove the auto darkening filter from the shell (See fig.21b). When installing the 

new auto darkening filter, clip the lower part of the filter into the bottom of helmet window first, 

and then insert the whole filter into the helmet window (See fig.21c).

16

Summary of Contents for Freflow V3

Page 1: ...ll instructions and warnings before use Users must understand this booklet prior to use Keep these User Instructions for future reference If you have questions regarding these products just feel free to let Tecmen know Produced by Freflow V3 ...

Page 2: ...tside air comes into the hood NOTICE If bleeping alarmed immediately get away from the contaminated area and check the device The hose may get blocked Battery low power Filter is dirty and need get changed with new one Please EXIT that contaminated place in any cases below IF some problem is shown in any part of the product for example the air supply is stopped or its amount is decreased IF it get...

Page 3: ...rty it means When warning lights flash please replace the filter DESCRIPTION SPECIFICATION BUTTON FILTER WARNING BATTERY INDICATOR AIRFLOW Indicator light refers to the airflow state Two different levels Low Speed 170 lpm High Speed 210 lpm Warning lights help to check the filter status More light spots turn on more dirty it means When warning lights flash pls replace the filter Display screen ind...

Page 4: ...hen replacing the filters Install the spark screen pre filter and particulate filter gas filter if any in filter cover Before installed always make sure filter material is intact and dry with no tears or other damages Install the filter cover assembly to the blower unit by engaging tabs on filter cover into bracket on blower unit and rotate assembly to close Push filter cover assembly down until l...

Page 5: ...he gas filter give additional protection against certain gaseous environment See the table below The particle filter and gas filter cannot be cleaned Stop using it immediately when smelling peculiar smell and replace it until you are in a safe area Stored at a temperature between 14 F to 131 F 10 C to 55 C in a clean environment without direct light Please install the particle filter and gas filte...

Page 6: ...propriate battery according to actual situation It is recommended to choose fast charging extended battery to match the gas filter Standard Battery Fast charging extended battery Fast charging standard battery Standard Battery Fast charging extended battery Fast charging standard battery Battery charger Fast charging battery charger V1BA TM3 00 V1FBA TM3 00 V1FEB TM3 00 V1BC TM3 00 V1FBC TM3 00 Ty...

Page 7: ...y is bleeping sounds occur every 30 seconds and vibration occurs every 2 minutes After the warnings occur around 15 minutes the battery indicator gets flashing which shows there should be at most 15 minutes left before the blower off Airflow low speed 170 lpm Remove battery pack from blower assembly Connect charger cord to battery terminal See fig 5b When the indicator light on charger turns from ...

Page 8: ... fig 7c BREATHING TUBE Assembling Insert the two prongs on the breathing tube into the blower unit and helmet air duct See fig 6 twist 1 4 to the anti open direction See fig 7a 7c then clip the breathing tube into holder on the back cover of the headgear to lock into place See fig 8 Disassembling Twist 1 4 to the open direction and then take the prongs out from the blower unit and helmet air duct ...

Page 9: ...ore use Testing method refers to page 9 5 Face seal Inspect face seal for damage and replace if necessary Make sure the air is supplied to helmet ENTER AND EXIT CONTAMINATED AREA Before using Respirator Check the following items AIR FLOW CONTROL SHOULDER STRAP BELT CUSHION Two indicator lights on display See fig 10a Low Speed 170 lpm High Speed 210 lpm When turn on the PAPR default setting is low ...

Page 10: ...met and disconnect tube from helmet Turn off the blower by long press button Release belt Remove straps from shoulders and remove blower off of your lower back IF some problem is shown in any part of the product for example the air supply is stopped or its amount is decreased IF it gets hard to breathe feeling dizzy or headache feeling the smell or taste of the contaminants and its stimulus occurr...

Page 11: ... the water NOT to get inside the body Do not use solvents or abrasive cleaners Ensure the electrical contacts of the motor blower and battery pack are dry before assembling well Breathing tube Wiping the exterior is insufficient Clean the outer hose and connection on the breathing tube with the soft cloth dipped in water and detergent solution Optional breathing tube covers can also be used to fac...

Page 12: ...lters Battery no power Battery not installed properly Tube blocked air leakage Dirty filter needs replacement Battery faulty Incorrect charging Blocked filter Damaged charger Filter is getting clogged Damaged Filter Hose with leakage problem Filter component not complete Tube gets blocked air leakage Filter assembled without removing the package The hose may get blocked air leakage STORAGE The TEC...

Page 13: ... auto darkening welding helmet immediately if the above mentioned problems cannot be corrected Contact the dealer Irregular Darkening Dimming Headband has been set unevenly and there is an uneven distance from the eyes to the filter lens Reset the headband to reduce the difference to the filter Auto Darkening filter does not darken or flickers Front cover lens is soiled or damaged Change the cover...

Page 14: ...urn to standby mode Short press the button again will active the screen once more and previous settings will remain MODE CONTROL Short Press ON MODE button to select the mode appropriate for the work activity See fig 14a Weld Mode used for most welding applications Push FUNC button to adjust shade number sensitivity and delay settings properly before welding In this mode the lens turns to dark imm...

Page 15: ...tting for everyday use The sensitivity ranges for each mode are as follows Cutting Mode Shade 5 8 Weld Mode Shade 9 13 Sensitivity 0 10 See fig 16a 16b Grind Mode No sensitivity adjustment As a simple rule for optimum performance it is recommended to set sensitivity to the maximum at the beginning and then gradually reduce it until the filter reacts only to the welding light flash and without anno...

Page 16: ... can also be used for low current TIG welding and TIG MIG MAG pulse ADJUSTING THE FIT OF THE HELMET The overall circumference of the headband can be made larger or smaller by rotating the knob on the back of the headband See adjustment Y in fig 18 This can be done while wearing the helmet and allows just the right tension to be set to keep the helmet firmly on the head without it being too tight I...

Page 17: ... upwards until it releases from the helmet See fig 20a 20b When installing the new shell cover put the side of lug boss of shell cover into the slot and then lock the other side into the helmet When hearing click the shell cover is completely fixed See fig 20c REPLACING THE AUTO DARKENING FILTER Press the thumb on the bottom sides of the auto darkening filter and push it upward See fig 21a remove ...

Page 18: ...t releases from helmet See fig 23b Press the grinding lens lightly and push inward remove the lens from slot and take it out carefully See fig 23c When installing new grinding lens put one side of lens into slot and then insert into the other side When installing new grinding lens cover put the side of lug boss of lens cover into the slot and then lock the other side into the helmet When hearing c...

Page 19: ... CLEANING Clean helmet by wiping with a soft cloth Clean the filter surfaces regularly Do not use strong cleaning solutions Clean sensors and solar cells with methylated spirit and a clean cloth and wipe dry with a lint free cloth 18 ...

Page 20: ...rc cutting Plasma arc welding Plasma arc cutting Torch brazing Torch soldering Carbon arc welding Gas welding Light Medium Heavy Oxygen cutting Light Medium Heavy Less than 3 2 5 3 5 2 5 4 5 8 4 6 4 More than 8 6 4 Light Heavy Light 2 Medium 2 Heavy 2 Under 1 8 1 8 to 1 2 Over 1 2 Under 1 1 to 6 Over 6 Less than 60 60 160 160 250 250 550 Less than 60 60 160 160 250 250 500 Less than 50 50 150 150 ...

Page 21: ...IN 4 Shade No from 5 to 8 Shade No from 9 to 13 Internal Digital Display Control Automatic On Off Low High Digital Display Control Up to Shade DIN16 at all times Solar cell Battery replaceable 2 CR2450 lithium battery 1 25 000 s from Light to Dark Yes 0 1 1 0 s Digital Display Control 2 amps DC 2 amps AC 10 C 55 C 14 F 131 F 20 C 70 C 4 F 158 F High Impact Resistance Nylon 160 g Stick Welding SMAW...

Page 22: ...PART LIST 1 1 1 2 3 5 6 7 8 9 10 11 12 4 2 2 2 3 1 2 3 4 5 6 7 9 8 21 The part with means it is not included in the product which need to be purchased seperately ...

Page 23: ...w indicator V3SC TM26 00 FC TM26 00 ADF950S IEXP IC TM950S 00 V3LC TM26 00 V3GL TM26 00 V3PH TM26 00 V3SW TM26 00 V3SWC TM26 00 V3FS TM26 00 V3AD TM26 00 V3HG TM26 00 V1BM TM3 00 V1BA TM3 00 V1P3 TM3 00 V1PF TM3 00 V1SS TM3 00 V1FC TM3 03 V1GF TM3 00 V1FBA TM3 00 V1FEB TM3 00 V1SH TM3 00 V1BE TM3 00 V1HC TM3 00 V1OR TM3 00 V1HO TM3 00 V1BC TM3 00 V1FBC TM3 00 V1AI TM3 00 A Tecmen PAPR Helmet Assem...

Page 24: ... to cause by improper handling abuse or application other than recommended in the user instruction If you come across any problem during warranty period contact your distributor send the defective parts together with the completed defect problem if necessary Thank you very much for choosing a TECMEN product For future reference please complete the owner s record below Serial Number Purchase Date W...

Reviews: