background image

TE70 IR-HEATER 


PAGE 16 

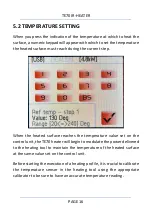
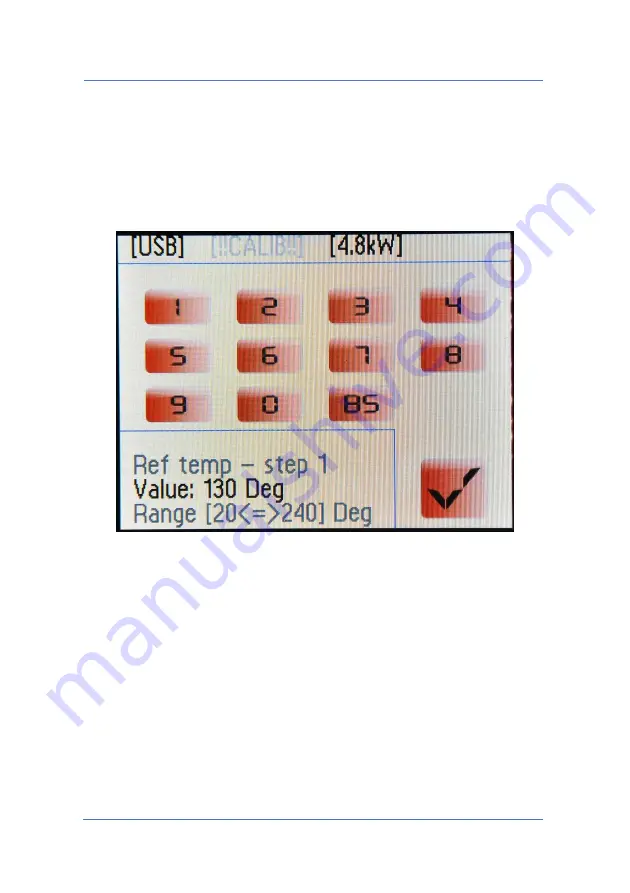
5.2 TEMPERATURE SETTING 

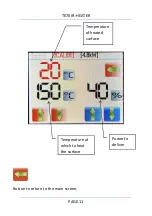
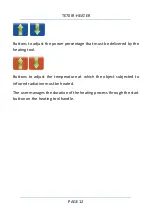
When you press the indication of the temperature at which to heat the 

surface, a numeric keypad will appear with which to set the temperature 

the heated surface must reach during the current step. 


When  the  heated  surface  reaches  the  temperature  value  set  on  the 

control unit, the TE70 heater will begin to modulate the power delivered 

to the heating tool to maintain the temperature of the heated surface 

at the same value set on the control unit.  

Before starting the execution of a heating profile, it is crucial to calibrate 

the  temperature  sensor  in  the  heating  tool  using  the  appropriate 

calibrator to be sure to have an accurate temperature reading. 

Summary of Contents for TE70

Page 1: ...MANUAL From version 1 00 TECNA S p A Via Meucci 27 40024 Castel S Pietro Terme Bologna ITALY Tel 39 0516954411 Fax 39 0516954490 http www tecna net DOCUMENT NUMBER MAN xxxx DISTRIBUTOR EDITION February 2016 ...

Page 2: ... AUTOMATIC WORK MODE 10 5 0 TEMPERATURE PROFILE WORK MODE 13 5 1 SELECTING THE STEP OF THE PROFILE TO BE EDITED 15 5 2 TEMPERATURE SETTING 16 5 3 POWER SETTING 17 5 4 SETTING THE STEP DURATION 18 6 0 USB 19 7 0 ERROR MESSAGES 21 8 0 HEATING TOOL 22 9 0 TEMPERATURE SENSOR CALIBRATION 23 10 0 CHOOSING BETWEEN C AND F 25 ...

Page 3: ...ment of the heater s programming parameters Three different operating modes o Manual o Automatic o Temperature profile for the drying or adhesive polymerization operations Temperature management both in C and F USB interface to load the pre parameterized profiles for the automatic and temperature profile operating modes Firmware upgrade through USB Alarms buzzer Automatic recognition of the type o...

Page 4: ... MENU Allows the user to access the TE70 heater s manual work mode This mode is used when a part needs to be heated through constant heat without the control unit having any limits on the temperature that the heated part can attain ...

Page 5: ...rolonged exposure to infrared radiation The TE70 heater will modulate power so that the object to be heated will not exceed the temperature set on the control unit Allows the user to access the TE70 heater s profile work mode This mode allows the generating of a temperature profile that varies over time and that features up to 5 different temperature values Heating according to a variable thermal ...

Page 6: ...R HEATER PAGE 6 Allows the user to load files from a USB pendrive that contains the pre parameterized programs for the automatic and temperature profile work modes simplifying parameter settings for the user ...

Page 7: ...he temperature sensor within the heating tool Calibrator not connected the temperature sensor cannot be calibrated CALIB Calibrator connected but temperature sensor calibration not done yet CALIB OK Calibrator connected and temperature sensor calibration performed correctly Indicator of the max power that the heating tool connected to the power box can deliver This value is updated automatically d...

Page 8: ...onstant amount of heat to it without any control on the maximum temperature the object will reach during the heat application time The user can adjust the power delivered by the heating tool power adjustment will affect the object s maximum temperature and heating speed Power to deliver Temperature of heated surface ...

Page 9: ...perature the sensor will no longer provide the temperature reading until the object s temperature drops to below 240 C In the event the surface subjected to infrared radiation is heated to above 240 C the temperature sensor built into the tool will not be damaged The precision in indicating the temperature of the object for temperatures below 240 C is related to the calibration of the sensor accor...

Page 10: ...to infrared radiation On reaching the temperature set on the TE70 heater the control unit will begin to modulate the power delivered to the tool to maintain constant the temperature of the heated surface We recommend using high power values when working on matt surfaces or when you want the piece to heat quickly A lower power value is advisable in the case of glossy surfaces or when you want a mor...

Page 11: ...TE70 IR HEATER PAGE 11 Button to return to the main screen Power to deliver Temperature of heated surface Temperature at which to heat the surface ...

Page 12: ...centage that must be delivered by the heating tool Buttons to adjust the temperature at which the object subjected to infrared radiation must be heated The user manages the duration of the heating process through the start button on the heating tool handle ...

Page 13: ... temperature profile simply place the tool on the surface to be heated and lock the Start through the appropriate button on the tool s handle in the ON position The TE70 heater will perform the programmed profile steps in sequence and at the end of the execution the tool will automatically stop delivering heat The maximum duration of each step can be 4 hours for a total maximum duration of the hea...

Page 14: ...TE70 IR HEATER PAGE 14 Power to deliver 5 3 Temperature of heated surface Temperature at which to heat the surface 5 2 Current step duration 5 4 Indicates current step number 5 1 ...

Page 15: ...ITED When you press the indication of the step number currently displayed a numeric keypad will appear with which to select which of the 5 steps making up the temperature profile you want to view and or edit The step to be viewed can be selected only when the start button on the heating tool is not pressed ...

Page 16: ...the heated surface reaches the temperature value set on the control unit the TE70 heater will begin to modulate the power delivered to the heating tool to maintain the temperature of the heated surface at the same value set on the control unit Before starting the execution of a heating profile it is crucial to calibrate the temperature sensor in the heating tool using the appropriate calibrator to...

Page 17: ...wer that must be delivered by the heating tool during the profile s current step We recommend using high power values when working on matt surfaces or when you want the piece to heat quickly A lower power value is advisable in the case of glossy surfaces or when you want a more uniform distribution of the heat delivered within the material to be heated ...

Page 18: ...ou set a current step duration of 0 the TE70 heater will skip the execution of the current step and go to the next step if present otherwise it will stop delivering power to the surface to be heated When you press the start button on the heating tool the field reserved to the duration of the current step will show the time remaining to the end of the step Step duration is displayed in hh mm format...

Page 19: ...n the status bar when it is properly recognized On entering the USB management menu the files containing the TE70 valid heating programs will be displayed in a scrollable list Button to return to the main screen without loading the parameters contained in the displayed file TE70 parameterization does not change ...

Page 20: ...n contain up to 100 different programs Files with TPM extension contain a parameterization for the temperature profile work mode Files with TAM extension contain a parameterization for the automatic work mode Loads the work parameters contained in the selected file and takes the user to the relating work screen ...

Page 21: ...utes You can press the START button at any time to resume the heating process You can delete the warning message by touching the touch screen in case you want to change the control unit s settings IGBT FAIL MACHINE LOCKED Power inverter error Check the integrity of the connection cable between the power box and the heating tool Contact customer support TEMP Warns there is an overheating in the pow...

Page 22: ...ton There is a button on the handle s side to lock the START button in held down position to be used when you cannot hold down the START button during the process or when using it in the temperature profile work mode In order to deactivate the START press the START button again to release the lock START button Temperature sensor ...

Page 23: ...inish and the color of the surface itself Therefore in order to have a correct reading of the surface temperature before starting work you must calibrate the temperature sensor using the appropriate calibrator Calibration should be performed each time you power on the machine when you connect a different heating tool and every time the surface to be processed changes color or finish ...

Page 24: ...quires from 30 seconds to 1 minute At the end of the calibration process the CALIB LED stays on and the control unit will emit 3 beeps to confirm calibration was performed Release the PUSH CALIB button and put the calibrator back in its seat N B use the calibrator only on surfaces at room temperature if the surface to be calibrated had been previously heated wait until it cools down before placing...

Page 25: ...t to display temperatures in C or F In order to change the two views press the area that displays the temperature of the heated surface within the automatic or temperature profile work screens The switching between the two units of measure will take place immediately ...

Reviews: