background image

EVO HOT - EVOK HOT 

| Manuale d’uso e manutenzione | IT

5

DESCRIZIONE DEL MOBILE

Il manuale d'uso fa riferimento ad un mobile “MURALE CALDO” tipo chiuso, per la vendita di “prodotti 

di GASTRONOMIA”.

Il mobile e' disponibile nelle seguenti lunghezze:

EVO HOT (Vetri curvi e vetro frontale ribaltabile) :    60 - 90 - 120 - 150 - 180 mm

EVOK HOT (Vetri dritti): 


90 - 120 - 150 - 180 mm

Il mobile è fornito standard di :

• 

n° 3 Ripiani vetrati con illuminazione.

• 

chiusure scorrevoli posteriori.

• 

illuminazione cappello e ripiani.

• 

controllore elettronico di comando.

Alimentazione: 230V - 1ph - 50Hz.

La vasca è realizzata a basso impatto ambientale con isolamento senza CFC. 


ATTENZIONE

Tutte le operazioni riguardanti i capitoli:

• 

"1 POSIZIONAMENTO DEL MOBILE" Pag. 6.

• 

"2 COLLEGAMENTO ELETTRICO E MESSA A TERRA" Pag. 7.

• 

"3 PULIZIA" Pag. 9.

• 

"5 MANUTENZIONE - GESTIONE RIFIUTI - SMALTIMENTO MATERIALI" Pag. 11.

devono essere effettuate da personale tecnico qualificato.

Summary of Contents for EVO

Page 1: ...MANUALE D USO E MANUTENZIONE USER AND MAINTENANCE MANUAL IT EN Cod LIEVOHT Rev 01_2018 del 02 2018 EVOK HOT EVO Tecnodom S p A Via Isonzo n 3 5 35010 Vigodarzere Padova Italy ...

Page 2: ... la rimozione della spina sia chiaramente indicato che la rimozione della spina deve essere tale per cui un operatore possa verificare da qualsiasi punto cui abbia accesso che la spina resti staccata Prima di procedere ad effettuare operazioni di manutenzione di controllo pulizia è necessario staccare l alimentazione elettrica UP DOWN STAND BY ESC SET ENTER LED ALARM MESSA A TERRA ATTENZIONE ITALI...

Page 3: ...LI PERIODICI pag 11 5 2 SOSTITUZIONEVETRO FRONTALE LATERALE RIPIANI pag 11 5 3 SOSTITUZIONEVETRI SCORREVOLI pag 12 5 4 SOSTITUZIONE LAMPADE ILLUMINAZIONE pag 13 5 5 SOSTITUZIONE MOTOVENTILATORE pag 14 5 6 SMALTIMENTO MATERIALI E GESTIONE RIFIUTI pag 14 5 7 ORDINARE LE PARTI DI RICAMBIO pag 14 6 PANNELLI COMANDO pag 16 DICHIARAZIONE DI CONFORMITA pag 45 DECLARATION OF CONFORMITY DECLARATION DE CONF...

Page 4: ...e per compiere in modo corretto e sicuro tutte le operazioni di installazione messa in funzione smontaggio e smaltimento dell apparecchio Questo manuale d uso e manutenzione contiene tutte le informazioni necessarie per una buo na gestione dell impianto con particolare attenzione alla sicurezza CONSERVAZIONE DEL MANUALE Il manuale d uso e manutenzione deve essere conservato integro ed in luogo sic...

Page 5: ...mm Il mobile è fornito standard di n 3 Ripiani vetrati con illuminazione chiusure scorrevoli posteriori illuminazione cappello e ripiani controllore elettronico di comando Alimentazione 230V 1ph 50Hz La vasca è realizzata a basso impatto ambientale con isolamento senza CFC ATTENZIONE Tutte le operazioni riguardanti i capitoli 1 POSIZIONAMENTO DEL MOBILE Pag 6 2 COLLEGAMENTO ELETTRICO E MESSA A TER...

Page 6: ...logistiche svolte senza ll rispetto delle norme di sicurezza 1 3 IMBALLO Alla consegna verificare che l imballo sia integro e che durante il trasporto non abbia subito danni Togliere il cartone di imballo esterno del mobile levare i fermi che fissano il mobile al pallet posizionare il mobile e rimuovere la pellicola adesiva a protezione dell acciaio se presente Il recupero ed il riciclaggio dei ma...

Page 7: ...rne la sua altezza in modo che questa non ostruisca le prese d aria Verificare che nell ambiente vi sia sufficiente ricambio d aria anche nei periodi di chiusura del locale di vendita DISTANZE MINIME DI INSTALLAZIONE Al fine di permettere un buon funzionamento del mobile e quindi un corretto ricircolo d aria durante la fase di posi zionamento del mobile si devono rispettare le distanze MINIME dal ...

Page 8: ...sinserire tutto l impianto di utilizzare come sezionatore un interruttore magnetotermico con differenziale da alta sensibilità La spina elettrica del mobile deve sempre essere collegata ad una presa fissa È vietato collegare la spina elettrica del mobile ad una prolunga e o o riduttore ATTENZIONE Tutte le operazioni di manutenzione ordinaria e straordinaria del mobile devono essere eseguite con un...

Page 9: ...i soggetti a fuoriuscite di liquidi o di altri detriti di alimenti Va fatta pulizia con detergente anche nelle zone esterne che circondano l area espositiva serve a mantenere il mobile presentabile e previene la formazione di sporcizia Fare attenzione a non ferirsi con le alette delle resistenze durante le operazioni di pulizia della vasca del mobile hanno uno spessore ridotto e possono risultare ...

Page 10: ... mobile attendere che la temperatura desiderata impostata dal termo stato sia raggiunta dal mobile Si ricorda che il mobile è un conservatore pertanto la merce va inserita calda Il carico massimo deve essere distribuito uniformemente per 20 kg al metro lineare 4 2 CONSERVAZIONE DEL PRODOTTO Si raccomanda di mantenere libere da ostruzioni tutte quelle aperture di ventilazione dell aria di mandata e...

Page 11: ...ettrico sia in completa sicurezza Controllare la chiusura degli scorrevoli posteriori e del loro scorrimento Pulire le resistenze riscadanti 5 2 SOSTITUZIONEVETRO FRONTALE LATERALE RIPIANI Nel caso di danneggiamento e o sostituzione del vetro frontale vetro laterale lato spalla della vetrina recupe rare i frammenti di vetro evitando di disperderli nell ambiente Fare attenzione dopo la eventuale ro...

Page 12: ...ilare delicatamente il cappello Prestare attenzione a non danneggiare le vetrocamere laterali 5 6 Svitare le viti laterali che fissano il montante che sorregge il binario alto delle porte scorrevoli 7 Svitare le viti laterali che fissano il montante superiore al binario alto delle porte scorrevoli 7 8 Liberare il binario delle porte scorrevoli svitando le viti superiori che lo fissano al montante ...

Page 13: ...mente 15 Rimontare le vetrocamere laterali prestando molta attenzione a non strisciarle o romperle 13 B 16 Riallineare la vetrocamera frontale curva facendola scorrere sulla sua guida inferiore 13 A 17 Rimontare la finitura frontale 12 12 13 A B 14 5 4 SOSTITUZIONE LAMPADE ILLUMINAZIONE Per la sostituzione delle lampade a stilo è sempre necessario staccare la spina di alimentazione o aprire il sez...

Page 14: ...n ogni paese Inoltre tutti i materiali che costituiscono il prodotto quali Lamiera rame e alluminio plastica e gomma vetro componenti in poliuretano schiumato ed altro Gas ed olio refrigerante devono essere stoccati in appositi bidoni non scaricarli nelle fognature Devono inoltre essere riciclati e o smaltiti secondo le procedure delle normative vigenti in materia Ricordiamo che lo smaltimento abu...

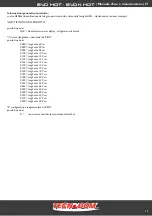
Page 15: ...ili opzioni 0060 lunghezza 60 cm 0090 lunghezza 90 cm 0096 lunghezza 96 cm 0100 lunghezza 100 cm 0120 lunghezza 120 cm 0125 lunghezza 125 cm 0136 lunghezza 136 cm 0140 lunghezza 140 cm 0150 lunghezza 150 cm 0180 lunghezza 180 cm 0182 lunghezza 182 cm 0200 lunghezza 200 cm 0240 lunghezza 240 cm 0250 lunghezza 250 cm 0262 lunghezza 262 cm 0280 lunghezza 280 cm 0300 lunghezza 300 cm 0350 lunghezza 35...

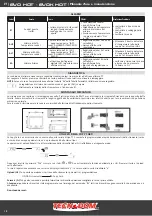
Page 16: ...lasciare Scorre le voci del menu Incrementa i valori Premere per almeno 5 sec Attiva la funzione Sbrinamento Manuale DOWN Premere e rilasciare Scorre le voci del menu Decrementa i valori Premere per almeno 5 sec Funzione configurabile dall utente par H32 SET ENTER Premere e rilasciare Visualizza eventuali allarmi se presenti Accede al menu Comandi Base Premere per almeno 5 sec Accede al menu Progr...

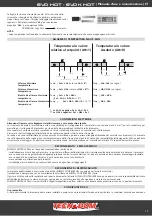
Page 17: ...cco MENU DI PROGRAMMAZIONE Per entrare nel menu Programmazione premere per oltre 5 secondi il tasto Se previsto verrà richiesta una PASSWORD di accesso PA1 vedi paragrafo PASSWORD All accesso il display visualizzerà il primo parametro diF Agendo sui tasti e si possono scorrere tutti i parametri del menu di Programmazione 5 sec Selezionare il parametro desiderato mediante i tasti e Premere il tasto...

Page 18: ...iare NOTE Se sono in corso tempi di esclusione allarme cartella AL della Tabella Parametri l allarme non viene segnalato La segnalazione di allarme derivante da sonda 1 guasta Pb1 compare direttamente sul display dello strumento con l indicazione E1 MONTAGGIO MECCANICO Lo strumento è concepito per il montaggio a pannello Praticare un foro da 29x71 mm e introdurre lo strumento fissandolo con le app...

Page 19: ...ne sia conforme a quello richiesto dallo strumento Le sonde non sono caratterizzate da alcuna polarità di inserzione e possono essere allungate utilizzando del normale cavo bipolare si fa presente che l allungamento delle sonde grava sul comportamento dello strumento dal punto di vista della compatibilità elettromagnetica EMC va dedicata estrema cura al cablaggio È opportuno tenere i cavi delle so...

Page 20: ...LRA max 250Vac o UL60730 B 2 Hp 12FLA 72LRA max 250Vac Normative Compatibilità Elettromagnetica Il dispositivo è conforme alla Direttiva 2004 108 EC e alla Norma armonizzata EN60730 2 9 Sicurezza Il dispositivo è conforme alla Direttiva 2006 95 EC e alla Norma armonizzata EN60730 2 9 Sicurezza Alimentare Il dispositivo è conforme alla Norma EN13485 come segue idoneo alla conservazione ambiente cli...

Page 21: ...co ventole a porta aperta e il loro riavvio alla chiusura se erano attive n blocco ventole y ventole inalterate ALLARMI Att 2 Permette di selezionare se i parametri HAL e LAL avranno valore assoluto Att 0 o relativo Att 1 AFd 2 Alarm Fan differential Differenziale degli allarmi HAL 90 Higher ALarm Allarme di massima temperatura Valore di temperatura in valore relativo il cui superamento verso l al...

Page 22: ... 3 set ridotto 4 stand by H42 1 2 Presenza sonda Evaporatore n non presente y presente reL 1 reLease firmware Versione del dispositivo parametro a sola lettura tAb 36 tAble of parameters Riservato parametro a sola lettura COPY CARD UL 2 Up Load Trasferimento parametri di programmazione da strumento a Copy Card Fr 2 Format Cancellazione di tutti i dati inseriti nella chiavetta ATTENZIONE Se vengono...

Page 23: ...EVO HOT EVOK HOT Manuale d uso e manutenzione IT 23 Note ...

Page 24: ... must be such that an operator may check from any point to which he has access that the plug remains disconnected All maintenance operations repairs and cleaning must be carried out with the equipment in stop position and with the power switched off UP DOWN STAND BY ESC SET ENTER LED ALARM EARTH CONNECTION ATTENTION ENGLISH RAEE Electrical and Electronic Waste Management The barred can symbol disp...

Page 25: ...pag 33 5 1 PERIODICAL CHECKS pag 33 5 2 GLASS REPLACEMENT pag 33 5 3 REPLACEMENT OF SLIDING DOORS pag 34 5 4 REPLACE OFTOP CANOPY AND SHELVES LIGHTINGS pag 35 5 5 MOTOR FAN REPLACEMENT pag 35 5 6 GARBAGE DISPOSAL pag 36 5 7 REQUESTING SPARE PARTS pag 36 6 CONTROL PANEL pag 38 DICHIARAZIONE DI CONFORMITA pag 45 DECLARATION OF CONFORMITY DECLARATION DE CONFORMITE KONFORMITÄTSERKLÄRUNG APPENDICE 1 pa...

Page 26: ...lp the operator and the qualified technician to conduct all installation procedures connections use and maintenance of the system in a safely manner and correctly This user and maintenance manual contains all the information required for handling the equipment with particular attention to safety MANUAL PRESERVATION It is advisable to use the manual with care and in such a way as not to compromise ...

Page 27: ...LASS 90 120 150 180 m EVO HOT and EVOK models include base n 3 glass shelves with ligthing lighting on the top canopy as standard rear sliding doors electronic control panel Power supply 230V 1ph 50Hz The insulation of the basin is free of CFC in order to guarantee a low environmental impact ATTENTION All operations regarding the points 1 HOT DISPLAY CABINET POSITIONING Pag 28 2 ELECTRICAL CONNECT...

Page 28: ...e above safety precautions 1 3 PACKING At the delivery please check that the packing is intact and that during transport no damage was occurred Remove the external carton box remove the fastener that keeps still the Hot Display Cabinet to its pallet put it in the correct position and then remove the adhesive white protection of the stainless steel if present The recovery and the recycling of the p...

Page 29: ...the equipment completely free so that air can circulate properly Do not place the equipment inside areas with high relative humidity levels it may cause forma tion of condensation Do not place the equipment inside a closed niche Do not place the equipment one above another Verify that the room in which the equipment is placed must be sufficiently aired even when the shop is closed Verify that in t...

Page 30: ...urrent and electricity meter 3 In order to save the equipment from overload or short circuit the connection to the electricity has to be done through a magneto thermal switch high sensibility 30 mA with manual re establishment of the right power 4 For protective device size consider the power consumptions showed on the identification label of the equipment APPENDICE 1 Pag 46 5 It is necessary that...

Page 31: ...n attached to the present manual 3 CLEANING All the procedures must be carried out with the stationary electrical system removing the tension from both the refrigerated item and the condensing unit 3 1 CLEANING OFTHE HOT DISPLAY CABINET It is necessary to keep the Hot Display Cabinet cleaned Any operation of cleaning must be done discon necting the electric power supply Wear protective gloves when...

Page 32: ...ording to local legislation provided that they are under strict supervision by a tutor and are adults as mentioned above In other words trainees must be in normal physical and psychological condition and adequately trained and informed regarding health and safety in the workplace ATTENTION Do not store explosive substances such as aeorsol cans with flammable propellant in this equipment 4 1 MAX SH...

Page 33: ...skets and the doors and make sure them closes correctly 5 2 GLASS REPLACEMENT In case of replacement or damage of the front of glass side glass shelf glass do not dissipate it on the environment In case of damage and or replacement of the front side doors glass pay attention manipulating it to avoid cutting yourself Glass replacement must be done by a technician ONLY FOR EVO HOT DISPLAY CABINET Th...

Page 34: ... the lid Be careful to not damage the insulating glass on the sides 5 6 Unscrew the screws located at the sides that fasten the stanchion that supports the upper rail of the sliding doors 7 Unscrew the screws located at the sides that fasten the upper stanchion to the upper rail of the sliding doors 7 8 Release the rail of the sliding doors by unscrewing the upper screws that fasten it to the uppe...

Page 35: ...them 13 B 16 Realign the front curved insulated glass letting it slide along its lower rail 13 A 17 Reassemble the front panel 12 12 13 A B 14 5 4 REPLACE OFTOP CANOPY AND SHELVES LIGHTINGS To replace the lamps it is always necessary to disconnect the power cord or open the switch upstream of the connection of the Refrigerator unit If the unit is equipped with lamps in case of breakage they must b...

Page 36: ...ure not to disperse Save the refrigerating gas and oil in special tanks do not dispose of them in the sewage system but dump them in according to your local laws 5 7 REQUESTING SPARE PARTS After verifying the problem with a specialized technician When requesting spare parts after please say clearly Model of the item Serial number of the item Motivation of the request of support Quantity of the spa...

Page 37: ...length of EUT possible options 0060 length 60 cm 0090 length 90 cm 0096 length 96 cm 0100 length 100 cm 0120 length 120 cm 0125 length 125 cm 0136 length 136 cm 0140 length 140 cm 0150 length 150 cm 0180 length 180 cm 0182 length 182 cm 0200 length 200 cm 0240 length 240 cm 0250 length 250 cm 0262 length 262 cm 0280 length 280 cm 0300 length 300 cm 0350 length 350 cm 0375 length 375 cm 0380 length...

Page 38: ...on DOWN Press and release Scrolls through menu items Decreases values Press for at least 5 secs Configurable function by user par H32 SET ENTER Press and release Displays alarms if active Opens the Machine Status menu Press for at least 5 secs Opens the Programming menu Confirms commands Heating elements LED Permanently on compressor active Off otherwise Alarm LED Permanently on alarm on Flashing ...

Page 39: ...gramming menu press for at least 5 secs the key If specified the PA1 access PASSWORD will be requested see PASSWORD paragraph At the access the display will show the first parameter diF By pressing the and keys you can scroll all parameters in the Programming menu 5 sec Select the desired parameter using the and keys Press to see the current value of the selected parameter Press and to change the ...

Page 40: ...ed for panel mounting Make a hole of 29x71 mm insert the instrument and fix it using the brackets provided Do not mount the instrument in humid and or dirty places it is suitable for use in ordinary polluted places Ventilate the place in proximity to the instru ment colling slits USING THE COPY CARD The Copy Card is an accessory connected to the TTL serial port used for quick programming of the de...

Page 41: ...r the conditions of assembly applied use on boards which allow access to dangerous parts without the use of tools tampering with and or alteration of the products installation use on boards that do not comply with the standards and regulations in force DISCLAIMER This manual and its contents remain the sole property of ELIWELL CONTROLS SRL and shall not be reproduced or distributed without authori...

Page 42: ...le sensors This means for example that sensor s error s shall be added to the instrument s one TABLE OF PARAMETERS PAR Level DESCRIPTION SEt Temperature SEtpoint COMPRESSOR diF 2 diFferential Relay compressor tripping differential The compressor stops on reaching the Setpoint value as indicated by the adjustment probe and restarts at temperature value equal to the Setpoint plus the value of the di...

Page 43: ...t 0 or relative Att 1 value AFd 2 Alarm Fan differential Alarm differential HAL 90 Higher ALarm Maximum temperature alarm Temperature value in relative value which if exceeded in an upward direction triggers the activation of the alarm signal LAL 35 Lower ALarm Minimum temperature alarm Temperature value in relative value which if exceeded in a downward direction triggers the activation of the ala...

Page 44: ...duced set 4 stand by H42 1 2 Evaporator probe present n not present y present rEL 1 reLease firmware Device version read only parameter tAb 36 tAble of parameters Reserved read only parameter COPY CARD UL 2 Up load Programming parameter transfer from instrument to Copy Card Fr 2 Format Erasing all data in the copy card WARNING If one or more of these parameters highlighted with are modified the co...

Page 45: ...ATION DE CONFORMITE KONFORMITÄTSERKLÄRUNG FARE RIFERIMENTO ALLA DICHIARAZIONE CE CHE ACCOMPAGNA IL PRODOTTO REFERTO CE DECLARATION ACCOMPANYINGTHE PRODUCT REPORTEZ VOUS À LA DÉCLARATION ACCOMPAGNANT LE PRODUIT BEACHTEN SIE DIE DEM PRODUKT BEILIEGENDE CE ERKLÄRUNG F A C S I M I L E المطابقة إقرار بالمنتج المرفق اإلقرار راجع ...

Page 46: ... plate defines all the technical data of the Hot Display Cabinet as showed on the table in the next page L étiquette définit toutes les donnes techniques sur le produit selon la tabelle page suivante Die Platte definiert die Produkt technischen Daten wie in der Legende auf der nächsten Seite beschrieben Dicha tarjeta define todos los datos técnicos del producto como se describe en la leyenda en la...

Page 47: ...nz gegen Wasser Kondensation Resistencia agua Condensado 12 Resistenza sbrinamento elettrico Watt Electric defrost Heater Résistance dégivrage Électrique Widerstand Abtauung Elektrische Resistencia descongelación 13 Potenza assorbita totale A Total power consumption Consommation d énergie totale Total Stromverbrauch Consumo total de potencia 14 Tensione alimentazione Volt Power supply Tension d al...

Page 48: ...Appendici Manuale d uso e manutenzione 48 APPENDICE 2 DESCRIZIONE PARTI DEL MOBILE HOT DISPLAY CABINET PARTS DESCRIPTION DESCRIPTION DU MEUBLE FRIGO BESCHREIBUNG DERTEILE DER KÜHLSCHRANK 1 2 8 10 3 4 5 6 4 8 5 6 2 9 10 3 ...

Page 49: ...eriore Rear sliding doors Les portes arrière coulissantes Hinre Schiebetüren 8 Vetro frontale Front glass Verre avant Frontglas 9 Pannello frontale Front panel Panneau frontal Frontpanel 10 Pannello inferiore Front panel Frontal inférieur Untere Blende 11 Controllo elettronico Electronic control panel Panneau de comande électronique Elektronisches Steuerpaneel 12 Unità riscaldante Heating system s...

Page 50: ...20 150 180 Lunghezza Lenght mm 600 900 1200 1500 1800 Potenza assorbita totale Ventilato Total absorbed power Ventilated W A 680 2 78 728 2 97 756 3 08 1356 5 53 1412 5 76 Potenza assorbita dall illuminazione dotazione standard Power absorbed by lighting standard version W 48 56 84 112 140 Superficie esposizione Display surface m2 0 99 1 41 1 88 2 34 2 81 Peso complessivo con imballo standard Tota...

Page 51: ...ght mm 900 1200 1500 1800 Potenza assorbita totale Ventilato Total absorbed power Ventilated W A 728 2 97 756 3 08 1356 5 53 1412 5 76 Potenza assorbita dall illuminazione dotazione standard Power absorbed by lighting standard version W 56 84 112 140 Superficie esposizione Display surface m2 1 41 1 88 2 34 2 81 Peso complessivo con imballo standard Total weight with standard packing Kg 135 155 170...

Page 52: ...IT EN F DE ARABIC Appendici Manuale d uso e manutenzione 52 APPENDICE 4 TEST DIELETTRICO DIELECTRICTEST TEST DIÉLECTRIQUE DIELEKTRISCHETEST FAC SIMILE ...

Page 53: ...RI 13 SONDA TEMPERATURA 14 15 16 18 LAMPADE ILLUMINAZIONE 1800 35W X 4 1500 28W X 4 1200 21W X 4 900 24W X 4 600 8W X 4 M1 INTERRUTTORE MAGNETOTERMICO 13 V U PE 8 14 15 18 V U PE 9 1 14 13 24 23 2 14 13 24 23 X1 L1 N PE R1 2 3 4 8 9 10 11 3 16 1 2 3 4 5 6 13 14 A1 A2 U 2 M1 R3 R2 R4 12 11 TS1 M 1 M 1 SCHEMA HO 961 OLD 22 06 2017 16 03 49 1 1 Sheet A B C D A B C D 1 2 3 4 EW961 TECNODOM resistenze ...

Page 54: ...cteur seréserveledroitdemodifiermodèles caractéristiques etprixsanspréavis Touteslesdonnéessontfourniesàtitreindicatifetn engagentenrienleConstructeur Seuleslesdonnéesfigurant sur la confirmation de commande font office de preuve et engagement Änderungen und Irrtümer vorbehalten Abbildungen können ähnlich sein und vom tatsächlich gelieferten Produkt abweichen Den Hersteller behält sich das Recht v...

Reviews: