background image

34

EN


ATTENTION

It is essential to keep daily clean the apliance in order to prevent the development and the accu-
mulation of bacteria. Before cleaning the chamber of the apliance, you must execute a defrosting 
process, by removing the lid of the drainage basin. 
Inside the upper part housing the block, it is recommended not to clean the electrical cables in 
order to prevent to pull them

Do not fl ush directly the inner parts of the apliance

 because the electrical parts could get damaged. 

• 

Do not use any hard metal tools to remove the ice

.

• 

For the cleaning use only warm water (not hot) with no-aggressive detergents, taking care 
of drying the wet parts with a soft cloth.

• 

Avoid to use products that contain chlorine or diluted solutions, caustic soda, abrasive de-
tergents, muriatic acid,

 vinegar, bleach or other products that might scratch or grind.

• 

We recommend to clean the device at least once a month,

 when it used for deep-frozen products.


Attention, during the cleaning operations it is recommended to use work gloves.

3.2  CONDENSER’S BUIlT-IN UNIT CLEANING


Any operation of cleaning must be done disconnecting the 

electric power supply.

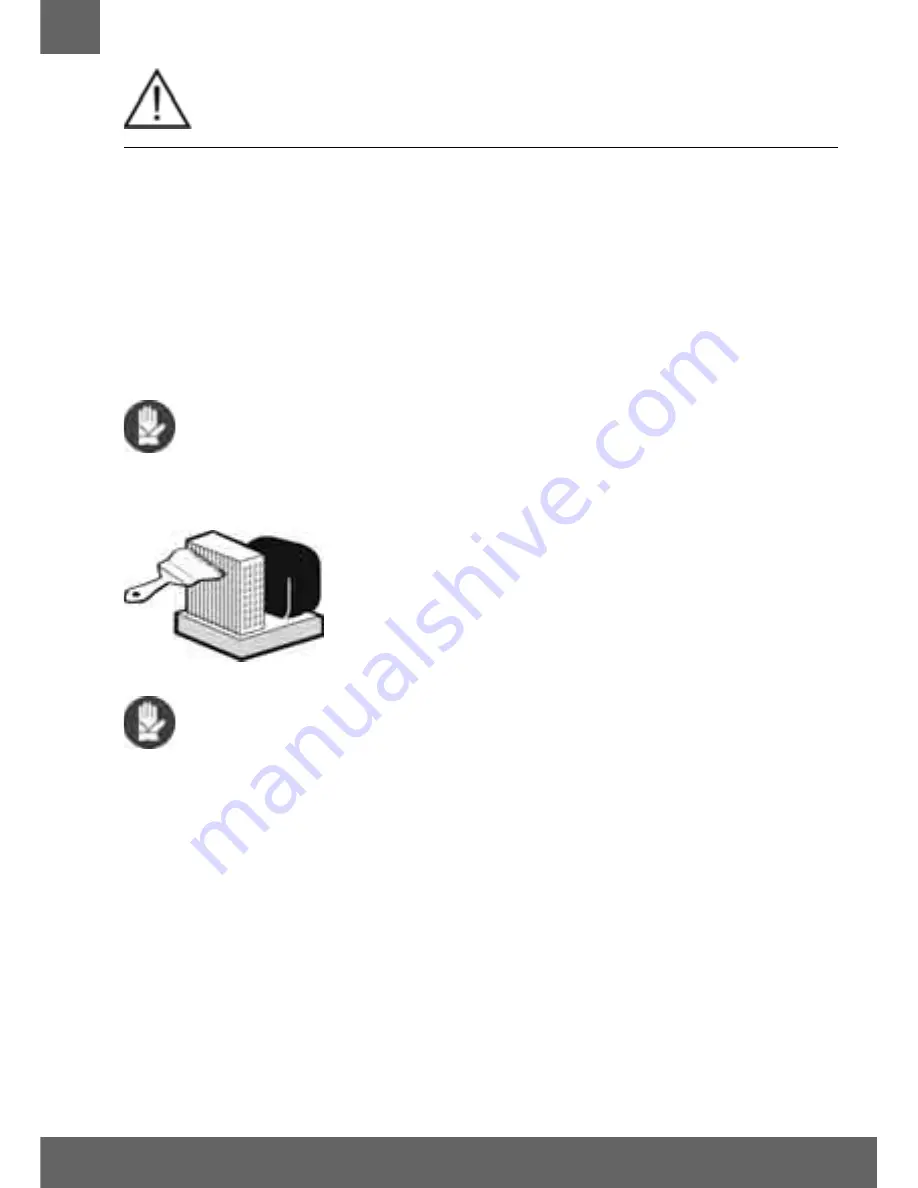
The condenser of the MINI Cold-Room with built-in unit must be cleaned, in 

normal conditions of use of the MINI Cold-Room, at least once a month by 

using a vacuum cleaner and a real-bristle brush.

It is advisable to use gloves since the reduced thickness of the wings can cut. 

Dirty condensing unit reduce the output ofthe engine causing an increase 

of energy consumption. 

Take care not to damage the refrigerating fl uid circuit.

The unit is on the top of the MINI Cold-Room.


The condenser features sharp edges. Wear protective gloves when cleaning.

3.3 FLOOR CLEANING

Use the correct cleaning products (follow manufacturer's instructions, use mild detergent in warm 
water, rinse and dry with a soft cloth). 

• 

Immediately clean up the spilled product 

• 

Check the joint between the fl oor panels 

• 

Use correct solution of detergent. 

• 

Use hand trucks with light wheels soft rubber. 

• 

Do not use abrasive cleaners 

• 

Do not wipe the fl oor with pressure equipment. 

Summary of Contents for MINI COLD ROOM 100

Page 1: ...Italian Products 100x100 cm base Cold and Freezer Rooms MINICELLA100 TN BT INSTALLATION AND OPERATION GUIDE SMALL COLD ROOMS Cod LINMCEL IT EN_REV_01_2014_M05 10 06 2014 EN ...

Page 2: ...nt le traitement des déchets des appareillages électriques et électroniques DEUTSCH RAEE Umgang mit Abfällen elektrischer und elektronischer Geräte Das Symbol der durchkreuzten Mülltonne auf dem Produkt oder der Dokumentation der Gebrauchsanweisung gibt an dass das Produkt nach dem 13 August 2005 auf den Markt gebracht wurde Am Ende des Nutzungszyklus muss das Produkt entsprechend der im jeweilige...

Page 3: ...LF LOAD pag 35 4 2 STORING PRODUCTS pag 35 4 3 DEFROSTING pag 36 5 MAINTENANCE WASTE MANAGEMENT DISPOSAL OF MATERIALS pag 36 5 1 PERIODICAL CHECK pag 36 5 2 REPLACEMENT OF THE LIGHT pag 36 5 3 SUBSTITUTION OF THE FAN MOTOR pag 36 5 4 SUBSTITUTION OF THE COMPRESSOR Refrigerated gas pag 37 5 5 CONDENSER S BUIlT IN UNIT CLEANING pag 37 5 6 MINI Cold Room WITH ELECTRIC DEFROSTING pag 37 5 7 GARBAGE DI...

Page 4: ...rt of the MINI Cold Room It must be kept intact and in the safe place for the entire life of the appliance even if the appliance is transferred to another user or owner The manual must be easily consulted by opera tors and maintenance staff and must be placed nearby the unit The appliance includes all documentation required by regulations in force which are reached during the planning and manufact...

Page 5: ...nox operating antiskid Cold room temperature Normal temperature NT 0 8 C Low temperature LT 18 20 C Isolamento The insulation is made with polyurethane injection PUR with characteristics as follow Panel thickness 60 mm K Kcal h m2 C 0 26 Density 40 42 kg mc The insulation of the basin is free of CFC in order to guarantee a low environmental impact The Mini Cold Room is available as follow already ...

Page 6: ...iability for failing to comply with safety rules currently in force Before starting the unloading positioning and installation procedures of the MINI Cold Room inside the shop kitchen according to the model of the MINI Cold Ro om please read carefully the information showed in the dimensions and weights list The manufacturer declines any responsibilities due to operations performed without adoptin...

Page 7: ...e monoblock unit or the condensing unit Do not positioning the MINI Cold Room inside the area in which there is to much hu midity possible making condensation of the surface of the MINI Cold Room Do not positioning the MINI Cold Room inside a close cavity there is no circulation of air and the MINI Cold Room will not run properly Do not positioning two or more MINI Cold Rooms back to back position...

Page 8: ...t the end of this manual Before plugging in the MINI Cold Room it is necessary to proceed with its complete and careful cleaning using warm water with no aggressive detergents and drying with a soft cloth all the humid parts read with attention the chapter 3 cleaning In order to carry out a correct plug in you must proceed as follow 1 Before the connection to the electrical supply it is necessary ...

Page 9: ...ing the plug in the socket check if the sectioning unit is in the position marked by 0 OFF for remote unit MINI Cold Room the first starting has to be made by qualified technicians After having checked as above it is possible to start the appliance giving electricity from the gene ral power pack see paragraph 2 1 Press green button in position n 1 ON WARNING Before loading the food on the applianc...

Page 10: ...cts Attention during the cleaning operations it is recommended to use work gloves 3 2 CONDENSER S BUIlT IN UNIT CLEANING Any operation of cleaning must be done disconnecting the electric power supply The condenser of the MINI Cold Room with built in unit must be cleaned in normal conditions of use of the MINI Cold Room at least once a month by using a vacuum cleaner and a real bristle brush It is ...

Page 11: ...ors and only do so for the time required to load products Storing non frozen products will worsen the operating conditions of the unit risking damaging products that are already stored inside the unit Therefore avoid placing products in non refrigerated areas to prevent excessive loss of cold make sure all of the ventilation inlets and outlets of the refrigerated table are free of obstacles The do...

Page 12: ...egular intervals at least once a year it is important to make a complete system check by qulified staff only Please check that the water drainage system works properly there are no refrigerating gas leaks and the complete refrigerating system works properly the maintenance state of the electrical system is completely safe the door gaskets and the door itself close properly the condenser of refrige...

Page 13: ...ill be hot after defrosting cycle Wait until it cools off then proceed with maintenance and cleaning operations 5 7 GARBAGE DISPOSAL Plastic gaskets sheet metal polyurethane components panel controls and electric material in general must be saved and or dumped in public dumps and or garbage authorized centre Be sure not to disperse Save the refrigerating gas and oil in special tanks do not dispose...

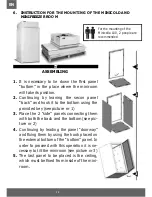
Page 14: ...cture nr 1 3 Place the 2 side panels connecting them with both the back and the bottom see pic ture nr 2 4 Continuing by leading the panel doorway and fixing them by using the hook placed on the external bottom of the bottom panel In order to proceed with this operation it is ne cessary to tilt the miniroom see picture nr 3 5 The last panel to be placed is the ceiling which must be fixed from insi...

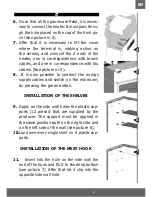
Page 15: ... 5 8 It is now possible to connect the energy supply cables and switch on the miniroom by pressing the green botton INSTALLATION OF THE SHELVES 9 Apply on the side wall holes the plastic sup ports 12 pieces that are supplied by the producer The support must be applied in the same position both on the right side and on the left side of the wall see picture 6 10 Lay down every single shelf on 4 plas...

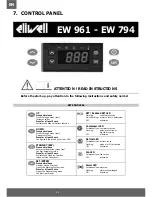
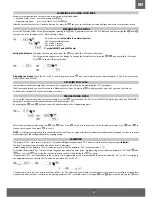
Page 16: ...s alarms if active Opens the Machine Status menu Press for at least 5 secs Opens the Programming menu Confirms commands SET Reduced SET LED Flashing reduced set active Quick flashing access to level 2 parameters Off otherwise Compressor LED Permanently on compressor active Flashing delay protection or blocked start up Off otherwise Defrost LED Permanently on defrost active Flashing manual or D I a...

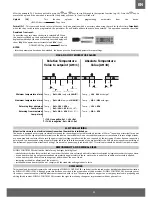
Page 17: ...gramming menu press for at least 5 secs the key If specified the PA1 access PASSWORD will be requested see PASSWORD paragraph At the access the display will show the first parameter diF By pressing the and keys you can scroll all parameters in the Programming menu 5 sec Select the desired parameter using the and keys Press to see the current value of the selected parameter Press and to change the ...

Page 18: ...endtemperature detectedbythePb2probe RegistrationAd2labelintheALfolder AlarmiconpermanentlyON waituntilthenextdefrostforautomaticreturn MANUAL DEFROST CYCLE ACTIVATION To manually activate the defrost cycle hold down the key for 5 seconds If the defrost conditions are not satisfied the parameter OdO 0 EW961 EW971 and EW974 the evaporator probe Pb2 temperature is higher than the defrost end tempera...

Page 19: ...e device is equipped with screw or removable terminals for connecting electric cables with a diameter of 2 5mm2 one wire per terminal for power connections For the capacity of the terminals see the label on the instrument Do not exceed the maximum current allowed in case of higher loads use an appropriate contactor Make sure the power supply voltage complies with the one required by the instrument...

Page 20: ...onnectors TTL for connection to Copy Card Temperature Operating 5 55 C Storage 30 85 C Humidity Operating Storage 10 90 RH not condensing Electrical Caracteristics Power Supply 230Vac 10 10 50 60 Hz Consumption 4 5W max Display Range NTC 50 0 C 110 C on display with 3 digit sign Accuracy Better than 0 5 of full scale 1 digit Resolution 0 1 C Buzzer YES it depends from the model Analogue Input EW96...

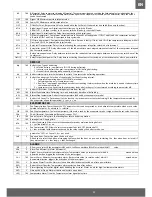
Page 21: ...top Each time the compressor stops a defrosting cycle is performed according to parameter dtY dOH 2 defrost Offset Hour Start of defrosting delay time from the call dEt 1 2 defrost Endurance time Defrosting time out determines duration of defrosting dSt 1 2 defrost Stop temperature Defrost stop temperature defined by the evaporator probe dPO 2 defrost at Power On Determines if at the start up the ...

Page 22: ...al etc for example set 10 C become 10 F ddd 2 Selection of type of value to be displayed 0 Setpoint 1 cold room probe Pb1 2 evaporator probe Pb2 CONFIGURATION H08 2 Stand by operating mode 0 display switch off 1 display switch off loads and alarms stopped 2 display with OFF label loads and alarms stopped H11 2 Configuration of digital inputs polarity 0 disabled 1 defrosting 2 reduced set 3 not use...

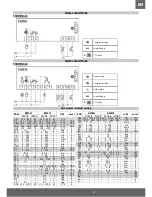
Page 23: ...50 0 150 8 0 C F 1 2 dPO n y n n y n flag 2 FPt 0 1 0 flag 2 FSt 50 0 150 50 0 C F 1 2 FAd 1 0 50 0 2 0 C F 2 Fdt 0 250 0 min 1 2 dt 0 250 0 min 1 2 dFd n y y flag 1 2 FCO n y y flag 2 Fod n y n flag 2 Att 0 1 1 0 1 1 flag 2 AFd 1 0 50 0 2 0 1 0 50 0 2 0 C F 2 PAR EW961 EW974 U M Level RANGE DEFAULT RANGE DEFAULT HAL LAL 150 0 50 0 LAL 150 0 50 0 C F 1 2 LAL 50 0 HAL 50 0 50 0 HAL 50 0 C F 1 2 PAO...

Page 24: ...72 EN Note ...

Page 25: ...quire ments of the machines directive La société affirme sa propre responsabilité que le produit ci dessus pour la conception et la construction répond aux exigences de la directive Die Firma erklärt unter alleiniger Verantwortung dass das oben genannte Produkt die Gestaltung und Konstruktion den Anforderun gen der Richtlinien erfüllt La empresa afirma de dice que su propia responsabilidad que el ...

Page 26: ...74 EN APPENDICE 1 Product identification plate The plate defines all the technical data of the MINI Cold Room as showed on the table in the next page ...

Page 27: ...l power Puissance total de la lumière Elektrische Leistung von licht Potencia electrica de iluminacion 11 Resistenza acqua di condensa Watt Electric heater condensation water Résistance eau Condensat Resistenz gegen Wasser Kondensation Resistencia agua Condensado 12 Resistenza sbrinamento elettrico Watt Electric defrost Heater Résistance dégivrage Électrique Widerstand Abtauung Elektrische Resiste...

Page 28: ...mballo mm 1120x1190x2300 H With packaging Peso lordo con imballo Kg 190 Gross weight with packing SENZA MONOBLOCCO mm 1000x1000x1800 H Without monoblock Con imballo mm 1120x1190x1980 H With packaging Peso lordo con imballo Kg 170 Gross weight with packing Dimensione luce netta di passaggio porta a tampone mm 700 x 1680H ...

Page 29: ...x1900x1000 H Packaging with monoblock Peso lordo con imballo Kg 210 Gross weight with packing IMBALLO SENZA MONOBLOCCO mm 1030x1900x680 H Packaging without monoblock Peso lordo con imballo Kg 190 Gross weight with packing Dimensione luce netta di passaggio porta a tampone mm 700 x 1680H ...

Page 30: ...78 EN APPENDICE 2 MINI Cold Room parts description 1 5 7 8 2 3 6 4 ...

Page 31: ...es Tueren Porta 4 Cremagliera Upright Crémaillère Rack Cremallera 5 Ripiano Shelf Clayettes Ablage Estantería 6 Guarnizione porta Door rubber Joint de la porte Türdichtung Junta de la puerta 7 Resistenza elettrica Electric heater Résistance électrique Elektrischer Widerstand Resistencia eléctrica 8 pavimento inox bugnato Embossed stainless steel floor sol en acier inoxydable bosselé Boden aus ruts...

Page 32: ...CK MINI Cold Room description Electrical diagram code MINICELLA TN with ligthing on request EL_MB_MIC_TN_001 MINICELLA BT with ligthing on request EL_MB_MIC_BT_003 APPENDICE 6 MINI Cold Room ELECTRICAL APPENDICE 5 DIELECTRIC TEST ...

Page 33: ...l S1 MC LEGENDA LEGEND S1 INTERRUTTORE BIPOLARE BIPOLAR SWITCH COMP COMPRESSORE COMPRESSOR M0 MOTORE VENTOLE EVAPORATORE FAN EVAPORATOR MOTOR MC MOTORE VENTOLA CONDENSATORE FAN CONDENSER MOTOR ROOM NTC PROBE SONDA CAMERA REFRIGERATA NTC D I DIGITAL INPUT 11 D I 8 UFF TECNICO UFF QUALITÀ MM 1 1 MONOBLOCCO MONOBLOCK MINICELLA MINICOLDROOM TN DISEGNATO 01 ...

Page 34: ...C HEATER R SCARICO RESISTENZA NEL CONDOTTO DI SCARICO ELECTRIC HEATER DRAIN M0 MOTORE VENTOLE EVAPORATORE FAN EVAPORATOR MOTOR MC MOTORE VENTOLA CONDENSATORE FAN CONDENSER MOTOR EVAP PROBE NTC SONDA EVAPORATORE mod NTC EVAPORATOR PROBE mod NTC ROOM NTC PROBE SONDA CAMERA REFRIGERATA NTC D I DIGITAL INPUT MARRONE G V BLU M0 R R SCARICO BORDO PORTA 220 V ca S1 ROOM PROBE NTC EVEP PROBE NTC D I 1 2 4...

Page 35: ...83 EN Note ...
Page 36: ...ndicativo e non impegnano il Costruttore The images showing the products have been taken during the printing of this catalogue and therefore they are merely indicative and could be subject to variations The Constructor holds the right to modify the models characteristics and prices without notice All the details are provided as a rough guide and they do not commit the Manufacturer MINICELLA100 TN ...

Reviews: