6
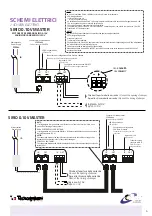
1. Inserire il connettore plug dell'alimentatore nella sede PLUG “IN”: l'altro capo del cavo di alimentazione va
alimentato a 230Vac.
2. Collegare i due fili per alimentazione 0-10V rispettando la polarità al connettore 2poli IN presente nel gruppo
motore
3. Alla prima alimentazione, verificare per un paio di secondi, una serie di movimenti di chiusura-apertura-chiusura
della farfalla (allineamento).
4. Al termine del settaggio, il led del motore Lampeggio ad intervalli regolari di 1sec. circa di colore Verde.
5. Alimentare l’ingresso 0-10V e verificare che alla tensione di 10V, vi sia l'apertura MAX della farfalla: durante
il movimento della farfalla, il led Verde rimane acceso fisso. In questa condizione, si constaterà la chiusura del
contatto a capo dei morsetti OUT.
6. Per chiudere la farfalla della serranda, portare l’alimentazione a 0V: durante il movimento della farfalla, il led Verde
rimane acceso fisso.
7. Alimentare con valori intermedi al 0-10V per definire aperture intermedie.
1. Insert the plug connector of the power supply into the PLUG seat “IN”: the other end of the power cord is powered at
230vac.
2. Connect the two wires for power supply 0-10V respecting the polarity to the 2pin IN connector present in the motor unit
3. At the first feeding, check for a couple of seconds, a series of closing-opening-closing movements of the butterfly
(alignment).
4. At the end of the setting, the LED of the Blinking motor at regular intervals of about 1sec. Green color.
5. Power the input 0-10V and verify that at the voltage of 10V, there is the MAX opening of the butterfly: during the
movement of the butterfly, the Green LED remains on fixed. In this condition, the contact at the end of the OUT terminals
will be closed.
6. To close the damper throttle, turn the power to 0V: while the butterfly is moving, the Green LED remains on permanently.
7. Feed with intermediate values of 0-10V to define intermediate openings.


