background image

MODEL: LED19BHRDWHBD, LED22BFRDWHBD, LED24BFRDWHBD

DIGITAL LED/LCD TELEVISION

WHTH EDGE LED LIGHTING

Summary of Contents for LED19BHRDWHBD

Page 1: ...MODEL LED19BHRDWHBD LED22BFRDWHBD LED24BFRDWHBD DIGITAL LED LCD TELEVISION WHTH EDGE LED LIGHTING ...

Page 2: ...ting an Antenna 10 Remote Control 11 First Installation 13 Picture Menu 15 Sound Menu 17 Channel Menu 19 Feature Menu 24 Setup Menu 33 Personal Video Recorder Mode PVR 36 Media Player Mode 37 Media Player Format 40 DVD Operation 41 Disc Care 49 Troubleshooting 50 Specifications 51 Contents Safety Information User Guidance Information Operation Maintenance and Service ...

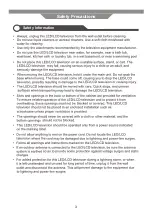
Page 3: ...2 Preface Safety Information Safety Precautions ...

Page 4: ...3 Safety Information Safety Precautions ...

Page 5: ...4 Safety Information Safety Precautions ...

Page 6: ...5 Safety Information Safety Precautions If the TV set is plugged in a slight current still flows even if the power button is in the OFF postion ...

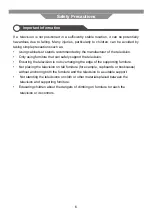
Page 7: ...vision Only using furniture that can safely support the television Ensuring the television is not overhanging the edge of the supporting furniture Not placing the television on tall furniture for example cupboards or bookcases without anchoring both the furniture and the television to a suitable support Not standing the televisions on cloth or other materials placed between the television and supp...

Page 8: ... the unit is ON or in STANDBY OFF mode 3 The functions of the buttons are described as bellows POWER Press to turn the unit on or off SOURCE Press to select the input source of the TV MENU Press to display the OSD menu press again to exit the menu CH Press to scan through channels VOL Press to adjust the volume Play Pause the disc playing Eject the disc 2 1 ...

Page 9: ... to the PC output jack a personal computer 5 AV Video R L Audio Input Jack Connecting for composite signal input in AV mode 6 Coaxial Output Jack 7 HDMI Input Jack Connecting of HDMI signal 8 USB Connecting for USB device 9 Antenna Input Jack Connecting to extern antenna to receive the TV 10 YPbPr Input Jack Connecting for component signal input in YPbPr mode 1 2 3 4 5 6 7 8 9 10 ...

Page 10: ...9 Use Guidance Information Desktop Mounting Wall Mounting ...

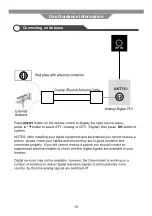
Page 11: ...10 Use Guidance Information Connecting an Antenna ...

Page 12: ...urce menu PMODE Change the picture mode SMODE Change the sound mode mode SLEEP Set sleep timer to turn off TV Mute Unmute the volume Recall previous channel in TV mode CH Adjust channel OK Navigation buttons Confirm selection button DVD SETUP EXIT Open the DVD Setup menu Exit from current menu FAV Open the FAV channel list in TV mode FAV Select the channel in FAV channel list EPG Open the electron...

Page 13: ...teletext mode Step playback mode in DVD and Media modes Play Pause in DVD and media playback Fast reverse in playback Fast forward in playback Start recording to PVR in DTV mode Stop in playback modes 9 Previous file in media playback Next file in media playback PROG RED Open the program playback function in DVD mode Red button function in on screen menus LANG GREEN Change the language or audio tr...

Page 14: ...ous menu Press OK button or GREEN button to enter Setup 4 menu Press EXIT button to exit Auto Installation menu Country Setup 2 Auto Installation Move Enter Exit OK Exit Home Mode Setup 1 Auto Installation Move Enter Exit OK Exit Next Page Previous Page Next Page Language Setup 3 Auto Installation Move Enter Exit OK Exit Previous Page Next Page Auto Installation German English French Italian Spani...

Page 15: ...lian Spanish Ukraine Other Australia New Zealand Singapore Setup 5 Auto Search Auto Installation All ATV DTV Previous Page Move Enter OK Exit Exit Country Setup 2 Auto Installation Move Enter Exit OK Exit Move Enter Exit OK Exit Next Page Previous Page Next Page Language Setup 3 Auto Installation Move Enter Exit OK Exit Previous Page Next Page Auto Power Off Hours can be chosen for a continuous vi...

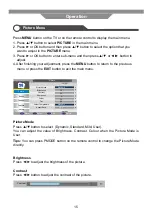
Page 16: ...button to exit the main menu Picture Mode Press button to select Dynamic Standard Mild User You can adjust the value of Brightness Contrast Colour when the Picture Mode is User Brightness Press to adjust the brightness of the picture Contrast Press button to adjust the contrast of the picture Picture Sound Channel Feature Setup Move Enter Exit OK Exit Return Menu Picture Mode Brightness Contrast S...

Page 17: ... and it will be shown in gray Tint Press button to adjust the tone of colour when system is in NTSC Colour temperature Press button to adjust the optimum colour temperature mode according to your preference Standard Cool Warm Aspect Ratio Press button to select Aspect Ratio 4 3 16 9 Full Zoom1 Zoom2 Cinema Just Scan Noise Reduction Press button to select Noise Reduction Off Low Middle High Operati...

Page 18: ...ter Exit OK Exit Return Menu Sound Mode Bass Treble Balance Surround AVL SPDIF Standard 50 50 0 Off Off PCM Sound TIPS You can press SMODE button on the remote control to change the Sound Mode directly Operation Press MENU button on the TV or on the remote control to display the main menu 1 Press button to select SOUND in the main menu 2 Press or OK button and then press button to select the optio...

Page 19: ...18 Surround Press button to turn On or Off the surround AVL Press button to turn On or Off the AVL Audio Volume Leveler SPDIF Press button to select Off PCM Auto Sound Menu Operation ...

Page 20: ... the channel Press GREEN button again to unlock Press YELLOW button to skip the channel Press YELLOW button again wil cancel skip Press BLUE button to swap the channel position Press MENU button on the TV or on the remote control to display the main menu 1 Press button to select CHANNEL in the main menu 2 Press or OK button and then press button to select the option that you want to adjust in the ...

Page 21: ...me Fav1 Fav2 Fav3 Fav4 Type Channel Favorite Manager Favorite1 NO 0001 0002 0003 0004 0005 0006 0007 Favorite2 Favorite3 Favorite4 Press RED button to set to Fav1 list Press GREEN button to set to Fav2 list Press YELLOW button to set to Fav3 list Press BLUE button to set Fav4 list Press the RED GREEN YELLOW BLUE button again unselect the program Press MENU or EXIT button the successfully updated m...

Page 22: ...r Exit OK Exit Return Menu All DTV ATV ENTER ENTER ENTER Channel Auto Search Message Are you sure Cancel OK Message will appear for confirmation Press button to choose OK or Cancel Press OK button to Confirm Channel Tuning menu will appear as follow Picture Sound Channel Feature Setup Exit Exit Skip Menu ATV channels found DTV channels found Radio channels found 21 10 5 Channel Tuning ATV Process ...

Page 23: ...OK button or button to enter and press button to select channel then press OK button or button to confirm Start Press button to select Start then press OK button or button to start scan the channel tuning menu will appear for few seconds Picture Sound Channel Feature Setup Move Enter Exit OK Exit Return Menu Current Channel Frequency Search Fine Tune Color System Sound System Save 001 48 25MHz ENT...

Page 24: ...NU button to return to the previous menu Color System Press button to select Auto PAL SECAM then press OK button or button to confirm Sound System Press button to select BG DK I L L then press OK or button to confirm Note Press RED button to save the result of the adjustment Search Press button to select Search then press OK button or button to enter and then press to scan the channel Operation Ch...

Page 25: ...tton to enter the sub menu the default password is 0000 Lock Channel Press OK button or button to enter Press button to select Off or On then press OK or button to confirm Parental Guidance and Change Pin Code will be available once Lock Channel is On Picture Sound Channel Feature Setup Move Enter Exit OK Exit Return Menu Lock Language Clock Sleep Timer Auto Power Off Hearing Impaired PVR Timeshif...

Page 26: ... password again at Confirm New Password if new password and confirm new password consistent The successfully updated message will appear for few seconds otherwise the password mismatch message will appear Hotel Mode Press OK or button to enter Picture Sound Channel Feature Setup Exit Exit Return Menu Old Password New Password Confirm New Password _ _ _ _ _ _ _ _ _ _ _ _ Feature Change Pin Code 1 2...

Page 27: ...t Feature Lock then press button to select On or Off Setup Lock Press button to select Setup Lock then press button to select On or Off Key Lock Press button to select Key Lock then press button to select On or Off When key lock option is on you can t use the key panel button Source Lock Press button to select Source Lock then press OK button to enter sub menu ON is locked Off is unlocked Set Sour...

Page 28: ...OK button to export hotel settings of this TV to USB disk DataBase Import Press button to select DateBase Import then press OK button to import hotel settings from USB disk Language Press OK button or button to enter the sub menu Picture Sound Channel Feature Setup Move Enter Exit OK Exit Return Menu OSD Language Preferred Subtitle Preferred Audio DTV Teletext Language ATV Teletext Language Englis...

Page 29: ...firm ATV Teletext Language Press button to select ATV Teletext language press OK button or button to enter the sub menu Then press button to select then press OK button or button to confirm Clock Press OK button or button to enter the sub menu Press button to select Sleep Timer Press OK button or button to enter the sub menu Press button to select Available options are Off 10 mins 20 mins 30 mins ...

Page 30: ...eshift Buffer Press button to select Timeshift Buffer press OK button or button to enter the sub menu then press button to select Auto 30 Mins lhr or 2hr then press OK button or button to confirm Partition List Total Size G Free Size G 01 udska0 Move Enter OK Format Set Default Partition Picture Sound Channel Feature Setup Move Enter OK Exit Exit Return Menu Partition Select Auto Timeshift Timeshi...

Page 31: ...ub menu Timer Edit will appear as show below Press button to select channel that you want to edit Message Delete all timers Cancel OK Move Enter 0 9 OK 0 9 Save Menu Recorder Type Channel Start Time Duration Date Mode Off DTV 0001 YLETV1 09 36 10 15 13 01 2008 Once Timer Edit 13 01 2008 18 02 25 Move Return Menu Timer 01 11 2011 06 51 13 Del Del All Add Edit 01 02 03 04 05 06 07 08 09 CH No Channe...

Page 32: ...select Start Time then press OK button or button to enter and press 0 9 button to input time Duration Press button to select Duration then press OK button or button to enter and press 0 9 button to input duration Date Press button to select Date then press OK button or button to enter and press 0 9 button to input date Mode Press button to select Mode then press OK button or button to enter and pr...

Page 33: ...ge will appear for confirmation Press button to select OK or Cancel Press OK button to confirm Press OK button to playback selected program Record Start Press button to select Record Start press OK button or button to enter Message will appear for confirmation Press button to select OK or Cancel Press OK button to confirm Message Do you want to start Recording Cancel OK Operation Feature Menu ...

Page 34: ...ting Never ENTER Off Standard ENTER Setup Operation Setup Menu Press MENU button on the TV or on the remote control to display the main menu 1 Press button to select SETUP in the main menu 2 Press or OK button and then press button to select the option that you want to adjust in the SETUP menu 3 Press or OK button to enter sub menu 4 After finishing your adjustment press the MENU button to return ...

Page 35: ... PHASE Press button to select the PHASE press button to adjust the picture The picture will shake if the PHASE sets unsuitable CLOCK Press button to select the CLOCK press button to adjust the signal s transfer speed to make the picture looks well Blue Screen Press OK button or button to enter the sub menu Then press button to select On or Off then press OK button or button to confirm Home Mode Pr...

Page 36: ...mation message will appear Press button to choose OK or Cancel Press OK button to confirm Resetting message and OK message will appear once reset Message Do you want to reset Database to default Cancel OK Operation Setup Menu ...

Page 37: ...n confirmation menu will apperar for your confirmation Press button to select Yes or No Press OK button to confirm If you want to stop RECORDING press button on you remote control Then an confirmation menu will appear for your confirmation Press button to select Yes or No Press OK button to confirm RECORNDING DO YOU WANT TO STOP RECORDING RECORD Yes No Operation Personal Video Recorder Mode PVR ...

Page 38: ...lect media type you want to play then press OK to confirm your selected Media types Photo Music Movie e Book Press button to select device Then press OK button or button to enter Photo player The user can play Photo files via the Photo Player ln left interface you can press and OK button to select your desired photo Press button to play selected photo s or press GREEN button to select all photos P...

Page 39: ...face you can press and OK button to select your desired music file or press GREEN button to select all music files and press to play While the Music is displaying you can press button to select function icon in control menu on the screen then press OK button to excute Press EXIT button to return to previous menu Tips You can also use the 9 button on the remote control Music player 001 002 Move Pag...

Page 40: ...ay 001 002 Move Page Enter CH OK Exit Exit e Book udska1 udska2 While the Movie is displaying you can press OK button to bring up the on screen control menu Press button to select function then press OK button to excute Press EXIT button to return to previous menu Tips You can also use the 9 button on the remote control Operation Media Player Mode ...

Page 41: ...EG 1920 x 1080 ASF WMV3 WVC1 MP4S M4S2 Matroska Video MPEG 2 Video MPEG 4 ASP H 264 Xvid DivX DivX Plus HD RV30 RV40 WMV9 VC 1 1920 x 1080 1920 x 1080 DivX MPEG 4 ASP DivX Xvid TS Stream MPEG 2 Video H 264 WMV 9 VC 1 1920 x 1080 Type Container Max Resolution PHOTO 0 7 3 5 6 1 G E P J 8 4 6 1 6 G E P J e v i s s e r g o r P BMP 101439 PNG 101439 GIF TIFF MUSIC e Book M C P D A M C P L E V A W f o r...

Page 42: ...K Press the button to switch between pausing and playing STOPPING PLAYBACK Press the button at the location where you want to interrupt playback To resume playback at the position where the disc was stopped press the button If you press the button twice the unit s memory will be cleared and pressing the button will reset the disc to the beginning SKIP PREVIOUS NEXT Press the 9 PREV button to go ba...

Page 43: ...epending on the disc This function can only be used for discs on which subtitles have been recorded in multiple languages AUDIO SELECTION DVD On some discs the sound is recorded in two or more formats Follow the directions below to select the preferred language and sound system 1 While a disc is playing press the AUDIO button to show the current audio format number 2 Press the AUDIO button repeate...

Page 44: ...ly display the MP3 contents automatically and start to play the first file highlighted file Screen as follow Use the buttons to select the folder you want to play NOTE When playback MP3 files there is no picture display only audio output Playing the JPEG discs press the PROGRAM button to select slide effects When play or pause with picture playback you may use the navigation buttons to flip rotate...

Page 45: ...ages recorded differs depending on the disc This function can only be used for discs on which subtitles have been recorded in multiple languages AUDIO SELECTION DVD On some discs the sound is recorded in two or more formats Follow the directions below to select the preferred language and sound system 1 While a disc is playing press the AUDIO button to show the current audio format number 2 Press t...

Page 46: ...ENERAL SETUP option Dolby General Setup Page TV Display OSD Lang Screen Saver Last Memory 16 9 Eng On Off 4 3 Pan Scan 4 3 Letter Box Wide Set TV Display mode TV Display OSD Lang Screen Saver Last Memory Cycles among TV Type modes 4 3 pan scan 4 3 letter box 16 9 You can choose the OSD Language This function is used to turn the screen saver On or Off This function to set the Last Memory to On or O...

Page 47: ...lect AUDIO SETUP option 2 Use the button to highlight and individual AUDIO SETUP option Dolby Audio Setup Page Speaker Setup Go To Speaker Setup Page Speaker Setup A disc recorded multi channel soundtrack the output signal will be incorporated to left and right or stereo channel Operation DVD Operation ...

Page 48: ... to enter setup menu 1 Use the button select Dolby Digital SETUP option 2 Use the button to highlight and individual Dolby Digital SETUP option Dynamic This option is used to set the compression ratio in order to control the sound Volume contrast Dolby Dolby Digital Setup Dynamic Set DRC To Full ...

Page 49: ...Multi NTSC You can choose the Audio Language You can choose the Subtitle Language You can choose the Disc Menu Language When playing disc with parental lock function you may select an Age Control Grade according to grade of disc and your own preference For example if PG is selected DVD Video disc rated higher than the PG grade can not be played User can change the password that is required when th...

Page 50: ...disc contains high density compressed data that needs proper handling 1 Hold the disc with fingers by outer edge and or the centre spindle hole Do not touch the discs surface 2 Do not bend or press the disc 3 Do not expose the disc to direct sunlight or heating sources Store discs in cabinet vertically and in dry condition Prevent exposure to Direct sunlight Heat or exhaust from a heating device E...

Page 51: ...50 Maintenance and Service Troubleshooting ...

Page 52: ...ect to change without prior notice for future product improvements Model Input Connector Output Connector Power Source Power Consumptior Mounting Bracket VESA Screw size Max Resolution 19 LEDTV 18 5 250 1000 1 1366 x 768 1 1 1 1 1 1 1 1 1 DC 12V 3A 36W 100mm x 100mm M4 22 LEDTV 21 5 250 1000 1 1920 x 1080 1 1 1 1 1 1 1 1 1 DC 12V 4A 48W 100mm x 100mm M4 24 LEDTV 23 6 250 1000 1 1920 x 1080 1 1 1 1...

Page 53: ......

Reviews: