43
Check if crankshaft is bent or otherwise damaged.
Make certain keyways are not worn or damaged and
flywheel taper is clean and in good condition. If taper
or keyways are worn or damaged, replace crankshaft.
Check oil seal contact surfaces on crankshaft for damage
or scratches which would damage oil seal or cause
leaks.
On engines that are equipped with ball bearings, the
crankshaft must be removed with the shroud base.
Before removing shroud base with crankshaft,
disassemble rod cap from rod and remove the piston
from the bore, then remove four (4) shroud base screws
and tap shroud base so base and crankshaft can be
removed together.
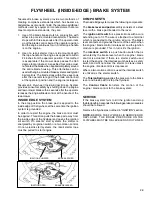
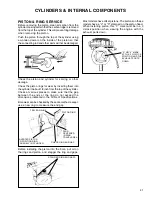
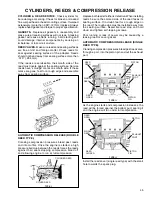
To remove crankshaft and bearing from shroud base,
use following procedure:
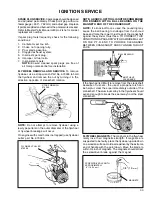
Using a propane torch, heat the area of shroud
base around the bearing area, until there is enough
expansion to remove the crankshaft and bearing.
CRANKSHAFT, BEARING AND OIL SEAL SERVICE
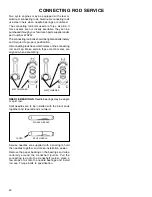
To remove the bearing from crankshaft, remove retainer
ring if so equipped, and use a bearing splitter to pull
bearing.
Before installing bearing on crankshaft, clean out the
grooves on the crankshaft where bearing locates and
put Loctite in the groove. Models with the retainer
ring do not require Loctite.
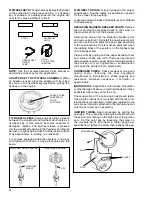
Using a sleeve over the crankshaft, press bearing
into position with arbor press. Make certain crankshaft
counter weight is supported and bearing is pressed
on inner race only.
HEAT AREA
SHROUD BASE
HEAT AREA
BALL BEARING
MUST HAVE
CLEARANCE
BEARING
RETAINER RING
(some Models)
SUPPORT
COUNTERWEIGHT
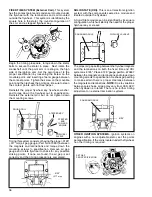
OIL SEAL
DRIVER-PROTECTOR
DRIVER (No. 670272)
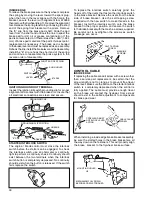
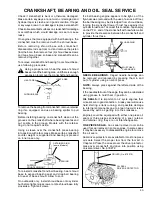
To reinstall crankshaft and ball bearing, heat shroud
base to expand bearing seat and drop ball bearing
into seat of base shroud. Allow to cool.
On outboards only, install shroud base onto cylinder
but before tightening screws, rotate shroud base fully
clockwise. Tighten screws.
If a ball bearing engine appears to be tight, or if the
flywheel was removed with the use of a knock-off tool,
the ball bearing may be dislodged from shroud base,
forcing the crankshaft lower thrust face against the
cylinder thrust face, To correct this condition, rap sharply
on the P.T.O. end of the crankshaft with rawhide mallet
to provide the clearance between the crankshaft and
cylinder thrust face.
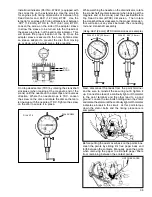
NEEDLE BEARINGS.
Caged needle bearings can
be removed and replaced by pressing them in and
out of cylinder using an arbor press.
NOTE:
Always press against the lettered side of the
bearing.
If the needles fall out of the cage, they can be reinstalled
using grease to hold them in position.
OIL SEALS.
It is important on 2 cycle engines that
oil seals are in good condition. A leaky seal will cause
hard starting, erratic running, and possible damage
to internal components due to a lean fuel-oil mixture
caused by extra air getting into the crankcase.
Engines could be equipped with either one piece oil
seals or three pieces consisting of a seal, retainer
and retainer ring; they are not interchangeable.
ONE PIECE SEALS.
An oil seal remover tool can be
used for seal removal in some engines. In some cases
it may be necessary to disassemble engine to remove
the oil seals.
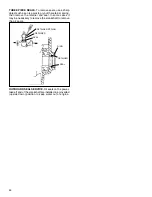
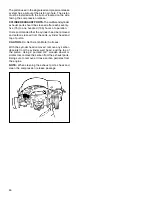
Seal driver-protectors are available for most one piece
oil seals. Select the proper tool from the tool list in
Chapter 8. Place the oil seal over the driver protector,
place over crankshaft, and drive into position using
universal driver No. 670272.
Summary of Contents for AH520 -
Page 67: ...64...

