background image


- 9 -


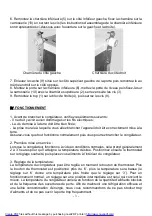
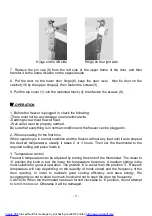
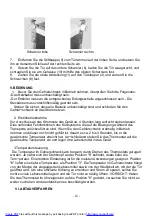
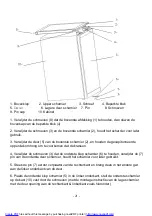
Hinge on the left side                      Hinge on the right side 
 

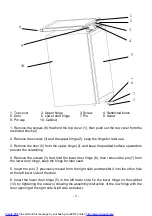
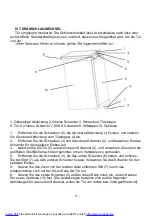
7.  Remove  the  pin  cap  (9)  from  the  left  side  of  the  upper  frame  of  the  door,  and  then 
transfer it to the same location on the opposite side. 
 
8.  Put  the  door  on  the  lower  door  hinge(6),  keep  the  door  level,    then  fix  door  on  the 
cabinet(10) by the upper hinge(2), then fasten the screws(3). 
 
9. Pull the top cover (1) into the restricted block (4), then fasten the screws (8). 


. OPERATION 


1. Before the freezer is plugged in, check the following: 
-There must not be any damage on all electrical wire. 
-Earthing screw must be well fixed. 
-Wall outlet must be properly earthed. 
Be sure that everything is in normal condition and the freezer can be plugged in. 
 
2. When operating for the first time 
When operating is in normal condition and the freezer without any load until it auto stops at 
the  desired  temperature,  usually  it  takes  2  or  3  hours.  Then  set  the  thermostat  to  the 
required setting and place foods in. 
 
3. Temperature control 
Freezer's temperature can be adjusted by turning the knob of the thermostat. The closer to 
‘6’  position the  knob is  set, the  lower  the  temperature  becomes.  A medium  setting is the 
most suitable for general operation. The position ‘6’ is cooler than the position ‘3’. Freezer's 
temperature  will  vary  depending  on the  quantity of foods stored  and the frequency of the 
door  opening,  In  order  to  maintain  good  cooling  efficiency  and  save  energy,  We 
recommend you not to store too much foods and not to open the door too frequently. 
CAUTION: When the thermostat has been turned clockwise to ‘6’ position, do not attempt 
to turn it more over. Otherwise it will be damaged. 
 

Create PDF

 files without this message by purchasing novaPDF printer (

http://www.novapdf.com

)

Summary of Contents for MT-VF71 A

Page 1: ...nungsanleitung Handleiding CONGELATEUR FREEZER Gefrierschrank Vriezer MT VF71 A Service helpline 0031 0 78 65 22 115 E mail info tedsinternational nl Create PDF files without this message by purchasin...

Page 2: ...r reste en position verticale lorsque vous le d placez Ne penchez pas l appareil plus de 45 Ne le mettez jamais l envers Pendant le transport ne mettez rien en appui sur les pi ces ext rieures telles...

Page 3: ...z le top du bloc de limite 4 2 tez les vis 3 et la charni re sup rieure 2 conservez la charni re pour une utilisation ult rieure 3 Enlevez la porte 5 de la charni re sup rieure 2 et posez la avec la s...

Page 4: ...urez vous que tout fonctionne normalement puis vous pourrez brancher le cong lateur 2 Premi re mise en service Lorsque le cong lateur fonctionne vide en conditions normales cela prend g n ralement 2 3...

Page 5: ...l res de bicarbonate de soude 1 litre d eau chaude pour nettoyer l int rieur de l appareil Rincez l eau fra che N utilisez jamais d acides de d marieuse chimique d essence ou de produits similaires po...

Page 6: ...mbole de flamme Ne laissez pas des flammes nues ou des sources d inflammation entrer en contact avec l appareil N utilisez pas de nettoyeur vapeur pour le d givrage ou le nettoyage N utilisez pas de d...

Page 7: ...t les p riodes tr s humides de la condensation pourra se former sur les parois externes de votre cong lateur c est un ph nom ne normal Vous n aurez qu l essuyer MISE AU REBUT DES ANCIENS APPAREILS La...

Page 8: ...not apply force on any external part such as pipe condenser door and its handle for moving freezer must be well packed and secured in long distance transportation to avoid damage from impacting and o...

Page 9: ...4 Remove the screws 3 that hold the lower door hinge 6 then remove the pin 7 from the lower door hinge keep the hinge for later used 5 Insert the pin 7 previously moved from the right side and transfe...

Page 10: ...tion and the freezer without any load until it auto stops at the desired temperature usually it takes 2 or 3 hours Then set the thermostat to the required setting and place foods in 3 Temperature cont...

Page 11: ...ll affect cold air circulation so some free space must be left It is recommended that about 70 storage volume is loaded Do not store volatile and or explosive materials such as ethers gasoline liquefi...

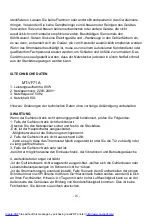
Page 12: ...larly qualified person in order to avoid a hazard The appliance must be positioned so that the plug is accessible SPECIFICATIONS MT VF71 A 1 Input power 80W 2 Rated voltage 220 240V 3 Rated frequency...

Page 13: ...uld be disposed of with bulk refuse 1 Remove the spring action or bolt catch from the appliance or render it unusable so that children cannot become trapped inside and suffocate 2 Ensure that the refr...

Page 14: ...chrank nicht horizontal aufgestellt mehr als 45 geneigt oder v llig von oben nach unten umgedreht werden Der K hl kreislauf darf nicht besch digt werden Falls es doch zu einer Besch digung kommt m sse...

Page 15: ...gestellt werden dass die Steck dose zug nglich ist WARNUNG Reparaturen am Ger t und am Netzkabel d rfen nur von Fachkr ften durchgef hrt werden um Gef hrdungen zu vermeiden Schutz vor Feuchtigkeit Ver...

Page 16: ...men Sie die T r 5 aus dem oberen Scharnier 2 und verwahren Sie sie mit der geriffelten Oberfl che nach oben gerichtet um ein Verkratzen zu vermeiden 4 Entfernen Sie die Schrauben 3 die das untere Scha...

Page 17: ...zur ckzuf hren sind Wenn Sie den Gefrierschrank erstmalig in Betrieb nehmen und dieser noch nicht gef llt ist dauert es ca 2 bis 3 Stunden bis er die gew nschte Temperatur erreicht hat An schlie end...

Page 18: ...as Ger t sollte maximal auf 70 seines Fassungsverm gens aufgef llt werden Lagern Sie keine fl chtigen oder explosive Substanzen wie ther Benzin fl ssiges Petroleum Klebstoffe usw im Gefrierschrank Es...

Page 19: ...Gefrierschrank nicht ordnungsgem funktioniert pr fen Sie Folgendes 1 Falls der Gefrierschrank nicht funktioniert Stecken Sie den Netzstecker sicher und fest in die Steckdose Evtl ist der Hauptschalter...

Page 20: ...se au er Betrieb damit Kinder nicht versehentlich im Geh use eingeschlossen werden k nnen Es besteht Erstickungsgefahr 2 Stellen Sie sicher dass der K hlkreislauf unbesch digt ist bevor Sie das Ger t...

Page 21: ...3 Verplaatsen Zorg er voor dat de vriezer altijd in de rechte positie staat INSTALLATIE De vriezer moet ge nstalleerd worden op een vlakke en solide ondergrond De vriezer moet uit het zonlicht en uit...

Page 22: ...voorkomen dat de krassen 4 Verwijder de schroeven 3 dat de onderste klep scharnier 6 te houden verwijder de 7 pin van de onderste deur scharnier houdt het scharnier voor later gebruikt 5 Steek de pin...

Page 23: ...tst Het stopcontact moet goed zijn geaard Zorg er voor dat alles in goede staat is zodat u de vriezer kan aansluiten 2 Eerste ingebruikname Laat de vriezer de eerste keer 2 3 uur draaien en stel dan d...

Page 24: ...uitgevoerd worden 3 Zorg er voor dat er geen naakte vlam in het toestel komt 4 Gebruik geen stoom apparaten voor de schoonmaak 5 Gebruik geen mechanische toestellen voor defrosting 6 Gebruik geen ele...

Page 25: ...en of de vriezer op geen meubilair staat dat geluid kan voortbrengen nakijken of de vriezer goed genivelleerd is Als dit niet de oorzaken zijn gelieve contact op te nemen met de leverancier OUDE TOEST...

Reviews: