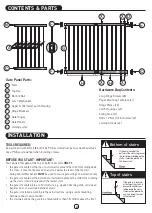
CONTENTS & PARTS
Hardware Bag Contents:
Long Hinge Screws (x8)
Paper Mounting Template (x1)
Hinge Plates (x2)
Latch Housings (x2)
Swing Stop (x1)
#10 x 1.25cm (1/2in) Screws (x2)
Joining Screws (x2)
Gate Panel Parts:
A Slats
B Top Rail
C Bottom Rail
D Latch Mechanism
E Upper & (E2 lower) Latch Housing
F Hinge Brackets
G Gate Hinges
H Gate Panels
X Joining points
C
F
F
E2
E
B
D
X
X
X
X
A
H
H
G
TOOLS REQUIRED:
An electric drill with 3mm (1/8in) drill bit, Phillips screwdriver, pencil, and adhesive tape.
Use a Phillips screwdriver when installing screws.
BEFORE YOU START - IMPORTANT:
You can use this gate at the top or bottom of stairs ONLY if:
• the gate is mounted at the top of a stairwell to prevent the child from falling down
the stairs, it must not be placed on any stair below the level of the top stair.
Swing Control Mechanism MUST be used to ensure gate swings one-direction only.
• the gate is mounted at the bottom of a stairwell to prevent the child from climbing
up the stairs, it must be placed on the lowest stair.
• the gate is mounted into a solid structure, e.g. wooden doorway jamb, solid wood
banister post, or wall stud behind dry wall.
• the gate is installed according to these instructions, using 4-point mounting
hardware and screws provided.
• the stairwell allows the gate to be mounted less than 7.5cm (3in) above the floor.
INSTALLATION
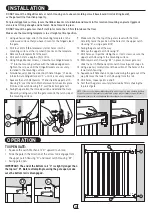
If the gate is used at the
bottom of the stairs to prevent
the child from climbing up the
stairs, it must be placed on
the lowest stair.
If the gate is to be used
at the top of the stairs to
prevent the child from
falling down the stairs,
it must not be placed on
any stair below the level
of the top stair.
Bottom of stairs
Top of stairs
2


