background image

EN

Owner’s manual

10

INSERTING AND REMOVING COMBS

Notes:

•  Make sure the appliance is turned off before connecting it to the power supply.

•  It takes about 2 hours to fully charge the appliance what provides about 2 hours of 

run time.

1.  Connect one plug of the AC charger to the power supply socket.

2.  Connect the other plug to the appliance’s power socket.
3.  When the appliance is charging, charging indicator   is on and operating time 

increases.

4.  When the appliance is fully charged, charging indicator goes off.

5.  Disconnect the AC charger from the appliance and power supply socket.

Notes:

• 

The appliance may become warm during charging/operation. It is a normal behavior.

• 

Use the included charging station to charge the appliance. To do this, first connect 

one plug of AC charger into power supply socket. Then connect the other plug to 

the charging socket of charging station. Finally, place the appliance into the charging 

station.

• 

When the appliance is fully charged, remove the appliance from charging station and 

disconnect the AC charger from the power supply socket.

CHARGING

OPERATION

Notes:

• 

Make sure that the appliance is turned off when attaching or removing the combs.

• 

The set includes four guides, each of them having different cutting lengths- 3, 6, 9 and 

12 mm.

1.  Choose the desired comb.

2.  Attach the comb on the back of the blade and slide it downwards until it locks in place.

3.  Remove the comb from the blade by pushing it upwards.

1.  Slide the Power switch upwards to turn on the appliance.

Note: If you want to use the appliance with a comb attached, do it before turning on 

the appliance (see “Inserting and removing combs” section).

2.  Set the cutting length switch to the desired position. Available cutting lengths are 0,8; 

1,05; 1,3; 1,55 and 1,8 mm.

3.  Start cutting your hair:

•  when cutting hair with a comb attached, make sure the blade stays close to the skin;

•  use the appliance without comb attached for more precise trim (for example on the 

temples).

Summary of Contents for Cut Pro X900

Page 1: ...DE EN PL RO SK Hair clipper TSA0523 Instrukcja obs ugi Manual de utilizare Owner s manual N vod na pou itie Bedienungsanleitung...

Page 2: ......

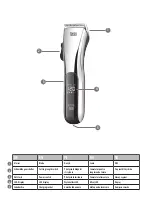
Page 3: ...trzy enia Comutator pentru lungimea de t iere Prep na d ky strihu Netztaste Power switch Prze cznik zasilania Comutator alimentare Hlavn vyp na LED Display LED display Wy wietlacz LED Afi aj LED Displ...

Page 4: ...acht werden die f r ihre Sicherheit verantwortlich ist in einer vorsichtigen Art und Weise und die alle Sicherheits Vorkehrungen verstanden hat und befolgen wird Kinder sollten nicht mit diesem Ger t...

Page 5: ...n des Ger tes Schlie en Sie dazu zun chst einen Stecker des AC Ladeger ts an die Steckdose an Schlie en Sie dann den anderen Stecker an die Ladebuchse der Ladestation an Zum Schluss legen Sie das Ger...

Page 6: ...nach oben um das Ger t einzuschalten Hinweis Wenn Sie das Ger t mit einem angebrachten Kamm benutzen m chten tun Sie dieses vor dem Einschalten des Ger tes siehe Abschnitt Einstecken und Entfernen vo...

Page 7: ...lay mit Ladeanzeige Schmieranzeige und Betriebszeit Abnehmbare Messer f r einfache Reinigung Ladestation zum bequemen Aufladen TECHNISCHE DATEN Leistung 3 W Schneidbreite 45 mm L ngeneinstellungen 0 8...

Page 8: ...menschilchen Gesundheit nicht durch unkontrollierte M llbeseitigung zu schaden Recyceln Sie das Ger t um die nachhaltige Wiederverwertung von stofflichen Ressourcen zu f rdern Private Nutzer sollten...

Page 9: ...y in a cautious manner and all the safety precautions are understood and followed Children should not play with this device 6 Use only the included AC charger to charge the device 7 Do not use this ap...

Page 10: ...ally place the appliance into the charging station When the appliance is fully charged remove the appliance from charging station and disconnect the AC charger from the power supply socket CHARGING OP...

Page 11: ...then push it firmly onto the appliance 5 Clean the combs using the brush or rinse them under running water Make sure to wipe them dry before refitting CLEANING Before storing the appliance make sure i...

Page 12: ...n the European Union and other European countries with separate collection systems This marking shown on the product or its literature indicates that it should not be disposed with other household was...

Page 13: ...iezb dnego do obs ugi tego urz dzenia Nale y poinstruowa dzieci aby nie traktowa y urz dzenia jako zabawki Nale y poinstruowa dzieci aby nie traktowa y urz dzenia jako zabawki 6 Do adowaniaurz dzenian...

Page 14: ...Nale y od czy adowark sieciow od urz dzenia oraz gniazda zasilania sieciowego Uwagi Podczas dzia ania adowania urz dzenie mo e si nagrzewa Jest to normalne zjawisko Urz dzenie mo e by r wnie na adowa...

Page 15: ...d Nale y u y za czonej szczoteczki aby oczy ci go z zanieczyszcze Nie nale y u ywa rodk w chemicznych lub detergent w do czyszczenia tego urz dzenia Obudow urz dzenia nale y czy ci za pomoc mi kkiej i...

Page 16: ...oliwiania oraz czasem dzia ania Zdejmowany no yk dla atwego czyszczenia Stacja aduj ca dla wygodnego adowania DANE TECHNICZNE Moc 3 W Szeroko no yka 45 mm Ustawienia d ugo ci 0 8 mm 1 05 mm 1 3 mm 1 5...

Page 17: ...od innego typu odpad w oraz odpowiedzialny recykling w celu promowania ponownego u ycia zasob w materialnych jako sta ej praktyki W celu uzyskania informacji na temat miejsca i sposobu bezpiecznego dl...

Page 18: ...tale reduse lipsite de experienta sau cunostinte decat daca acestea sunt supravegheate sau primesc instructiuni cu privire la folosirea aparatului de la o persoana responsabila de siguranta acestora 6...

Page 19: ...e nc rcare a sta iei de nc rcare Pune i dispozitivul n sta ia de nc rcare C nd dispozitivul est nc rcat complet scoate i l din sta ia de nc rcare i deconecta i nc rc torul AC de la priz INTRODUCEREA I...

Page 20: ...u cl ti ii sub jetul de ap Asigura i v c sunt usca i complet nainte de a I utiliza din nou nainte de a depozita aparatul asigura i v c acesta este curat uscat i deconectat de la priz Depozita i aparat...

Page 21: ...uuri din gospod arie atunci cand nu mai este in stare de functionare Pentru a preveni posibile efecte daunatoare asupra mediului inconjurator sau a san ata tii oamenilor datorate evacuarii necontrolat...

Page 22: ...ou situ cie pou itia pr stroja za pr tomnosti osoby zodpovednej za ich bezpe nos Je potrebn pou i deti e zariadenie nie je hra ka 6 Na nab janie pou vajte v lu ne iba pribalen origin lny adapt r 7 Nep...

Page 23: ...nie na nab jaciu stanicu Po skon en nab jania vyberte zariadenie z nab jacej stanice a odpojte nab ja ku od elektrickej siete NASADENIE A ODPOJENIE HREBE OV CH N STAVCOV Pozn mky Uistite sa e je zaria...

Page 24: ...u na vlasy 4 Pre op tovn nasadenie epele ju najsk r umiestnite na spodn hranu vlasovej komory a pevne ju zatla te 5 N stavce vy istite kefkou alebo opl chnut m pod te cou vodou Pred op tovnou mont ou...

Page 25: ...hodln nab janie TECHNICK PARAMETRE Pr kon 3 W rka epele 45 mm Nastavenie d ky 0 8 mm 1 05 mm 1 3 mm 1 55 mm 1 8 mm Cas prev dzky do 2 h as nab jania do 2 h Hlu nos 75 dB Akumul tor 3 7 V 1300 mAh Nap...

Page 26: ...stredia alebo po kodeniu udsk ho zdravia nekontrolovanou likvid ciou odpadu odde te ich pros me od al ch typov odpadov a recyklujte ich zodpovedne a podporte op tovn vyu itie materi lnych zdrojov Dom...

Page 27: ......

Page 28: ...www teesa pl...

Reviews: