background image

EN

Owner’s manual

14

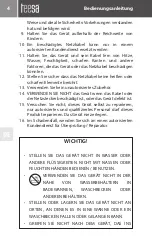
•  DO NOT DROP THE APPLIANCE OR SUBJECT IT TO 

STRONG IMPACTS.

•  NEVER COVER THE APPLIANCE (WITH A BLANKET OR 

TOWEL) WHEN IT IS HOT.

•  DO NOT LEAVE THE APPLIANCE UNATTENDED WHEN 

IT IS OPERATING.

•  DO NOT TOUCH ANY PART OF YOUR BODY WITH 

ANY PART OF THE APPLIANCE.

•  DO NOT WRAP THE POWER CORD AROUND THE 

APPLIANCE.

•  DO NOT USE THE APPLIANCE ON WET HAIR.
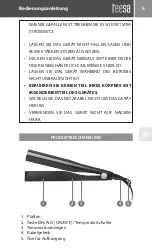
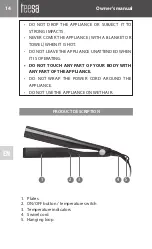
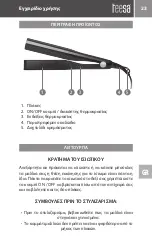
PRODUCT DESCRIPTION

1.  Plates

2.  ON/OFF button / temperature switch

3.  Temperature indicators

4.  Swivel cord

5.  Hanging loop

1

2

3

4

5

Summary of Contents for Dream Looks PRO700

Page 1: ...EN GR PL RO SK Hair straightener 2 in 1 TSA0565 Instrukcja obs ugi Manual de utilizare N vod na pou itie Owner s manual DE Bedienungsanleitung...

Page 2: ......

Page 3: ...se bereinstimmt 3 Ger t ist nur f r den Hausgebrauch 4 Das Produkt nicht f r andere Zwecke verwenden als in dieser Bedienungsanleitung angegeben 5 Reinigen und Lagern Sie das Ger t gem den Anweisungen...

Page 4: ...DEN SIE NICHT das Ger t wenn das Kabel oder der Netzstecker besch digt ist oder das Ger t defekt ist 15 Versuchen Sie nicht dieses Ger t selbst zu reparieren nur autorisiertes und qualifiziertes Perso...

Page 5: ...EINEM HANDTUCH AB WENN ES HEIS IST LASSEN SIE DAS GER T W HREND DES BETRIEBS NICHT UNBEAUFSICHTIGT BER HREN SIE KEINEN TEIL IHRES K RPERS MIT IRGENDEINEM TEIL DES GER TES WICKELN SIE DAS NETZKABEL NI...

Page 6: ...sind Je f cherartiger und flacher die Str hnen sind desto besser sind die Ergebnisse GL TTEN 1 Verbinden Sie den Stecker des Netzkabels mit der Steckdose 2 Schalten Sie das Ger t ein durch dr cken der...

Page 7: ...em Ger t zu ber hren Es ist wichtig den Haargl tter langsam herunterzuziehen damit jedes Haar gleichm ig erhitzt werden kann Bitte denken Sie daran die Haare nicht zu lange zwischen den Platten zu hal...

Page 8: ...gl tter nach vorne in Richtung des Spiegels vor Ihnen 4 Wiederholen Sie die obigen Schritte um den Rest der Haare zu stylen KR USELN DER HAARE AUF DER LINKEN SEITE 5 Um die Haare auf der linken Seite...

Page 9: ...Sie dieTaste EIN AUS um das Ger t auszuschalten und trennen es vom Stromnetz 10 Bevor Sie das Ger t reinigen und lagern stellen Sie sicher dass es vollst ndig abgek hlt ist 11 Reinigen und lagern Sie...

Page 10: ...nden Position aufzubewahren TECHNISCHE DATEN HAUPTMERKMALE 2 in 1 Lockenstab und Gl tteisen Innovatives Design Aluminiumplatten Erhitzt sich in weniger als 3 Minuten Automatische Abschaltung nach 30 M...

Page 11: ...r menschilchen Gesundheit nicht durch unkontrollierte M llbeseitigung zu schaden Recyceln Sie das Ger t um die nachhaltigeWiederverwertung von stofflichen Ressourcen zu f rdern Private Nutzer sollten...

Page 12: ...ge in the power supply socket 3 Product intended for household use only 4 Do not use the product for purposes different from displayed in this operating manual 5 Clean and store this appliance in acco...

Page 13: ...DO NOT use this appliance if the cord or the plug is damaged or the appliance is broken 15 Do not attempt to repair this appliance yourself Only authorized and qualified personnel may repair this appl...

Page 14: ...OT DO NOT LEAVE THE APPLIANCE UNATTENDED WHEN IT IS OPERATING DO NOT TOUCH ANY PART OF YOUR BODY WITH ANY PART OF THE APPLIANCE DO NOT WRAP THE POWER CORD AROUND THE APPLIANCE DO NOT USE THE APPLIANCE...

Page 15: ...er curling results 1 Connect the plug of the power cord to the power supply socket 2 Turn on the straightener by pressing the ON OFF button 3 The appliance has 5 temperature settings 140 C 160 C 180 C...

Page 16: ...le the rest of the hair 7 When you have finished using the appliance press and hold the ON OFF button to turn off the appliance and disconnect it from power mains 8 Prior to cleaning and storing the a...

Page 17: ...tely over the back of the straightener then grab it from front and underneath and pull the straightener forward towards the mirror in front of you 8 Repeat the above steps to style the rest of the hai...

Page 18: ...cooled down completely Store the appliance in a dry and cool place Make sure that while storing the power cord is not wrapped around the appliance Use a hanging loop to store the device in a hanging p...

Page 19: ...olled waste disposal please separate this from other types of wastes and recycle it responsibly to promote the sustainable reuse of material resources Household users should contact either the retaile...

Page 20: ...GR 20 TEESA 1 2 3 4 5 6 7 8 8...

Page 21: ...GR 21 9 10 11 12 13 14 15 16...

Page 22: ...GR 22...

Page 23: ...GR 23 1 2 ON OFF 3 4 5 1 2 3 4 5 ON OFF v...

Page 24: ...GR 24 1 2 ON OFF 3 5 140 C 160 C 180 C 200 C 230 C 4 180 C 1 230 C 3 5...

Page 25: ...GR 25 6 7 ON OFF 8 9 1 1 4 2 45 3 4...

Page 26: ...GR 26 5 45 6 45 7 8 9 ON OFF 10 11...

Page 27: ...GR 27 2 1 3 30 360 45 W...

Page 28: ...GR 28 LECHPOL ELECTRONICS Sp z o o Sp k ul Garwoli ska 1 08 400 Mi tne 5 140 C 160 C 180 C 200 C 230 C 110 230 V 50 60 Hz 367 g 270 x 38 mm 2 m...

Page 29: ...niazdasieciowegoiurz dzenia 3 Urz dzenie wy cznie do u ytku domowego 4 Nie nale y u ywa urz dzenia w innym celu ni opisanym w poni szej instrukcji 5 Urz dzenie nale y czy ci i przechowywa zgodnie ze w...

Page 30: ...dzenia lub kabla 12 Nale y zwr ci szczeg ln uwag aby kabel zasilaj cy nie dotyka gor cych ostrych kraw dzi 13 Nie nale y u ywa nieoryginalnych akcesori w 14 Zabrania si u ywa urz dzenia je li kabel z...

Page 31: ...A URZ DZENIA NP KOCEM LUB R CZNIKIEM KIEDY JEST GOR CE NIE NALE Y POZOSTAWIA URZ DZENIA W CZASIE PRACY BEZ NADZORU NIE NALE Y DOTYKA ADN CZ CI URZ DZENIA CZ CI CIA A NIE NALE Y OWIJA PRZEWODU ZASILAJ...

Page 32: ...ek Nale y upewni si e pasma w os w nie s skr cone Im bardziej roz o yste i p askie pasma tym lepszy efekt kr cenia PROSTOWANIE 1 Nale y pod czy wtyczk przewodu zasilaj cego do gniazda zasilania siecio...

Page 33: ...j cz ci cia a Aby odpowiednio wyprostowa w osy nale y powoli przesuwa prostownic tak aby ka dy w os osi gn odpowiedni temperatur Nale y jednak pami ta o tym aby nie przetrzymywa w os w mi dzy p ytkami...

Page 34: ...stron lustra 4 Nale y powt rzy powy sze kroki aby wystylizowa reszt w os w po prawej stronie g owy KR CENIE W OS W PO LEWEJ STRONIE G OWY 5 Aby zakr ci w osy po lewej stronie g owy nale y trzymaj c pr...

Page 35: ...urz dzenie po czym od czy je od r d a zasilania 10 Przed przyst pieniem do czyszczenia oraz od o enia urz dzenia nale y upewni si e ca kowicie ostyg o 11 Nale y czy ci oraz przechowywa urz dzenie zgod...

Page 36: ...t owini ty wok urz dzenia Uchwyt do zawieszania s u y do praktycznego przechowywania urz dzenia SPECYFIKACJA G WNE CECHY 2w1 prostownica i lok wka Innowacyjny design Aluminiowe p ytki Nagrzewa si w mn...

Page 37: ...od innego typu odpad w oraz odpowiedzialny recykling w celu promowania ponownego u ycia zasob w materialnych jako sta ej praktyki W celu uzyskania informacji na temat miejsca i sposobu bezpiecznego dl...

Page 38: ...ati va ca tensiunea de alimentare necesara inscrisa pe eticheta produsului corespunde cu tensiunea retelei 3 Produsul este destinat doar pentru uz casnic 4 Nuutilizatiprodusulinaltescopuridecatcelemen...

Page 39: ...lul de alimentare nu atinge niciun element cald sau ascutit 13 NU utilizati accesorii neautorizate 14 NU FOLOSITI aparatul daca stecherul sau cablul sunt deteriorate sau daca aparatul este spart 15 Nu...

Page 40: ...CU P TUR PROSOP ETC C ND ESTE CALD NU L SA I APARATUL NESUPRAVEGHEAT ATUNCI C ND ACESTA FUNC IONEAZ NU ATINGE I NICIO PARTE A CORPULUI CU APARATUL NU NF URA I CABLUL N JURUL APARATULUI NU UTILIZA I A...

Page 41: ...rezultatele vor fi mai bune 1 Conecta i techerul de la cablul de alimentare la priz 2 Porni i aparatul ap s nd butonul ON OFF 3 Aparatul are 5 set ri de temperatur 140 C 160 C 180 C 200 C i 230 C Con...

Page 42: ...stul p rului 7 C nd a i terminat de utilizat aparatul ap sa i i men ine i ap sat butonul ON OFF pentru a opri aparatul i deconecta i l de la priz 8 nainde de a cur a i depozita aparatul asigura i v c...

Page 43: ...lui s cad complet peste partea din spate a aparatului apoi prinde i l din fa i de dedesubt i trage i aparatul n fa spre oglind 8 Repeta i pa ii de mai sus pentru restul p rului Ave i grij c nd v ncre...

Page 44: ...aratul ntr un loc uscat i r coros Asigura i v c n timpul depozit rii cablul de alimentare nu este nf urat n jurul aparatului Utiliza i bucla pentru ag are pentru a ag a aparatul CARACTERISTICI PRINCIP...

Page 45: ...eziduurilor v rug m s separa i acest produs de alte tipuri de reziduuri si s l reciclati in mod responsabil pentru a promova refolosirea resurselor materiale Utilizatorii casnici sunt rugati s ia lega...

Page 46: ...v dom cnosti 4 Nepou vajte spotrebi na in el ne je uveden v tomto n vode 5 Spotrebi je potrebn isti a skladova pod a in trukci obsiahnut ch v kapitole istenie a skladovanie 6 V dy spotrebi vypnite ak...

Page 47: ...enie ak je nap jac k bel po koden alebo zariadenie nepracuje spr vne 15 Je zak zan vlastnoru ne prev dza opravy zariadenia a demontova ho Iba opr vnen osoby a kvalifikovan person l m e zariadenie opra...

Page 48: ...5 chyt na zavesenie 1 2 3 4 5 NEVYSTAVUJTE ZARIADENIE P DU A OTRASOM AK JE ZARIADENIE HOR CE NEZAKR VAJTE HO NAPR DEKOU ALEBO UTER KOM NENECH VAJTE ZARIADENIE PO AS PREV DZKY BEZ DOZORU NEDOT KAJTE SA...

Page 49: ...fekt nat ania EHLENIE 1 Zapojte nap jac k bel do elektrickej z suvky 2 N sledne zapnite ehli ku stla en m tla idla ON OFF 3 Zariadenie m 5 rovn nastavenia teploty 140 C 160 C 180 C 200 C a 230 C Stl a...

Page 50: ...ravu zvy ku vlasov 7 Po dokon en pou vania vypnite ehli ku stla en m a podr an m tla idla nap jania a odpojte z str ku zo siete 8 Pred isten m a uskladnen m zariadenia sa uistite e plne vychladlo 9 is...

Page 51: ...plat a vidite n v zrkadle Pustite pramienok vlasov vy nievaj ci za plat ami tak aby vo ne padali za ehli kou a n sledne ich uchopte dla ou spredu zospodu a jemne ich dr iac dla ou pres vajte ehli ku...

Page 52: ...ni istiace prostriedky Pred ulo en m zariadenia sa uistite e je ist such a e plne vychladlo Zariadenie skladujte na suchom a chladnom mieste Po as skladovania sa uistite e nap jac k bel nie je ovinut...

Page 53: ...ne isteniu ivotn ho prostredia alebo po kodeniu udsk ho zdravia nekontrolovanou likvid ciou odpadu odde te ich pros me od al ch typov odpadov a recyklujte ich zodpovedne a podporte op tovn vyu itie ma...

Page 54: ......

Page 55: ......

Page 56: ...www teesa pl...

Reviews: