16
Locking system
(depending on model)
Your appliance is fitted with a retaining hoop to hold the iron onto the base with a locked position for easy
transport and storage:
• Locking. • Unlocking.
To transport your appliance using the handle of the iron:
• Put the iron on the iron rest plate and raise the retaining hoop over the iron until it locks into place.
• Hold the iron by the handle to transport your appliance.
Preparation
What water may be used ?
This appliance has been designed to be used with untreated tap water.
Types of water not to use: In order to maintain your appliance life, you should not use water from clothes dryers,
scented or softened water or water with additives, water from refrigerators, batteries, air conditioners, rain water,
boiled, filtered or bottled water.
All the types of water listed above may contain organic waste, mineral or chemical elements that can cause spitting,
brown staining or premature wear of the appliance.
If your water is very hard, we recommend you use a mix of 50% untreated tap water and 50% distilled water
available in hardware stores.
Do not use pure distilled nor pure demineralised water.
Do not fill the water tank from the cartridge compartment.
Filling the water tank
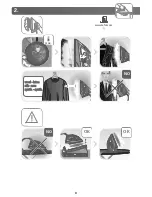
• Place your iron on a flat, stable, horizontal surface that is heatproof and waterproof.
• Always ensure that the base unit is positioned close enough to the ironing surface to avoid straining and wear
of the cord.
• We recommend that you use a mesh type ironing board to allow steam to pass through the garments for better
ironing results and also to prevent steam venting sideways.
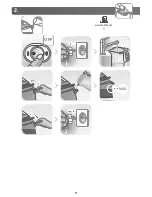
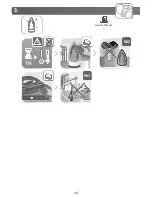
• Check that your appliance is unplugged and open the refill inlet cover on the front of the water tank.
• Fill the water tank with untreated tap water until the max level.
• Close the water tank refill inlet cover.
• Do not fill the water tank from the cartridge compartment.
•
This appliance is designed to be used with a cartridge.
Using your appliance
The first time the appliance is used, there may be some fumes and smell but this is not harmful. They will not affect use
and will disappear rapidly.
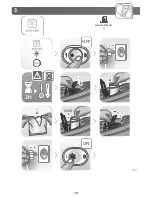
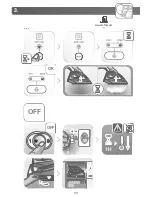
• Completely unwind the power cord and the water connection cord.
• Plug in your appliance to an earthed socket.
• Press on the on / off switch. The max indicator located on the control panel flashes while the iron heats up. When
the max indicator light stops flashing and the iron thermostat light goes out (after 2 minutes approximately),
the appliance is ready for use.
• If you use the appliance for the first time, if you have replaced the anti calc cartridge or after filling the
water tank, press the steam control button continuously for a few minutes pointing it away from your linen,
in order to prime the pump and obtain steam when the temperature dial is in the 3 dot position.
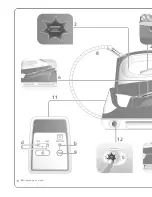
1.
Steam control button
2.
Iron temperature control dial
3.
Iron thermostat light
4.
iron rest plate
5. Water
tank
6.
Lock system
(depending on model)
7.
Water tank refill inlet
8.
Water connection cord
9.
Water connection cord storage compartment
10. Anti Calc cartridge
11.
Control panel
a. Reset Anti-calc button
b. Anti-calc indicator
c. Max steam mode and steam ready indicator
d. ECO steam mode indicator
12. Illuminated on / off switch
13. Soleplate
Description
EN • PLEASE REFER TO SAFETY INSTRUCTIONS AT THE BEGINNING
OF THIS BOOKLET BEFORE USING YOUR APPLIANCE
TE_CENTRALE_FASTEO_1800142429.qxp_110x154 17/10/2016 14:19 Page16
Summary of Contents for Fasteo
Page 1: ...www tefal com Fasteo EN...
Page 2: ...c d b a 3 2 11 12 8 4 EN Depending on model...
Page 3: ...2 5 5 7 6 1 13 10 9 x3 STEAMBOOST www tefal com...
Page 4: ...4 1 www tefal com MAX EN Depending on model...
Page 5: ...5 1 www tefal com 2 www tefal com ON ON OK OK...
Page 6: ...NO 6 2 www tefal com max...
Page 7: ...7 2 www tefal com max OK x3 STEAMBOOST max EN Depending on model...
Page 9: ...9 2 www tefal com OFF MAX...
Page 10: ...10 3 www tefal com OFF 2H ON...
Page 11: ...11 3 www tefal com OFF 1H OFF 3s OK...
Page 12: ...12 3 www tefal com 1H NO NO...
Page 20: ...1800142429 01 41 16...

