
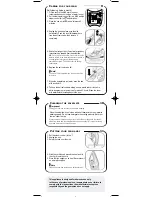

Self-cleaning (twice a month)
1. Fill the tank to the MAX mark (see our
recommendations on the type of water to use).
2. Put the thermostat control (
H
) on MAX and the
steam control (
G
) on and switch on.
3. Place the iron on its heel and wait around 5
minutes.
4. Unplug the iron and place over the sink
horizontally. Push the lock (
E
) backwards to
free the anti-calc valve, then remove it
completely.
5. Shake the iron gently until most water (and any
impurities) has drained from the soleplate.
N.B. Once you have done this, it is normal for a little
water to remain in the water tank because the iron’s
anti-drip system may prevent the tank being
completely emptied. This will not effect its ironing
performance.
6. Replace the anti-calc valve (
E
).
7. When the soleplate is just warm, wipe the iron
with a soft cloth.
8. To keep the anti-calc valve working, once a month leave it to soak in
white vinegar or pure lemon juice for around 2 hours. Rinse the stem
with water before inserting back in the iron.
9
C
ARING FOR YOUR IRON
!
Note!
Your iron will only operate when the anti-calc valve
is in place.
2
1
11
P
UTTING YOUR IRON AWAY
1. Set the steam control (
G
) on .
2. Unplug the iron.
3. Empty the tank over the sink.
4. Wind the cord loosely around the heel and fix
the clip (
J
) onto the cord.
5. Store the iron upright on its heel. Never place it
on a metallic support.
Note
Wait until the iron has cooled down before storing it.
10
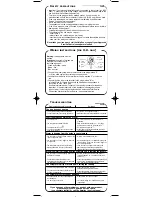
C
LEANING THE SOLEPLATE
!
Important
Unplug your iron and let it cool down before cleaning.
When the soleplate is cool, clean with a soft damp cloth or non-metallic
washing up pad. Do not use detergent or descaling products. Never put
the iron under the tap.
We recommend that when using starch, it should be sprayed onto the reverse
side of the fabric and the soleplate cleaned more frequently. Try to avoid ironing
over zips which may have rough edges.
!
This appliance is designed for domestic use only.
In the case of professional use, inappropriate use or failure to
comply with the instructions, the manufacturer accepts no
responsibility and the guarantee does not apply.
Turbo Pro UK 019449 20/07/01 15:44 Page 3


