6
To descale the iron:
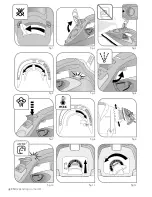
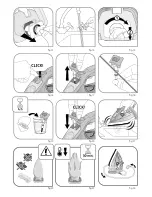
• Once the steam iron has completely cooled down, raise and turn the tab to unlock it
– fig.11-12.
• Remove the collector from the iron, it contains the limescale collected in the iron –
fig.13.
• To clean the collector thoroughly rinse in water to remove the limescale inside
– fig.14.
• Reposition the collector in its housing and turn the tab a quarter turn to the right in order to lock the
collector and ensure it is watertight –
fig.14 and 15.
In addition to this regular maintenance, it is recommended that the self-clean
function is performed once a year.
• If you live in a very hard water area, perform the self-cleaning operation on
a more regular basis.
• Put the steam button on
“MAX”
.
• Place the iron on its base with a full tankand set the thermostat to the
“MAX”
position.
• When the light goes out, disconnect the iron and place it over a sink.
• Set the thermostat to the “
MIN
” position.
• Remove the anti-calc valve.
• Shake the iron lightly and horizontally above a sink until part of the water
(with the impurities) flows from behind the appliance
– fig.21.
• Once you have finished this operation, replace the anti-calc valve, inserting
it until you hear a click
– fig.20.
• Plug in your iron and let it stand on its base for 2 minutes in order to clean
the soleplate.
• Unplug your iron and when the soleplate is lukewarm, dry it with a soft cloth.
• When you next use your iron, switch it on in the horizontal position, holding
it away from you, to remove any water and limescale residue left in the
baseplate.
Clean the anti-calc valve
(every 4 months )
• Unplug your iron and empty the tank.
• Put the steam button on max and set the thermostat to the
“MIN”
position
• To remove the anti-calc valve, press the self-clean extraction button –
fig.16
and pull the valve upwards –
fig.17.
• Let the valve soak for 4 hours in a glass of commercially available white
vinegar or natural lemon juice –
fig.19.
• Rinse the valve under tap water.
• Reposition the anti-calc valve; push it until it clicks –
fig.20.
Cleaning the soleplate
Your steam iron is equipped with a self-cleaning soleplate (depending on
model):
• Its exclusive active coating eliminates all impurities that can be generated
under normal conditions of use.
• Ironing using the incorrect temperature could however leave traces that
require manual cleaning. In this case, it is recommended that you use a soft
damp cloth on the still warm soleplate so as not to damage clothing.
Your steam iron is equipped with the Durilium / Durilium Airglide
soleplate (depending on model):
• Clean with a damp non-metallic sponge or damp soft cloth while the
soleplate is still warm.
Storing your iron
• Unplug it and wait for the soleplate to cool down –
fig.23.
• Empty the tank and set the steam control to
. A little water may remain in the tank.
• Wind the cord around the heel of the iron. Position the iron on its support base –
fig.24.
Warning! Using any
abrasive sponge damages
the self-cleaning coating
(according to model) of
your soleplate – fig.22.
Warning!
- Never touch the end of
the valve – fig.18.
- The iron does not work
without the anti-calc
valve.
WARNING!
The iron does not work
without the limescale
collector.
Do not use corrosive or
abrasive products.


