background image

18

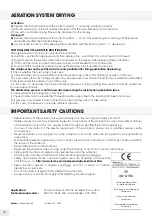
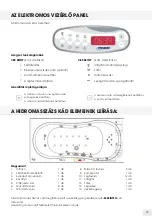
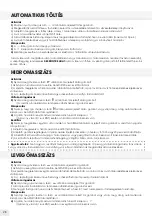
AERATION SYSTEM DRYING

Activation
1)

 Depress the Air pushbutton with the bottom symbol 

 while the whirlpool is empty 


 I) Activate slow drying of the Air nozzles beforehand for the specified period of 30 seconds.

II) Time with countdown drying time will be displayed on the display.

Turning off
2)

 Depress the Air pushbutton with the bottom symbol 

 for a short period again or turning off takes place  

     automatically after the time limit elapses

3)

 Turn all active functions off by keeping the pushbutton with the bottom symbol 

 depressed

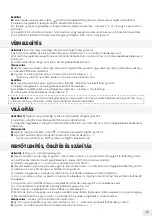
POTENTIAL DEFECTS AND THEIR RECTIFICATION

Strange behaviour of the control unit and the controller
b) Hold the + pushbutton depressed and then depress the – pushbutton for a short period (soft reset).
c) Program version followed by daily time is displayed on the display after releasing the pushbuttons. 
d) If this is not the case, turn the main power supply circuit breaker for 30 s (hard reset).
e) In case of other problems, please ask an authorized service for qualified assistance.

The whirlpool has not been filled at all or only partially after filling pushbutton depressing

f) Check whether the mixing tap is fully open.
g) Check another tap to see whether the central water supply line in the building has been shut down.
h) It is possible in the case of larger whirlpools when pressure is low (below 2 bar) that your whirlpool will be filled 

to the level under the nozzles or up to them only.

i) In this case, it is necessary to provide sufficient pressure or to prolong filling time, which should be carried out 

by a service technician.

The disinfection process is not started after depressing the disinfection pushbutton twice

i) Check whether the mixing tap is fully open. 
j) Check another tap to see whether the central water supply line in the building has been shut down.
k) If pressure is low (below 2 bar), disinfection solution dosing does not take place.
l) In this case, it is necessary to provide sufficient pressure.

IMPORTANT SAFETY CAUTIONS

•  Before removal of the whirlpool face guard, always turn the main power supply circuit off.
•  Neither owner nor user may intervene in electric components of the whirlpool in case of any defect (failure) 


of the whirlpool system. This also applies to the through-flow heating thermostat unblocking.

•  In case of any defect of the electric equipment of the whirlpool, always ask a qualified service centre 


for assistance.

•  Never let children or insane persons in the whirlpool or its vicinity when the face guard is removed without 


supervision. 

•  Mind portable electric appliances (such as radios, electric razors, hair driers etc.) that may not be used within 


the reach of the whirlpool.

•  Never bath animals in the whirlpool.
•  Never use the whirlpool when you are under the influence of alcohol or narcotic substances.
•  Side guards must be complete and locked before using the whirlpool.
•  Observe the instructions mentioned on the disinfecting agent packaging. 
•  Safety data sheets for the chemical agents used are available at the website 


of TEiKO spol. s r.o.

 http://www.teiko.cz/cz/podpora/data-ke-stazeni.html.

•  Keep chemical agents in original packaging and out of reach of children, 


ideally in a locked room.

•  Do not mix chemical agents from different manufacturers.
•  Always wash your hands thoroughly after handling chemical agents.

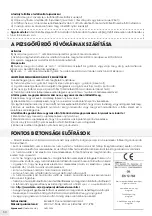
Application:


Acrylic whirlpools with the Excellent Duo system

Technical parameters: 


230V AC, 50Hz, 20A circuit breaker  20C, IP55

Author:  

Vladimír Koutný  

on March 26, 2008    

~‹Œ•“’’–ꇈ–ŒŠ‘„—ˆ‡

‰’•ê“ˆ•–’‘„ê‹œŠŒˆ‘ˆ

yˆ–Œ–—„‘†ˆê—’ê‹„Œ•ê—•„““Œ‘Š®

z„—Œ–‰„†—’•œ

h…ŒŒ—œê—’ꅈꆏˆ„‘ˆ‡®

z„—Œ–‰„†—’•œ

jˆ„‘Œ‘Šê„…ŒŒ—œê‡˜•„…ŒŒ—œ®

z„—Œ–‰„†—’•œ

Summary of Contents for EXCELLENT DUO

Page 1: ...n linka 800 100 050 A A 0 0 0 5 5 5 36 36 6 ver 05 2008 U IVATELSK N VOD U VATE SK N VOD USER MANUAL BEDIENUNGSANLEITUNG HASZN LATI UTAS T S INSTRUKCJA DLA U YTKOWNIKA STAVEBN P IPRAVENOST STAVEBN PRI...

Page 2: ...ekce s obsahem 1 4 litr Doporu ujeme P ed ka dou hydromas n l zn dodr ujte z sady spr vn hygieny Touto prevenc spole n v kombina ci s funkcemi desinfekce proplachu a vysou en hydromas niho syst mu doc...

Page 3: ...s e Nastaven doby chodu mas e P ed napou t n m vany pro hydromas se syst m d c jednotky nach z v ROVNI 1 vana je pr zdn jsou p ipraveny funkce zn zorn n pod tla tky ovlada e POPIS KOMPONENT VE V IV VA...

Page 4: ...sob tla tko hydromas e s horn m symbolem v klidov m stavu erpadla I Na displeji se zobraz doba kter je nastavena pro hydromas II Pomoci krokov ch tla tek m ete hodnotu doby mas e sn it zv it 5 10 15 a...

Page 5: ...te 2x kr tce po sob tla tko desinfekce s horn m symbolem p i pr zdn van a Aktivujete mezi dobu na 3s pro potvrzen aktivace desinfekce b Na displeji se zobraz symbol 3 s kter se za ne odpo t vat 3 Stis...

Page 6: ...trolujte na jin baterii zda li nen uzav en centr ln p vod vody do objektu k V p pad n zk ho tlaku pod 2 Bary se desinfekce nenad vkuje i V tomto p pad je zapot eb zajistit dostate n tlak D LE IT BEZPE...

Page 7: ...l 1 2 G MM M Sprcha N Dr k sprchy O Koleno pro p ipojen F 1 2 G P Zp tn klapka R Hladinov senzor AUTOMATICK NAPOU T N p es trysky syst mu verze 2 P ipojen napou t n na v vod ze zdi od miks n baterie V...

Page 8: ...nfekcie s obsahom 1 4 litrov Odpor ame Pred ka d m hydromas nym k pe om dodr ujte z sady spr vnej hygieny Touto prevenciou spolo ne v kombin cii s funkciami dezinfekcie preplachovania a vys ania hydro...

Page 9: ...avenie doby chodu mas e Pred napusten m vane na hydromas sa syst m riadiacej jednotky nach dza v ROVNI 1 va a je pr zdna s pripraven funkcie zn zornen pod tla idlami ovl da a POPIS KOMPONENTOV VO V RI...

Page 10: ...sebe tla idlo hydromas e s horn m symbolom v pokojnom stave erpadla I Na displeji sa zobraz doba ktor je nastaven pre hydromas II Pomocou krokov ch tla idiel m ete hodnotu doby mas e zn i zv i 5 10 15...

Page 11: ...ko za sebou tla idlo dezinfekcie s horn m symbolom pri pr zdnej vani a Aktivujete medzi as na 3 s na potvrdenie aktiv cie dezinfekcie b Na displeji sa zobraz symbol 3 s ktor sa za ne odpo tava 3 Stla...

Page 12: ...i nie je uzavret centr lny pr vod vody do objektu k V pr pade n zkeho tlaku pod 2 Bary sa dezinfekcia nenad vkuje i V tomto pr pade je potrebn zaisti dostato n tlak D LE IT BEZPE NOSTN UPOZORNENIA Pre...

Page 13: ...2 G MM M Sprcha N Dr iak sprchy O Koleno na pripojenie F 1 2 G P Sp tn klapka R Hladinov senzor AUTOMATICK NAP ANIE cez d zy syst mu verzia 2 Pripojenie nap ania na v vod zo steny od zmie avacej bat...

Page 14: ...ro massage bathing observe the principles of correct hygiene By applying this preven tion together with the hydro massage system disinfection flushing and drying functions you will imple ment one of t...

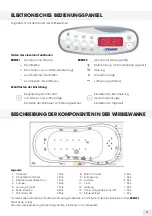
Page 15: ...interval adjustment Before whirlpool filling for hydro massage the control unit system is set to LEVEL 1 the whirlpool is empty the functions illustrated under the controller pushbuttons are ready DES...

Page 16: ...e pushbutton with the top symbol twice for a short period while the pump is idle I The period that has been set for hydro massage will appear on the display II You can shorten extend the massage perio...

Page 17: ...upper symbol twice while the tub is empty a Activate the interim time for 3s to confirm the activation of disinfection b A 3s symbol will appear on the display and the countdown will be started 3 Depr...

Page 18: ...infection pushbutton twice i Check whether the mixing tap is fully open j Check another tap to see whether the central water supply line in the building has been shut down k If pressure is low below 2...

Page 19: ...MM M Shower N Shower holder O Elbow for F 1 2 G connection P Non return valve R Level sensor AUTOMATIC FILLING through system nozzles verze 2 Filling hose connection to the wall outlet from the mixin...

Page 20: ...mit Desinfektion mit dem Inhalt 1 4 l Wir empfehlen Halten Sie vor jedem Hydromassagebad die Grunds tze der richtigen Hygiene ein Mit dieser Vorbeugung gemeinsam in der Kombination mit den Funktionen...

Page 21: ...ssageablauf Vor dem F llen der Wanne f r die Hydromassage befindet sich das System der Steuereinheit auf der EBENE 1 Die Wanne ist leer Die unter den Bedienungstasten dargestellten Funktionen sind vor...

Page 22: ...Sie erneut die Taste Hydro mit dem oberen Symbol oder automatisch nach dem Ablauf des Zeitlimits 4 Mit dem Halten der Taste schalten Sie alle aktiven Funktionen ab I Bei niedrigem Wasserspiegel Ebene...

Page 23: ...en Sie kurz die Taste Beleuchtung mit dem oberen Symbol I Aktivieren Sie die Beleuchtung auf die vorab eingestellte Zeit von 20 Minuten II Auf dem Display wird die Zeitdauer der Beleuchtungszeit abwec...

Page 24: ...esem Fall ist es notwendig ausreichenden Druck sicherzustellen oder die F llzeit zu verl ngern was der Service techniker durchf hren muss Beim Dr cken der Desinfektionstaste zweimal kurz nacheinander...

Page 25: ...N Halter der Dusche O Kniest ck f r den Anschluss F 1 2 G P R ckschlagklappe R Spiegelaufnehmer AUTOMATISCHES F LLEN ber die Systemd sen Version 2 Anschlie en des F llens ber die Ausf hrung von der W...

Page 26: ...sz r t funkci 1 4 literes fert tlen t szer t rol Javaslatunk Minden hidromassz zs f rd el tt tartsa be a megfelel higi niai alapelveket Ezzel a megel z ssel s a hidromassz zs rendszer fert tlen t bl t...

Page 27: ...zs id tartam nak be ll t sa A k d hidromassz zshoz val megt lt se el tt a vez rl egys g rendszere az 1 ES SZINTEN van a k d res A vez rl gombjai alatt felt ntetett funkci k k szen llnak A HIDROMASSZ Z...

Page 28: ...omatikusan kikapcsol a be ll tott id tartam lej rtakor 4 A gomb hosszabb lenyom s val minden akt v funkci t kikapcsol I Alacsony v zszint 1 es SZINT eset n a hidromassz zs blokkolva van Be ll t s 5 Ny...

Page 29: ...iv l s 1 Nyomja meg a fels szimb lummal jelzett vil g t s gombot I Aktiv lja a vil g t st az el re be ll tott 20 perces id tartamra II A kijelz n megjelenik a vil g t s id tartam b l eltelt id a ponto...

Page 30: ...skodni vagy meg kell hosszabb tani a t lt s idej t ezt a szerel nek kell elv geznie A fert tlen t s gomb k tszer egym s ut n t rt n r vid megnyom s ra a folyamat nem indult el i Ellen rizze hogy a kev...

Page 31: ...1 2 G MM k t elem M Zuhany N Zuhanytart O K ny kcs az F 1 2 G sszek t s re P Szelep R V zszint rz kel AUTOMATIKUS T LT S a f v k kon kereszt l 2 es verzi A t lt s csatlakoztat sa a kever csaptelep fa...

Page 32: ...kaniem i suszeniem dysz powietrznych zbiornik rodka dezynfekuj cego o pojemno ci 1 4 litra Zalecamy Przed ka d k piel w wannie z hydromasa em nale y przestrzega zasad higieny Dzi ki takiemu zach owani...

Page 33: ...ed nape nianiem wanny w celu hydromasa u system jednostki steruj cej znajduje si na POZIOMIE 1 wanna jest pusta przygotowane s funkcje opisane pod przyciskami panelu steruj cego OPIS KOMPONENT W WANNY...

Page 34: ...t pi automaty cznie po up ywie limitu czasu 4 Poprzez naci ni cie i przytrzymanie przycisku zostan wy czone wszystkie aktywne funkcje I Przy niskim poziomie wody POZIOM 1 hydromasa jest zablokowany Us...

Page 35: ...ycisk o wietlenia nad kt rym znajduje si symbol 3 Poprzez naci ni cie i przytrzymanie przycisku zostan wy czone wszystkie aktywne funkcje I Przy niskim poziomie wody POZIOM 1 o wietlenie jest zablokow...

Page 36: ...nienia wody poni ej 2 Bar nie zostanie przeprowadzone dozowanie rodka dezyn fekcyjnego l W sytuacji takiej nale y zapewni dostateczne ci nienie wody WA NE INFORMACJE DOTYCZ CE BEZPIECZE STWA Przed zdj...

Page 37: ...Uchwyt s uchawki prysznicowej O Kolano pod czeniowe F 1 2 G P Zaw r zwrotny R Czujnik poziomu AUTOMATYCZNE NAP ENIANIE przez dysze systemu wersja 2 Pod czenie nape niania do wyj cia ze ciany prowadz...

Page 38: ...38 38 38 38 39 39 40 40 40 41 41 41 42 42 42 1 4 230 1 230 50 20 A I 1 I 0 23 2 0 23 3 4 I 0 59 5 0 59 6...

Page 39: ...39 1 2 1 1 1 2 1 3 Excellent Duo 1 4 1 5 AQ 1 6 maxi SA 6 7 mini AQ 2 8 KO 5 9 1 10 air 12 11 1 12 1 13 1 14 1...

Page 40: ...40 1 b 1 d 10 e 2 3 4 2 1 Hydro I 20 II b 2 Hydro I 3 Hydro 4 I 1 5 I II 5 10 15 20 III IV Hydro Air 10 1 Air I 20 II b 2 Air I II 3 Hydro 4 I...

Page 41: ...41 5 I II 5 10 15 20 III IV Hydro Air 1 I 20 II III 2 3 I 1 4 I II III 36 C 1 I 20 II 2 3 I 1 1 2 a 3 b 3 3 4 20 b c I II III IV V 10 2 3...

Page 42: ...et soft c d 30 Reset hard e f g h 2 i i j k 2 l TEiKO TEiKO spol s r o http www teiko cz cz podpora data ke stazeni html Excellent Duo 230 AC 50 20A 20C IP55 26 03 2008 p TEiKO spol s r o 763 64 576 4...

Page 43: ...43 1 A B C FF 1 2 D E F G H 1 2 G I J K HTP L 1 2 G MM M N O F 1 2 G P R 2 A B C FF 1 2 D E F G H 1 2 G I J K HTP L 1 2 G MM M N O F 1 2 G P R...

Page 44: ...44 44 44 44 44 45 45 46 46 46 47 47 47 47 48 1 4 230 1 230 50 20 A I 1 I 0 23 2 0 23 3 4 I 0 59 5 0 59 6 A A A...

Page 45: ...45 1 2 1 1 b 1 d 10 e 2 3 4 2 1 1 2 1 3 Excellent Duo 1 4 1 5 AQ 1 6 SA 6 7 AQ 2 8 KO 5 9 1 10 12 11 1 12 1 13 1 14 1...

Page 46: ...46 1 Hydro I 20 II b 2 Hydro I 3 Hydro 4 I 1 5 I II 5 10 15 20 III IV Hydro Air 10 1 Air I 20 II b 2 Air I II 3 Hydro 4 I 5 I II 5 10 15 20 III IV Hydro Air 1 I 20 II III 2 3 I 1 4 I II III 36 C...

Page 47: ...47 4 I II III 36 C 1 I 20 II 2 3 I 1 1 2 a 3 b 3 3 4 20 I II III IV V 10 2 3 a b 1 Vitapur Sanosil Super 25 c 1 d 1 Air I Air 30 II 2 Air 3 b Reset soft c d 30 Reset hard e...

Page 48: ...ko cz cz podpora data ke stazeni html 1 2 A B C FF 1 2 D E F G H 1 2 G I J K HTP L 1 2 G MM M N O F 1 2 G P R Excellent Duo 230 AC 50 20A 20C IP55 TEiKO spol s r o 763 64 576 420 577 110 311 420 577 1...

Reviews: