background image

Tecai electropneumatic brushing robot

22-34

Remember not to operate the brush when it
is outside the duct as this could cause
damage to people or objects.

Do NOT bend the hose around very tight corners
as this can break the backing guide on the
inside.

operating instructions

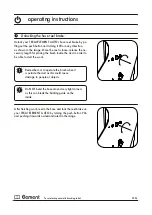
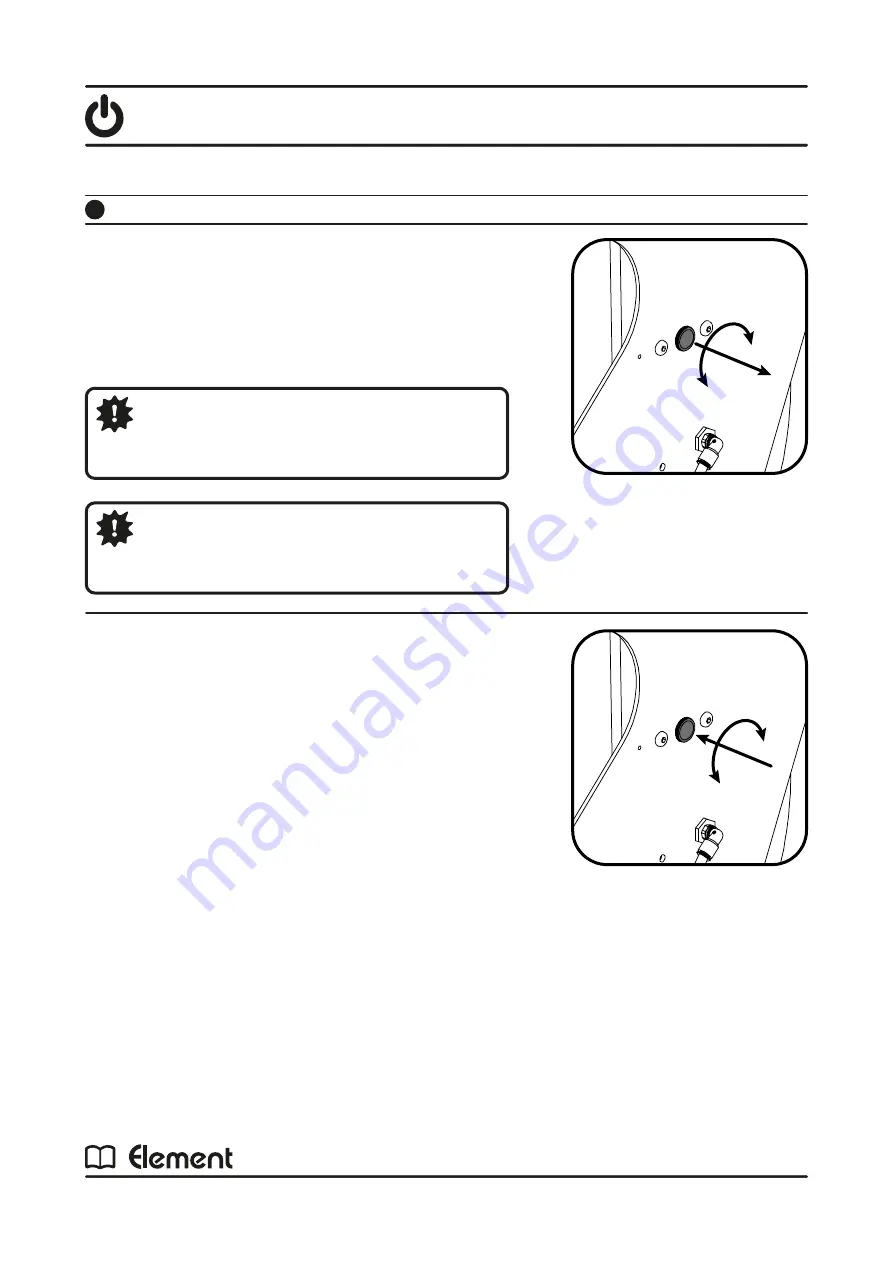
Unlock your TECAI ELEMENT AUTO’s hose reel brake by pu-
lling out the push-button and turning it 90o in any direction,
as shown in the image. Once the reel is loose, release the ne-
cessary length for placing the brush inside the duct in order to 
be able to start the work.

After finishing work, reel in the hose and lock the reel brake on 
your TECAI ELEMENT AUTO by turning the push-button 90o 
and pushing it inwards as demonstrated in the image.

Unlocking the hose reel brake:

4

Summary of Contents for TECAI ELEMENT

Page 1: ...1 34 user manual ENG Tecai electropneumatic brushing robot Original manual translation...

Page 2: ...ssibility of providing companies with specific training for using our equipment and training their operatives so that they can perform the best service and thus contribute to the success of their end...

Page 3: ...ing robot 3 34 contents symbols safety warnings conditions of use know your machine control panel remote control accessories and related equipment operating instructions transport 5 34 6 34 7 34 8 34...

Page 4: ...eumatic brushing robot 4 34 contents maintenance and care waste management problem solving guide technical specifications conditions of the guarantee declaration of compliance CE 27 34 30 34 31 34 32...

Page 5: ...ot followed appropriately Ensure that you read all the instructions described in the Safety information section WARNING This symbol warns of a potentially dangerous situation that could cause mild or...

Page 6: ...while you work Persons operating the TECAI ELEMENT AUTO equipment must be sufficiently trained Hold the hose firmly before starting the motor for the pneumatic brush Always keep a firm hold of the ho...

Page 7: ...her circular with diameters of 150 1000 mm or rectangular The appropriate accessories shall be available for each type of duct A 20 metre hose is included so 40 metres of the same tube can be cleaned...

Page 8: ...r 4 Hose 5 Compressed air inlet 6 Power connection 7 Back wheel 8 Hose reel 9 Front brake 10 Compressed air duct 11 Front wheel 12 Front brake 13 Regulator system lubricant 14 Compressed air duct 15 D...

Page 9: ...Control arrow keys ON OFF STOP ON OFF button for activating deactivating the equipment Emergency stop Control display STOP anti clockwise rotation clockwise rotation and AUTO mode STOP Anti clockwise...

Page 10: ...anti clockwise Operate the timer on the Tecai brushing machine so that its rotating movement lasts for the selected time Power up the Tecai brushing machine s motor so that its rotation movement is c...

Page 11: ...rs specifically for supplying both compressed air and electricity to your TECAI ELEMENT AUTO from the AR20 compressed air generator supplied by Teinnova Cod AC3303104 Combined hose A coupler where a s...

Page 12: ...84 11 81 13 78 15 75 17 72 19 69 23 62 27 56 31 5 CP2001020 CP2001025 CP2001030 CP2001035 CP2001040 CP2001545 CP2001550 CP2001560 CP2001570 CP2001580 Fine nylon brushes recommended for cleaning ducts...

Page 13: ...rushes recommended for cleaning ducts with grade 2 dust heavy soiling The measurements of the brushes range from a diameter of 200mm up to 600mm Pack of Fine Nylon Brushes Pack of Thick Nylon Brushes...

Page 14: ...iameter of 200mm up to 600mm Square Pack These brushes are used in combination with the double brush adapter This allows you to effectively clean the flat sides of the ducts and the corners 200x300 30...

Page 15: ...cally for supplying compressed air to your TECAI ELEMENT AUTO The connectors correspond to those found on the equipment provided by TEINNOVA Cod AC3303101 Compressed air supply hose 1 5 8 metre cable...

Page 16: ...quipment Vane compressor that generates an output of compressed air of 240 litres at 5 bar 220V 50Hz Cod TG3330201 110V 60Hz Cod TG3330500 Oil free double piston compressor that generates an output of...

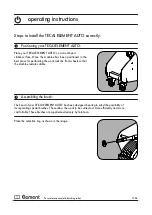
Page 17: ...tably These brushes are supplied exclusively by Teinnova Steps to install the TECAI ELEMENT AUTO correctly Assembling the brush Positioning your TECAI ELEMENT AUTO 1 operating instructions 2 Place you...

Page 18: ...ge Place the second retention ring and press the closing knob into place as shown in the image Align the retention hole on the brush with the reten tion pin on the ring that was placed in the previous...

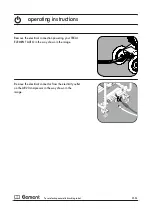
Page 19: ...Tecai electropneumatic brushing robot 19 34 operating instructions Remove the retention ring as shown in the image Remove the brush as shown in the image...

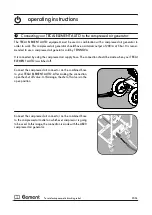
Page 20: ...d air supply hose The connection should be made when your TECAI ELEMENT AUTO is switched off Connect the compressed air connector on the combined hose to the compressed air outlet on whichever compres...

Page 21: ...tructions Connect the combined hose s electrical cable to the electrical outlet on the compressor to be used In this image the connection is made with the AR20 compressed air generator Connect the com...

Page 22: ...Unlock your TECAI ELEMENT AUTO s hose reel brake by pu lling out the push button and turning it 90o in any direction as shown in the image Once the reel is loose release the ne cessary length for pla...

Page 23: ...ediately push the emergency stop button shown in the image Start the anti clockwise rotation of the motor by pressing the arrow shown in the image Start the clockwise rotation of the motor by pressing...

Page 24: ...ould be operated so as to release the compressed air that has remained trapped in the circuit On having released the residual pressure from the circuit remove the head with the brush from the duct ree...

Page 25: ...25 34 Remove the electrical connector from the electricity outlet on the AR20 compressor in the way shown in the image Remove the electrical connection powering your TECAI ELEMENT AUTO in the way show...

Page 26: ...its normal working position vertical and the front wheel brakes should be on Placing the machine on a transport pallet or anything similar is advised against It is essential that the machine is stood...

Page 27: ...the equipment somewhere that is protected from the weather Maintain the machine in good condition and avoid knocking or overloading it Keep the connectors clean so as to avoid blockages in the condui...

Page 28: ...necessary for better efficiency and reduced wear of the machine s pneumatic components To remove the filter s oil deposit turn it anti clockwise as shown in the image Once the filter s oil deposit ha...

Page 29: ...rts of the machine as well as for consumables for all the maintenance tasks mentioned in this manual In the event of needing any part or consumable get in touch with TEINNOVA s Customer Service Depart...

Page 30: ...cial collection points for recycling Do not dispose of electrical equipment in the trash We recommend that electrical tools and accessories are subjected to an environmentally friendly recovery proces...

Page 31: ...ed motor Page 20 Page 29 Page 31 Page 20 Page 21 Check that the air inlet is open Contact the technical service at Tecai Innova S L Insufficient airflow Check the compressor s output No electricity su...

Page 32: ...rol system Dimensions Weight Length of hose Structure material Features 220V 50 60 Hz 110V 50 60 Hz 5 W 50 mA 100 mA Compressed air 220 l min 8 bar 7 77 cfm 8 bar 762 rpm 379 2 rpm 2 5 Nm 22 13 lbf in...

Page 33: ...oint 2 the transport both collection at the customer s facilities and return of the pro duct will be borne by the customer TEINNOVA reserves the right to overrule the applica tion of the guarantee whe...

Page 34: ...y certifies that the machine model described above complies with all the essential requirements of the following directives Machinery directive 2006 42 CE Directive 2014 30 EU on electromagnetic compa...

Reviews: