background image

17 


- Attention especially to safety warnings! 
-  The  appliance  may  only  be  used  as  described  in  this 
instruction manual. 
- Keep the instruction manual. 
-  If  you  give  the  appliance  to  a  third  party,  also  give  the 
instruction manual. 


Dear Customer, 


thank you for choosing us! 

Congratulations for having purchased your new kitchen hood. 

In order to use the appliance safely and to better know all of its features and performances:


- Read this instructions manual carefully before installing and switching the appliance on.   
- Special attention shall be paid to safety warnings! 
- The appliance shall only be used according to instructions given in this user manual. 
- Keep this instruction manual for further reference. 
- In case the appliance is given to third party, the instructions manual shall also be given. 
 

GENERAL INFORMATION 

When exchanging information with the appliance MANUFACTURER, please refer to the serial 
number and identification data specified in the rating label. 
This appliance has been designed, tested and manufactured in full compliance with any relevant 
standards on: 


Safety: CEI/EN 60335-

1; CEI/EN 60335

-2-

31; 


Performance: CEI/EN 61591; 

CEI/EN 60704-

1; CEI/EN 60704

-2-

13; EN 50564; CEI 62301.


EMC: EN 55014-

1; EN 55014

-

2; CEI/EN 61000

-3-

2; CEI/EN 61000

-3-3. 

Recommendations  for  proper  use  of  the  appliance  aimed  at  reducing  environmental  impact: 
when you start cooking, switch the hood on at minimum speed and switch it off only few minutes 
after you finished cooking. Increase the hood speed only in case of large amounts of vapours 
and fumes, and use the booster function only when absolutely necessary. Clean the grease filter 
only when necessary, in order to keep its efficiency over time. Use a piping system having the 
maximum diameter specified in this manual, in order to increase efficiency and reduce noise 
levels.   
 

The symbol on the appliance or on its documentation indicates that this product shall 
not be treated as household waste, but it shall be handed over to a specific collection 
point for the recycling of electrical and electronic equipment. Proper disposal of this 
appliance will help reduce raw materials consumption and environmental pollution.   
For more detailed information about recycling of this appliance, please contact your 
local  city  office,  your  household  waste  disposal  service  or  the  shop  where  you 
purchased the appliance.   

Summary of Contents for 113100004

Page 1: ...User Manual EN PT FR IT DE PL ES www teka com ...

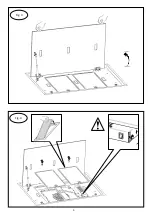
Page 2: ...2 Fig 1 Fig 2 ...

Page 3: ...3 Fig 3 Fig 4 ...

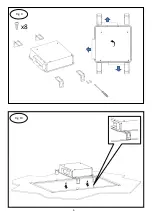
Page 4: ...4 Fig 5 Fig 6 X4 LAMP CABLE DISCONNECTION ...

Page 5: ...5 Fig 7 Fig 8 X4 MOTOR CABLE DISCONNECTION ...

Page 6: ...6 Fig 9 Fig 10 x8 ...

Page 7: ...7 Fig 11 Fig 12 ...

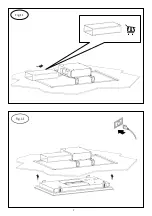
Page 8: ...8 Fig 13 Fig 14 X12 MOTOR CABLE CONNECTION ...

Page 9: ...9 Fig 15 LAMP CABLE CONNECTION Fig 16 X4 ...

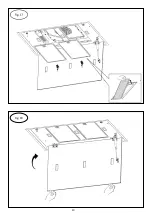
Page 10: ...10 Fig 17 Fig 18 ...

Page 11: ...11 Fig 19 Fig 20 INSTALLATION CEILING HOOD EN INSTALLATION KIT RECIRCULATION EN INSTALLATION CEILING ES INSTALLATION KIT RECIRCULATION ES ...

Page 12: ...d informed of the potential associated risks and warnings Children shall not be allowed to play with the appliance Safety and warning instructions specified in the user manual shall be strictly followed Caution Failure to use screws and fixing devices according to instructions specified in this manual may result in electrical risk The appliance shall not be used by persons children included with i...

Page 13: ...ction of the appliance from the mains supply after the installation through an accessible plug or main switch Steam cleaner should not be used Do not use harsh abrasives or sharp metal scrapers to clean glass since they can scratch the surface which can cause the glass to break CAUTION Ensure that the appliance is disconnected OFF before replacing the lamp to avoid the possibility of electric shoc...

Page 14: ...ply and socket The power cord shall be connected to an omnipolar magneto thermal breaker with a switch contact gap of at least 3 mm In case the power cord is damaged it shall be replaced either by the manufacturer or the technical assistance service or by specialized personnel The power cord shall not enter into contact with surfaces whose temperature exceeds 50 C once the appliance has been insta...

Page 15: ...in the pot might overheat and burn Fire risk is quite higher when oil is used Grease filters proper maintenance and accurate cleaning are extremely important Clean the hood and the other surfaces regularly in order to avoid any fire risk CAUTION when the hob is on accessible parts of the hood might become hot Connection of the exhaust device to exhaust ducts or channels and pipes for room ventilat...

Page 16: ...able unit of the hood if your appliance is equipped with it Range hoods and other cooking fume extractors may adversely affect the safe operation of appliances burning gas or other fuels including those in other rooms due to back flow of combustion gases These gases can potentially result in carbon monoxide poisoning After installation of a range hood or other cooking fume extractor the operation ...

Page 17: ...ty CEI EN 60335 1 CEI EN 60335 2 31 Performance CEI EN 61591 CEI EN 60704 1 CEI EN 60704 2 13 EN 50564 CEI 62301 EMC EN 55014 1 EN 55014 2 CEI EN 61000 3 2 CEI EN 61000 3 3 Recommendations for proper use of the appliance aimed at reducing environmental impact when you start cooking switch the hood on at minimum speed and switch it off only few minutes after you finished cooking Increase the hood s...

Page 18: ...ied and specialized personnel Wear protective gloves before and during installation Check that no accessory material provided with the appliance manuals accessories etc is placed inside the hood in such a case remove and keep them Figures shown in this installation manual might also refer to different aesthetics of the appliance in any case use installation and maintenance instructions remains the...

Page 19: ...NS P0 MOTOR ON OFF key If selected with the engine off the display shows a zero 0 for about 1 second P1 key to decrease the motor speed if the hood is in 1st speed it switches off the motor P2 key to increase the motor speed if the hood is off it switches on the 1st speed pressing a second time activates the 2nd speed pressing a third time activates the 3rd speed pressing a fourth time activates t...

Page 20: ...eriod of 24 hours To deactivate the Fresh Air function press the PC or P0 key again While the function is active both with the engine running and in stand by the hood LED will flash every 5 seconds Clean Air Activation Deactivation pressing the PC a C appears on the display When this function is activated the motor is set at maximum speed for about 6 minutes at the end of the 6 minutes the motor w...

Page 21: ...es and then ends the remaining 9 minutes at the 4th speed In the Clean Air function the light blue LED remains steady the motor switches to 6th speed and after 6 minutes the motor and not the lighting switches off In the Fresh Air function the Blue LED flashes intermittently for 5 seconds with the hood off the engine starts at 1st speed for 10 minutes and then remains off for 50 minutes and so on ...

Page 22: ...rease filter Ceramic filters They have the task of retaining odors and purifying the air that is returned to the environment The ceramic filters can be cleaned in the oven at a temperature of 180 200 C for about 45 60 minutes It is recommendable to replace the ceramic filters every 5 years to assure the best odor elimination Lighting The hood is equipped with lighting based on high efficiency LED ...

Page 23: ...e control is not synchronised with the hood Synchronise the remote control as described in the user manual from page 20 Electrical system problems Check the power supply on the electronic board On off switch is in position 0 Set the on off switch to position 1 as shown on page 4 Picture 4 of the instruction manual Hood aspirates little air Soiled aluminium filters Remove the filters as shown on pa...

Page 24: ...ation en toute sécurité de l appareil et informé des risques potentiels associés et des avertissements Les enfants ne doivent pas être autorisés à jouer avec l appareil Les consignes de sécurité et d avertissement spécifiées dans le manuel d utilisation doivent être strictement suivies Attention Ne pas utiliser les vis et dispositifs de fixation selon instructions spécifiées dans ce manuel peut en...

Page 25: ...e lors de l installation Débranchez l appareil de l alimentation électrique avant d effectuer toute opération de nettoyage ou d entretien Nécessité de permettre la déconnexion de l appareil de l alimentation secteur après l installation via une prise accessible ou un interrupteur principal Le nettoyeur à vapeur ne doit pas être utilisé N utilisez pas d abrasifs durs ou de grattoirs métalliques poi...

Page 26: ...l alimentation électrique Avant de brancher l appareil au réseau électrique vérifiez si les valeurs de tension de fréquence et de puissance indiquées sur la plaque signalétique de l appareil sont compatibles avec l alimentation et la prise du domicile Le cordon d alimentation doit être connecté à un disjoncteur magnétothermique omnipolaire avec un écart entre les contacts de l interrupteur d au mo...

Page 27: ...t utilisé en mode recirculation assurez vous que la poussière d évacuation est en bon état au cas où elle n aurait pas été utilisée pendant longtemps Il est interdit de cuire des aliments sur des flammes nues flambe sous la hotte Ne laissez jamais de casseroles sans surveillance lorsque la table de cuisson est allumée l huile contenue dans la casserole pourrait surchauffer et brûler Le risque d in...

Page 28: ...ns la pièce ne doit pas dépasser 4 Pa 4x10 5 bar Le local où est installée la hotte doit être pourvu d une entrée d air dont la capacité doit être supérieure à celle du dispositif d évacuation de la hotte Il est strictement interdit de placer les membres ou toute autre partie du corps humain ainsi que des objets de cuisine ou autres à proximité de l unité extractible de la hotte si votre appareil ...

Page 29: ...e votre nouvelle hotte de cuisine Afin d utiliser l appareil en toute sécurité et de mieux connaître l ensemble de ses caractéristiques et performances Lisez attentivement ce mode d emploi avant d installer et d allumer l appareil Une attention particulière doit être portée aux avertissements de sécurité L appareil ne doit être utilisé que conformément aux instructions données dans ce manuel d uti...

Page 30: ...votre mairie votre service d élimination des déchets ménagers ou le magasin où vous avez acheté l appareil Pièces de rechange Utilisez uniquement des pièces de rechange d origine Remplacez les composants avant qu ils ne soient usés Effectuez des vérifications d entretien régulières comme détaillé dans la section ENTRETIEN Garantie Afin de bénéficier de la garantie du FABRICANT les utilisateurs doi...

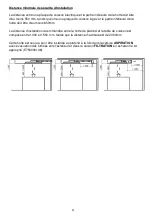
Page 31: ...nférieure de la hotte doit être d au moins 650mm La distance d installation recommandée entre la hotte de plafond et la table de cuisson est comprise entre 1300 et 1500 mm tandis que la distance maximale est de 2000mm Cette hotte est conçue pour être installée au plafond à la fois dans la version ASPIRATION avec évacuation des fumées vers l extérieur et dans la version FILTRATION en achetant le ki...

Page 32: ...nouveau opérationnelle LES FONCTIONS P0 Touche MARCHE ARRÊT DU MOTEUR S il est sélectionné avec le moteur éteint l écran affiche un zéro 0 pendant environ 1 seconde P1 Touche pour diminuer la vitesse du moteur si la hotte est en 1ère vitesse elle éteint le moteur P2 Touche pour augmenter la vitesse du moteur si la hotte est éteinte elle allume la 1ère vitesse un deuxième appui active la 2ème vites...

Page 33: ...e pendant une période de 24 les heures Pour désactiver la fonction Fresh Air appuyez à nouveau sur la touche PC ou P0 Tandis que le fonction est active aussi bien avec le moteur en marche qu en stand by la LED du capot clignotera toutes les 5 secondes Activation Désactivation Clean Air appui sur le PC un C apparaît sur l afficheur Lorsque cette fonction est activée le moteur est réglé à la vitesse...

Page 34: ... termine les 9 minutes restantes à la 4ème vitesse En fonction Clean Air la LED bleu clair reste fixe le moteur passe en 6ème vitesse et au bout de 6 minutes le moteur et non l éclairage s éteint Dans la fonction Fresh Air la LED bleue clignote par intermittence pendant 5 secondes capote éteinte le moteur démarre en 1ère vitesse pendant 10 minutes puis reste éteint pendant 50 minutes et ainsi de s...

Page 35: ... changer de couleur à cause des sels de lave vaisselle et des détergents Le changement de couleur n affecte pas la fonctionnalité du filtre à graisse Filtres en céramique Ils ont pour tâche de retenir les odeurs et de purifier l air qui est renvoyé dans l environnement Les filtres en céramique peuvent être nettoyés au four à une température de 180 200 C pendant environ 45 60 minutes Il est recomma...

Page 36: ... page 4 image 4 du manuel d instructions La hotte ne fonctionne pas Pas d électricité Vérifiez le câble d alimentation La télécommande n est pas synchronisée Synchroniser la télécommande comme dans le manuel d instructions à partir de la page 20 Problèmes au système électrique Vérifier l alimentation de la carte électronique L interrupteur On Off est en position 0 Réglez l interrupteur On Off sur ...

Page 37: ...ren Verwendung versehen wurden des Geräts und informiert über die damit verbundenen Risiken und Warnungen Kinder dürfen nicht mit dem Gerät spielen Die in der Bedienungsanleitung angegebenen Sicherheits und Warnhinweise müssen strikt befolgt werden Achtung Nichtverwendung von Schrauben und Befestigungsmitteln gem Anweisungen die in diesem Handbuch angegeben sind können zu elektrischen Risiken führ...

Page 38: ...ltenden Richtlinien durch Schließen Sie das Gerät während der Installation nicht an das Stromnetz an Trennen Sie das Gerät von der Stromversorgung bevor Sie Reinigungs oder Wartungsarbeiten durchführen Das Gerät muss nach der Installation über einen zugänglichen Stecker oder Hauptschalter vom Stromnetz getrennt werden können Dampfreiniger sollten nicht verwendet werden Verwenden Sie zum Reinigen v...

Page 39: ...alified electrician who will be responsible for proper electrical connection of the appliance to power supply Before connecting the appliance to the electrical network check if voltage frequency and power values specified in the rating label of the appliance are compatible with home power supply and socket The power cord shall be connected to an omnipolar magneto thermal breaker with a switch cont...

Page 40: ...s verwendet wird vergewissern Sie sich dass der Abluftstaub in gutem Zustand ist falls es längere Zeit nicht verwendet wurde Das Garen von Speisen über offenem Feuer Flambe unter der Haube ist nicht gestattet Lassen Sie Töpfe niemals unbeaufsichtigt wenn das Kochfeld eingeschaltet ist Im Topf enthaltenes Öl kann überhitzen und verbrennen Bei Verwendung von Öl ist die Brandgefahr deutlich höher Fet...

Page 41: ... nicht überschreiten Der Raum in dem die Dunstabzugshaube installiert wird muss mit einem Lufteinlass ausgestattet sein dessen Kapazität größer sein muss als die der Dunstabzugsvorrichtung Es ist strengstens verboten die Gliedmaßen oder andere Teile des zu platzieren menschliche Körper sowie Kochgegenstände oder andere Gegenstände in der Nähe der ausziehbaren Einheit der Haube falls Ihr Gerät dami...

Page 42: ...n Bewahren Sie die Bedienungsanleitung auf Wenn Sie das Gerät an Dritte weitergeben geben Sie auch die Bedienungsanleitung mit Lieber Kunde Danke daß Sie uns gewählt haben Herzlichen Glückwunsch zum Kauf Ihrer neuen Dunstabzugshaube Um das Gerät sicher zu verwenden und alle seine Funktionen und Leistungen besser kennenzulernen Lesen Sie diese Bedienungsanleitung sorgfältig durch bevor Sie das Gerä...

Page 43: ... Effizienz zu steigern und den Geräuschpegel zu reduzieren Das Symbol auf dem Gerät oder seiner Dokumentation weist darauf hin dass dieses Produkt nicht als Haushaltsabfall zu behandeln ist sondern an einer speziellen Sammelstelle für das Recycling von elektrischen und elektronischen Geräten abgegeben werden muss Die ordnungsgemäße Entsorgung dieses Geräts trägt dazu bei den Rohstoffverbrauch und ...

Page 44: ...sthetik des Geräts beziehen In jedem Fall bleiben die Gebrauchs Installations und Wartungsanweisungen gleich Mindestsicherheitsabstand bei der Installation Der Abstand zwischen einem Elektrokochfeld und dem unteren Teil der Abzugshaube muss mindestens 550 mm betragen während zwischen einem Gaskochfeld und dem unteren Teil der Abzugshaube mindestens 650 mm betragen muss Der empfohlene Installations...

Page 45: ... ausgeschaltetem Motor zeigt das Display etwa 1 Sekunde lang eine Null 0 an P1 Taste zum Verringern der Motorgeschwindigkeit wenn sich die Dunstabzugshaube in der 1 Geschwindigkeit befindet schaltet sie den Motor aus P2 Taste zum Erhöhen der Motorgeschwindigkeit wenn die Haube ausgeschaltet ist schaltet sie die 1 Geschwindigkeit ein ein zweites Drücken aktiviert die 2 Geschwindigkeit ein drittes D...

Page 46: ...ie erneut die Taste PC oder P0 Während Funktion aktiv ist sowohl bei laufendem Motor als auch im Stand by blinkt die Motorhauben LED alle 5 Sekunden Clean Air Aktivierung Deaktivierung Drücken Sie die Taste PC ein C erscheint auf dem Display Wenn diese Funktion aktiviert ist wird der Motor für etwa 6 Minuten auf maximale Geschwindigkeit eingestellt am Ende der 6 Minuten schaltet sich der Motor aut...

Page 47: ...tung ab In der Frischluftfunktion blinkt die blaue LED 5 Sekunden lang intermittierend bei abgenommener Motorhaube startet der Motor 10 Minuten lang mit der 1 Geschwindigkeit und bleibt dann 50 Minuten lang ausgeschaltet und so weiter bis die Funktion ausgeschaltet wird Metallfettfilter Reinigungssignal Nach 30 Betriebsstunden beginnt die grüne LED 20 Sekunden lang zu blinken um anzuzeigen dass di...

Page 48: ...stattet die auf hocheffizienter LED Technologie geringem Stromverbrauch und sehr hoher Lebensdauer unter normalen Nutzungsbedingungen basiert Wenden Sie sich für den Austausch an die Serviceabteilung DAS UNTERNEHMEN HERSTELLER kann nicht für Schäden verantwortlich gemacht werden die durch eine unsachgemäße Installation oder Verwendung dieses Geräts verursacht werden FEHLERBEHEBUNG PROBLEM MÖGLICHE...

Page 49: ...ektrischen System Überprüfen Sie die Stromversorgung auf der Elektronikplatine Ein Ausschalter steht auf Position 0 Stellen Sie den Ein Ausschalter auf Position 1 wie auf Seite 4 Bild 4 der Bedienungsanleitung gezeigt Hood saugt wenig Luft an Verschmutzte Aluminiumfilter Entfernen Sie die Filter wie auf Seite 11 Bild 17 der Bedienungsanleitung gezeigt und waschen Sie die Filter Grüne LED blinkt fü...

Page 50: ...ibles riesgos y advertencias asociados No se debe permitir que los niños jueguen con el aparato Se seguirán estrictamente las instrucciones de seguridad y advertencia especificadas en el manual del usuario Atención No utilizar tornillos y dispositivos de fijación según instrucciones especificadas en este manual puede resultar en un riesgo eléctrico El aparato no debe ser utilizado por personas niñ...

Page 51: ...ón de limpieza o mantenimiento Necesidad de permitir la desconexión del aparato de la red eléctrica después de la instalación a través de un enchufe accesible o interruptor principal No se debe utilizar un limpiador a vapor No utilice abrasivos fuertes ni rascadores metálicos afilados para limpiar el cristal ya que pueden rayar la superficie y hacer que el cristal se rompa PRECAUCIÓN Asegúrese de ...

Page 52: ...características del aparato son compatibles con el suministro eléctrico y la toma de corriente domésticos El cable de alimentación se conectará a un disyuntor magnetotérmico omnipolar con un espacio de contacto del interruptor de al menos 3 mm En caso de que el cable de alimentación esté dañado deberá ser reemplazado por el fabricante o por el servicio de asistencia técnica o por personal especial...

Page 53: ...limentos sobre llamas abiertas flambeado debajo de la campana Nunca deje las ollas sin vigilancia cuando la placa esté encendida el aceite contenido en la olla podría sobrecalentarse y quemarse El riesgo de incendio es bastante mayor cuando se utiliza aceite El mantenimiento adecuado de los filtros de grasa y la limpieza precisa son extremadamente importantes Limpiar periódicamente la campana y la...

Page 54: ...mpana deberá estar provisto de una toma de aire cuya capacidad deberá ser superior a la del dispositivo de extracción de la campana Queda terminantemente prohibido colocar las extremidades o cualquier otra parte del cuerpo humano así como objetos para cocinar u otros objetos cerca de la unidad extraíble de la campana si su aparato está equipado con ella Las campanas extractoras y otros extractores...

Page 55: ... este manual de instrucciones Conservar el manual de instrucciones Si entrega el aparato a un tercero entregue también el manual de instrucciones Estimado cliente Gracias por elegirnos Felicitaciones por haber adquirido su nueva campana de cocina Para utilizar el aparato con seguridad y conocer mejor todas sus características y prestaciones Lea atentamente este manual de instrucciones antes de ins...

Page 56: ...claje de aparatos eléctricos y electrónicos La eliminación adecuada de este aparato ayudará a reducir el consumo de materias primas y la contaminación ambiental Para obtener información más detallada sobre el reciclaje de este electrodoméstico comuníquese con la oficina local de su ciudad el servicio de eliminación de desechos domésticos o la tienda donde compró el electrodoméstico Piezas de repue...

Page 57: ...a parte inferior de la campana debe ser como mínimo de 550 mm mientras que entre una placa de gas y la parte inferior de la campana debe ser como mínimo de 650 mm La distancia de instalación recomendada entre la campana de techo y la placa de cocción es de 1300 a 1500 mm siendo la distancia máxima de 2000 mm Esta campana está diseñada para ser instalada en el techo tanto en la versión ASPIRANTE co...

Page 58: ...ES P0 Tecla ENCENDIDO APAGADO DEL MOTOR Si se selecciona con el motor apagado la pantalla muestra un cero 0 durante aproximadamente 1 segundo P1 tecla para disminuir la velocidad del motor si la campana está en 1ª velocidad apaga el motor P2 tecla para aumentar la velocidad del motor si la campana está apagada se enciende la 1ª velocidad al pulsar una segunda vez se activa la 2ª velocidad al pulsa...

Page 59: ...rmanece activa durante un periodo de 24 horas Para desactivar la función Fresh Air vuelva a pulsar la tecla PC o P0 Mientras que la función está activa tanto con el motor en marcha como en stand by el led del capó parpadeará cada 5 segundos Activación Desactivación de Aire Limpio pulsando el PC aparece una C en el display Cuando esta función está activada el motor se ajusta a la velocidad máxima d...

Page 60: ...finaliza los 9 minutos restantes en la 4ª velocidad En la función Clean Air el LED azul claro permanece fijo el motor pasa a la 6ª velocidad y después de 6 minutos se apaga el motor y no la iluminación En la función Fresh Air el LED azul parpadea de forma intermitente durante 5 segundos con la capota apagada el motor arranca a 1ª velocidad durante 10 minutos y luego permanece apagado durante 50 mi...

Page 61: ...cambio de color no afecta la funcionalidad del filtro de grasa Filtros Cerámicos Tienen la función de retener los olores y purificar el aire que se devuelve al ambiente Los filtros cerámicos se pueden limpiar en el horno a una temperatura de 180 200 C durante unos 45 60 minutos Es recomendable reemplazar los filtros cerámicos cada 5 años para asegurar la mejor eliminación de olores Encendiendo La ...

Page 62: ...iona Sin electricidad Verifique el cable de alimentación El control remoto no está sincronizado con la campana Sincronice el control remoto como se describe en el manual de usuario de la página 20 Problemas del sistema eléctrico Verifique la fuente de alimentación en la placa electrónica El interruptor de encendido apagado está en la posición 0 Coloque el interruptor de encendido apagado en la pos...

Page 63: ...iais riscos e avisos associados As crianças não devem brincar com o aparelho As instruções de segurança e advertência especificadas no manual do usuário devem ser rigorosamente seguidas Atenção Não utilizar parafusos e dispositivos de fixação conforme instruções especificadas neste manual pode resultar em risco elétrico O aparelho não deve ser utilizado por pessoas incluindo crianças com deficiênc...

Page 64: ... Necessidade de permitir a desconexão do aparelho da rede eléctrica após a instalação através de uma ficha acessível ou interruptor geral O limpador a vapor não deve ser usado Não use abrasivos fortes ou raspadores de metal afiados para limpar o vidro pois podem arranhar a superfície o que pode causar a quebra do vidro CUIDADO Certifique se de que o aparelho esteja desconectado OFF antes de substi...

Page 65: ... O cabo de alimentação deve ser conectado a um disjuntor magnetotérmico omnipolar com uma distância entre contatos de comutação de pelo menos 3 mm Caso o cabo de alimentação esteja danificado deverá ser substituído pelo fabricante ou pelo serviço de assistência técnica ou por pessoal especializado O cabo de alimentação não deve entrar em contato com superfícies cuja temperatura superior a 50 C apó...

Page 66: ...do na panela pode sobreaquecer e queimar O risco de incêndio é bastante maior quando o óleo é usado Filtros de gordura manutenção adequada e limpeza precisa são extremamente importantes Limpe regularmente o exaustor e as outras superfícies para evitar qualquer risco de incêndio ATENÇÃO com a placa ligada as partes acessíveis do exaustor podem ficar quentes Não é permitida a conexão do dispositivo ...

Page 67: ...bjetos de cozinha ou outros objetos perto da unidade extraível do exaustor se o seu aparelho estiver equipado com ele Exaustores e outros exaustores de fumaça de cozinha podem afetar adversamente a operação segura de aparelhos que queimam gás ou outros combustíveis incluindo aqueles em outras salas devido ao refluxo dos gases de combustão Esses gases podem potencialmente resultar em envenenamento ...

Page 68: ...arde este manual de instruções para referência futura Caso o aparelho seja cedido a terceiros o manual de instruções também deverá ser fornecido INFORMAÇÕES GERAIS Ao trocar informações com o FABRICANTE do aparelho consulte o número de série e os dados de identificação especificados na etiqueta de classificação Este aparelho foi concebido testado e fabricado em total conformidade com todas as norm...

Page 69: ... e escrupulosas permitir a utilização do exaustor apenas a pessoas com competências e conhecimentos comprovados O não cumprimento das instruções contidas neste manual anulará imediatamente a garantia do fabricante INSTRUÇÕES DE INSTALAÇÃO As operações de instalação e conexão elétrica devem ser realizadas de acordo com estas instruções e por pessoal qualificado e especializado Use luvas de proteção...

Page 70: ...ontrole remoto perder a comunicação com o exaustor execute o seguinte procedimento Desconecte o exaustor da rede elétrica Aguarde alguns segundos e restaure a energia e dentro de 10 segundos pressione os botões P1 e PT ao mesmo tempo por cerca de 3 segundos O controle remoto estará operacional novamente ...

Page 71: ...la PL você terá a variação do tom de cor da luz de 2700 K a 4000 K em 10 passos Uma vez alcançado o tom desejado deverá aguardar 10 segundos o LED da coifa deixará de piscar e a função será memorizada PC Tecla ON OFF AR FRESCO Ativação Desativação do Ar Fresco pressionar o botão PC por um longo tempo com o capô desligado Esta função permite ligar o motor na 1ª velocidade durante 10 minutos seguido...

Page 72: ...nutos em velocidades não intensivas o motor desliga e não a iluminação Quanto às velocidades intensivas quando o timer é ativado ele permanece na velocidade definida nos primeiros 6 minutos e depois termina os 9 minutos restantes na 4ª velocidade Na função Clean Air o LED azul claro permanece fixo o motor passa para 6ª velocidade e após 6 minutos o motor e não a iluminação desliga Na função Fresh ...

Page 73: ...a função de reter odores e purificar o ar que é devolvido ao ambiente Os filtros cerâmicos podem ser limpos no forno a uma temperatura de 180 200 C durante cerca de 45 60 minutos É recomendável substituir os filtros cerâmicos a cada 5 anos para garantir a melhor eliminação de odores Iluminação O exaustor está equipado com iluminação baseada na tecnologia LED de alta eficiência baixo consumo de ene...

Page 74: ...to não está sincronizado com o capô Sincronize o controle remoto conforme descrito no manual do usuário a partir da página 20 Problemas no sistema elétrico Verifique a alimentação na placa eletrônica O interruptor liga desliga está na posição 0 Coloque o interruptor liga desliga na posição 1 conforme mostrado na página 4 Figura 4 do manual de instruções Capô aspira pouco ar Filtros de alumínio suj...

Page 75: ...mato dei potenziali rischi e avvertenze associati I bambini non devono giocare con l apparecchio Le istruzioni di sicurezza e di avvertenza specificate nel manuale dell utente devono essere rigorosamente seguite Attenzione mancato utilizzo di viti e dispositivi di fissaggio secondo istruzioni specificate in questo manuale può comportare rischi elettrici L apparecchio non deve essere utilizzato da ...

Page 76: ...o manutenzione disconnettere l apparecchio dalla rete di alimentazione Consentire lo scollegamento dell apparechiuo alla rete elettrica dopo l installazione tramite una spina accessibile o interruttore generale Non utilizzare pulitore a vapore Non utilizzare abrasivi aggressivi o raschietti metallici affilati per pulire il vetro poiché possono graffiare la superficie causando la rottura del vetro ...

Page 77: ...arecchio all alimentazione elettrica verificare che i valori di tensione frequenza e potenza elettrica indicati sull etichetta dati dell apparecchio siano compatibili con l alimentazione elettrica e la presa Il cavo di alimentazione deve essere collegato ad un interruttore magnetotermico omnipolare con una distanza tra i contatti di almeno 3 mm Se il cavo di alimentazione danneggiato deve essere s...

Page 78: ...to fermato per lungo tempo Non è consentito cuocere cibi su fiamme libere flambe sotto la cappa Quando il piano cottura è in funzione non lasciare mai la pentola incustodita l olio contenuto nella pentola può surriscaldarsi e infiammarsi Quando si utilizza l olio il rischio di incendi è più elevato È importante eseguire una corretta manutenzione e pulire i filtri antigrasso Per evitare il pericolo...

Page 79: ...iore a quella di scarico dalla cappa È assolutamente vietato collocare gli arti o qualsiasi altra parte del corpo o del corpo umano oggetti per la cottura o altri oggetti in prossimità dell unità estraibile della cappa se presente nella versione del prodotto Le cappe aspiranti e altri aspiratori di fumi di cottura possono influire negativamente sul funzionamento sicuro degli apparecchi a gas o alt...

Page 80: ...ione per l uso prima dell installazione e della prima messa in funzione Attenzione soprattutto alle avvertenze per la sicurezza E consentito utilizzare l apparecchio solo come descritto in questo libretto di istruzioni per l uso Conservare il manuale di istruzione Se cedi l apparecchio a terzi consegnare anche il libretto di istruzione INFORMAZIONI GENERALI In caso di scambio di informazioni con i...

Page 81: ...ia L Utente per poter usufruire della garanzia fornita dal Costruttore deve osservare scrupolosamente le prescrizioni indicate nel presente manuale ed in particolare operare sempre nei limiti d impiego della cappa effettuare sempre una costante e diligente manutenzione autorizzare all uso della cappa persone di provata capacità e attitudine L inosservanza delle prescrizioni contenute in questo man...

Page 82: ...48 ISTRUZIONE COMANDI Il telecomando arriverà già programmato con la cappa se per qualsiasi motivo il telecomando dovesse perdere la comunicazione con la cappa eseguire la seguente procedura togliere corrente alla cappa attendere qualche secondo e ripristinare la corrente ed entro 10 secondi premere contemporaneamente il tasto P1 e PT per circa 3 secondi Il telecomando sarà di nuovo operativo ...

Page 83: ... K a 4000 K in 10 step Una volta raggiunta la tonalità desiderata si dovrà attendere 10 secondi il led sulla cappa smetterà di lampeggiare e la funzione verrà memorizzata PC Tasto ON OFF FRESH AIR Attivazione Disattivazione Fresh Air pressione prolungata del tasto PC a cappa spenta Questa funzione permette di accendere il motore alla 1 velocità per 10 minuti seguiti da 50 minuti di stand by Questa...

Page 84: ...intensive all attivazione del timer per i primi 6 minuti rimane nella velocità impostata per poi terminare i restanti 9 minuti alla 4 velocità Nella funzione Clean Air il LED di colore Celeste rimane fisso il motore passa alla 6 velocità e dopo 6 minuti si spegne il motore e non l illuminazione Nella funzione Fresh Air il LED di colore Blu lampeggia con intermittenza di 5 secondi a cappa spenta si...

Page 85: ...ionalità del filtro antigrasso Filtri Ceramici Hanno il compito trattenere gli odori e di depurare l aria che viene rimessa nell ambiente I filtri ceramici possono essere puliti in forno ad una temperatura di 180 200 C per circa 45 60 minuti Sostituire i filtri ogni 5 anni oppure ogni volta che risultino danneggiati Illuminazione La cappa è dotata di illuminazione basato su tecnologia LED ad alta ...

Page 86: ...limentazione Il telecomando non è sincronizzato alla cappa Sincronizzare il telecomando come riportato nel manuale d uso da pag 20 Problemi all impianto elettrico Controllare l alimentazione sulla scheda L interruttore on off è in posizione 0 Portare l interruttore on off su posizione 1 come riportato a pag 4 Fig 4 del manuale d uso La cappa aspira poca aria Filtri allumino sporchi Togliere i filt...

Page 87: ...dzenia i poinformowany o potencjalnych zagrożeniach i ostrzeżeniach Dzieci nie mogą bawić się urządzeniem Należy ściśle przestrzegać instrukcji bezpieczeństwa i ostrzeżeń zawartych w instrukcji obsługi Uwaga niestosowanie śrub i urządzeń mocujących zgodnie z instrukcji określonych w niniejszej instrukcji może spowodować ryzyko porażenia prądem elektrycznym Urządzenie nie powinno być używane przez ...

Page 88: ...silania przed przystąpieniem do jakichkolwiek czynności związanych z czyszczeniem lub konserwacją Konieczność odłączenia urządzenia od zasilania sieciowego po instalacji za pomocą dostępnej wtyczki lub wyłącznika głównego Nie należy używać odkurzacza parowego Nie używaj ostrych materiałów ściernych ani ostrych metalowych skrobaków do czyszczenia szkła ponieważ mogą zarysować powierzchnię co może s...

Page 89: ...owe podłączenie elektryczne urządzenia do zasilania Przed podłączeniem urządzenia do sieci elektrycznej należy sprawdzić czy wartości napięcia częstotliwości i mocy podane na tabliczce znamionowej urządzenia są kompatybilne z domowym zasilaniem i gniazdkiem Przewód zasilający należy podłączyć do wielobiegunowego wyłącznika magnetotermicznego z przerwą między stykami co najmniej 3 mm W przypadku us...

Page 90: ...yczących operacji wywiewu powietrza Jeśli urządzenie jest używane w trybie recyrkulacji upewnij się że kurz wylotowy jest w dobrym stanie na wypadek gdyby nie był używany przez długi czas Nie wolno gotować potraw na otwartym ogniu flambe pod okapem Nigdy nie zostawiaj garnków bez nadzoru gdy płyta jest włączona olej zawarty w garnku może się przegrzać i spalić Ryzyko pożaru jest znacznie wyższe gd...

Page 91: ...odciśnienie w pomieszczeniu nie powinno przekraczać 4 Pa 4x10 5 bar Pomieszczenie w którym montowany jest okap powinno być wyposażone w czerpnię powietrza o przepustowości większej niż wyrzutnia okapu Surowo zabrania się umieszczania kończyn lub jakiejkolwiek innej części ciała ludzkiego a także przedmiotów do gotowania lub innych przedmiotów w pobliżu wyciąganej części okapu jeśli Twoje urządzeni...

Page 92: ...w niniejszej instrukcji obsługi Zachowaj instrukcję obsługi Jeśli przekazujesz urządzenie osobie trzeciej przekaż również instrukcję obsługi Szanowny Kliencie Dziękujemy za wybranie nas Gratulujemy zakupu nowego okapu kuchennego Aby bezpiecznie korzystać z urządzenia i lepiej poznać wszystkie jego funkcje i możliwości Przeczytaj uważnie niniejszą instrukcję obsługi przed zainstalowaniem i włączeni...

Page 93: ...y zwiększyć wydajność i zmniejszyć poziom hałasu Symbol na urządzeniu lub w jego dokumentacji wskazuje że produkt ten nie powinien być traktowany jako odpad domowy ale należy go przekazać do określonego punktu zbiórki sprzętu elektrycznego i elektronicznego Właściwa utylizacja tego urządzenia pomoże zmniejszyć zużycie surowców i zanieczyszczenie środowiska Aby uzyskać bardziej szczegółowe informac...

Page 94: ...się do innej estetyki urządzenia w każdym przypadku instrukcje użytkowania instalacji i konserwacji pozostają takie same Minimalna bezpieczna odległość instalacji Odległość między płytą elektryczną a dolną częścią okapu musi wynosić co najmniej 550 mm natomiast między płytą gazową a dolną częścią okapu musi wynosić co najmniej 650 mm Zalecana odległość montażowa między okapem sufitowym a płytą grz...

Page 95: ...ku wyboru przy wyłączonym silniku wyświetlacz pokazuje zero 0 przez około 1 sekundę P1 przycisk do zmniejszania prędkości silnika jeśli okap jest na 1 prędkości wyłącza silnik P2 przycisk do zwiększania prędkości silnika jeśli okap jest wyłączony włącza 1 prędkość drugie naciśnięcie włącza 2 prędkość trzecie naciśnięcie włącza 3 prędkość czwarte naciśnięcie włącza 4 prędkość naciśnięcie a piąty ra...

Page 96: ...aktywować funkcję Fresh Air ponownie naciśnij przycisk PC lub P0 Podczas funkcja jest aktywna zarówno przy pracującym silniku jak iw stanie czuwania dioda LED na masce będzie migać co 5 sekund Aktywacja dezaktywacja czystego powietrza naciśnięcie przycisku PC na wyświetlaczu pojawi się C Gdy ta funkcja jest aktywna silnik jest ustawiony na maksymalną prędkość przez około 6 minut po upływie 6 minut...

Page 97: ...j prędkości przez pierwsze 6 minut a następnie kończy pozostałe 9 minut na 4 prędkości W funkcji Clean Air jasnoniebieska dioda LED świeci światłem ciągłym silnik przełącza się na 6 prędkość i po 6 minutach wyłącza się silnik a nie oświetlenie W funkcji Fresh Air niebieska dioda LED miga z przerwami przez 5 sekund przy wyłączonej masce silnik uruchamia się na 1 prędkości przez 10 minut a następnie...

Page 98: ...ą za zadanie zatrzymywanie zapachów i oczyszczanie powietrza które powraca do otoczenia Filtry ceramiczne można czyścić w piekarniku w temperaturze 180 200 C przez około 45 60 minut Zaleca się wymianę filtrów ceramicznych co 5 lat aby zapewnić najlepszą eliminację zapachów Oświetlenie Okap wyposażony jest w oświetlenie oparte na wysokowydajnej technologii LED niskim zużyciu energii i bardzo wysoki...

Page 99: ...kapem Zsynchronizuj pilota zgodnie z opisem w instrukcji obsługi od strony 20 Problemy z układem elektrycznym Sprawdź zasilanie na płytce elektronicznej Włącznik wyłącznik jest w pozycji 0 Ustaw włącznik wyłącznik w pozycji 1 jak pokazano na stronie 4 Zdjęcie 4 instrukcji obsługi Kaptur zasysa mało powietrza Zabrudzone filtry aluminiowe Wyjąć filtry jak pokazano na stronie 11 Zdjęcie 17 instrukcji...

Page 100: ...100 www teka com E461000129 Rev 1 ...

Reviews: