EN
13
ELECTRICAL CONNECTION
The mains power supply must corre-
spond to the rating indicated on the pla-
te situated inside the hood. If provided
with a plug connect the hood to a socket
in compliance with current regulations and positio-
ned in an accessible area, after installation. If it not
fitted with a plug (direct mains connection) or if the
plug is not located in an accessible area, after instal-
lation, apply a double pole switch in accordance with
standards which assures the complete disconnec-
tion of the mains under conditions relating to over-
-current category III, in accordance with installation
instructions.
Warning!
Before re-connecting the hood circuit to
the mains supply and checking the efficient function,
always check that the mains cable is correctly as-
sembled.
The hood is provided with a special power cable ; if
the cable is damaged, request a new one from Tech-
nical Service.
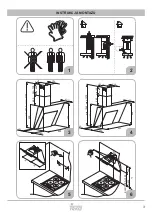
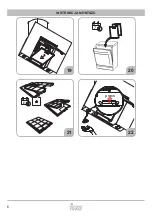
MOUNTING
Very heavy product; hood handling and installation
must be carried out by at least two persons. Before
beginning installation:
• Check that the product purchased is of a suita-
ble size for the chosen installation area.
• Remove the charcoal (*) filter/s if supplied (see
also relative paragraph). This/these is/are to be
mounted only if you want lo use the hood in the
filtering version.
• Check (for transport reasons) that there is no
other supplied material inside the hood (e.g.
packets with screws (*), guarantees (*), etc.),
eventually removing them and keeping them.
• If possible, disconnect and move freestanding
or slide-in range from cabinet opening to provi-
de easier access to rear wall/ceiling. Otherwise
put a thick, protective covering over countertop,
cooktop or range to protect from damage and
debris. Select a flat surface for assembling the
unit. Cover that surface with a protective cove-
ring and place all canopy hood parts and har-
dware in it.
• In addition check whether near the installation
area of the hood (in the area accessible also
with the hood mounted) an electric socket is
available and it is possible to connect a fumes
discharge device to the outside (only suction
version).
• Carry out all the masonry work necessary (e.g.
installation of an electric socket and/or a hole for
the passage of the discharge tube).
Expansion wall plugs are provided to secure the
hood to most types of walls/ceilings. However, a qu-
alified technician must verify suitability of the mate-
rials in accordance with the type of wall/ceiling. The
wall/ceiling must be strong enough to take the we-
ight of the hood. Do not tile, grout or silicone this
appliance to the wall. Surface mounting only.
OPERATION
Use the high suction speed in cases of concentrated
kitchen vapours. It is recommended that the cooker
hood suction is switched on for 5 minutes prior to
cooking and to leave in operation during cooking and
for another 15 minutes approximately after termina-
ting cooking.
To select the functions of the hood, simply touch the
controls.
1. Speed decrease / switching off
This button is used to decrease the speed of the
motor. Press and hold this button to switch off
the appliance.
2. Speed increase / switching on
In the off - mode press this button to switch on
the motor in speed one.
Pressing this button while the appliance is in
operation will increase the speed one step hi-
gher.
The speed of the motor is shown on the LED
display. The digit on the display corresponds
to the speed of the motor (i.e. “1” indicates first
speed, “2” indicates second speed etc.)
3. LED display
Indicates the current function / mode of the hood
4. Timer
Enables to set automatic switch off of the hood
5. Lights on/off
1
2
3
4
5
Summary of Contents for DVS 673 BK
Page 1: ...INSTRUKCJA MONTAŻU OBSŁUGI I UŻYTKOWANIA DVS 983 BK WH DVS 673 BK WH ...
Page 2: ......
Page 5: ...5 4x 3 9 x 9 5 13 15 17 14 16 18 INSTRUKCJA MONTAŻU ...
Page 6: ...6 1 4 press 19 21 20 22 INSTRUKCJA MONTAŻU ...
Page 15: ......
Page 16: ...TEKA POLSKA SP Z O O ul 3 go Maja 8 05 800 PRUSZKÓW tel 22 738 32 70 www teka com ...


