11
EN
Using the Browning Plate
Normally when cooking food, such as pizzas or
pies, on a grill or in a microwave oven, the dough
or pastry becomes soggy. This can be avoided
by using a browning plate. As a high temperature
is reached quickly on the bottom of the browning
plate, the crust turns crisp and brown.
The browning plate can also be used for bacon,
eggs, sausages, etc.
VERY IMPORTANT NOTES:
Use oven gloves at all times as the browning
plate will become very hot.
Never place the browning plate in the oven
without the glass plate.
Do not place any recipients on the browning
plate that are not heat-resistant (plastic
bowls for example).
How to cook with the browning plate:
1. Preheat the browning plate by selecting the
Microwave and Grill function for 3 to 5
minutes with a 600 W microwaves power
level.
2. Brush the browning plate with oil in order to
brown the food nicely.
3. Place the fresh or frozen food directly on
the browning plate. You can place defrost
food (like frozen pizza) without a previous
defrosting.
4. Place the browning plate on the glass
turntable in the microwave oven.
5. Select the Microwaves and Grill function
and the cooking time as described below.
How to clean the browning plate
The best way to clean the browning plate is to
wash it with hot water and detergent and rinse off
with clean water. Do not use a scrubbing brush or
a hard sponge otherwise the top layer will be
damaged.
VERY IMPORTANT NOTES:
As the browning plate has a Teflon layer, if you
use it incorrectly, it can be damaged.
Never cut the food on the plate. Remove the
food from the plate prior to cutting.
Turn the food over preferably with a plastic or
wooden spatula.
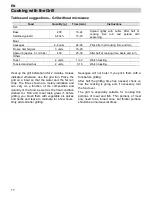
Food
Weight
Cooking
Time
Standing Time
Recommendation
Pizza
200 g
5 min
2 min
If the pizza is thin.
If the pizza is high increase the time
by 1
– 2 minutes
300 g
6 min
2 min
400 g
7 min
2 min
Quiches and
Pies
200 g
5 min
2 min
A temperature compensation is
achieved through the standing time
300 g
6 min
2 min
Hamburgers
---
8 min
2 min
Turn 2 x
Oven chips
400 g
5 min
---
Turn 1 x
Summary of Contents for MWR 32 BI
Page 2: ......


