4
5
6
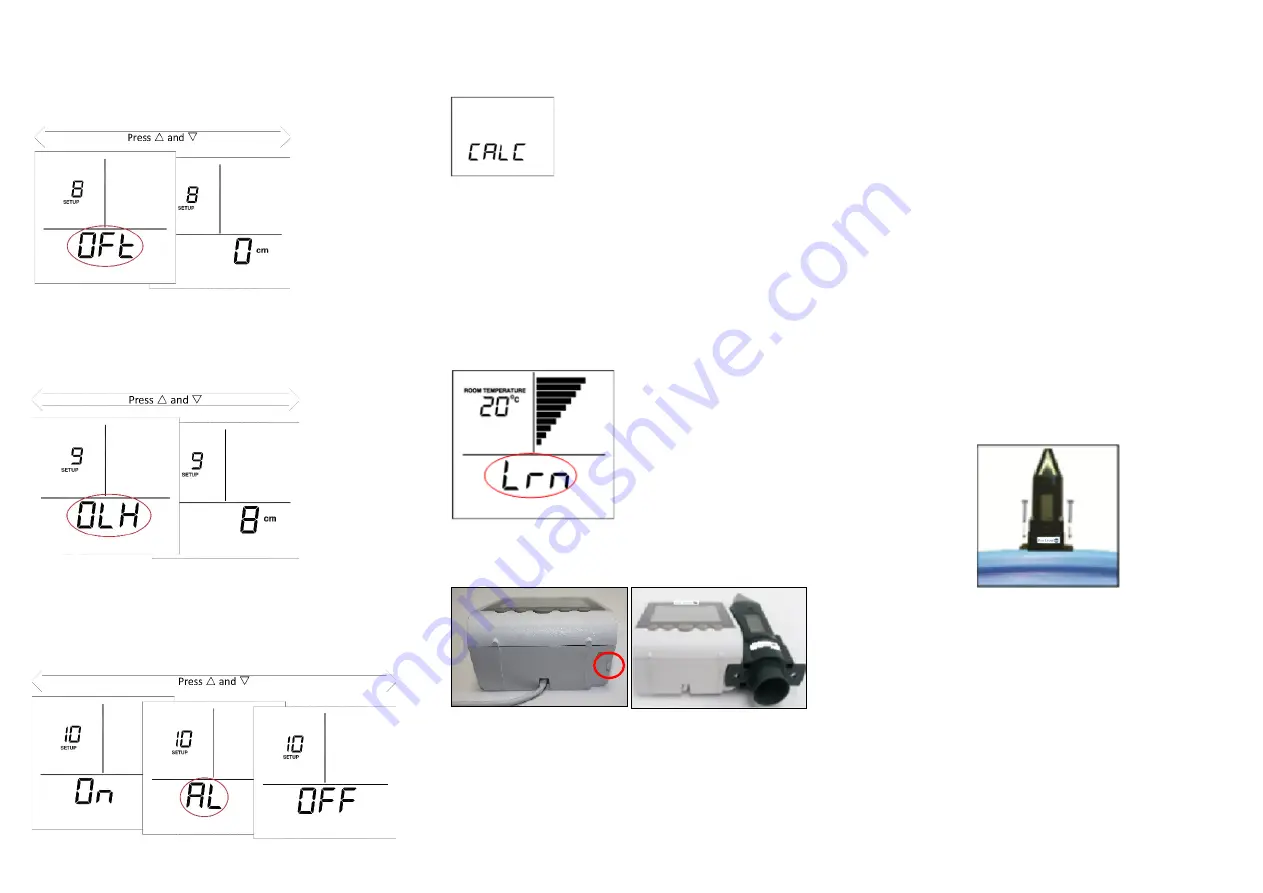
SETUP 8 – Setting the sensor mounting offset (cm/inch)
The “mounting offset” is the distance that the Eco Water Sensor is
mounted above the top surface of the tank being monitored. When the
fixing point is known, measure the distance from the top surface of the
tank to the sensor inside the cone of the Eco Water sensor. Adjust the
sensor offset height in cm/inch using
/
. Press
ENTER
to save.
SETUP 9 – Setting the tank outlet height (cm/inch)
The outlet is the connection point from which liquid is drawn from your
tank. It may be located at the base of the tank or as a take-off pipe
through one of the sidewalls or fed in from the top of the tank. Water
below the outlet level is not usable. Adjust the tank outlet height in
cm/inch using
/
. Press
ENTER
to save.
SETUP 10 – Setting the Low Water Audible Alarm
Alarm on:
The Tekelek Eco Water Monitor
will sound an audible beep
when the water level is greater than 90% of tank capacity.
Alarm off:
Disengages the alarm (default state).
Select
AL ON/OFF
using
/
. When the display shows your preferred
setting, press
ENTER
to save.
(For further information please refer to Section 6 of the Product manual)
SETUP should now be complete. Press
SETUP
to exit.
On exiting SETUP
mode,
the Tekelek Eco Water Monitor
temporarily
displays ‘CALC’.
N.B. If at any stage you exit SETUP mode for any reason, simply hold
SETUP for 3 seconds to begin again.
STEP 2: MATCHING ECO WATER MONITOR AND SENSOR
The Tekelek Eco Water Monitor
must be in
LEARN
mode which can be
entered in one of two ways:
A) Pressing
SETUP
after completing STEP 1 above
B) Disconnecting and reconnecting the power
When in
LEARN
mode the display shows ‘Lrn’ in the main display area.
LEARN
mode will last for
2 minutes
during which time you must
‘match/pair’ the sensor
to the Tekelek Eco Water Monitor.
To match/pair the units:
Note the location of the alignment pin on the
right-hand side of the base of the Monitor.
Using the screw hole of the
sensor,
slot it onto the pin.
The logo label on the sensor should be facing in the same direction as the
Monitor’s display. When located properly, the bars in the bar graph
display of the Tekelek Eco Water Monitor (and on the display of the
sensor if a visual sensor is being used)
will flash and begin to increase in
synch together rising from one bar to ten bars. A continuous audible beep
and flashing LED on the monitor will also indicate the matching is in
progress. Continue to hold the units in place until
all 10 bars are flashing.
The Tekelek Eco Water Monitor
will
make a
loud beep
and the
Red LED
on
the sensor will
flash. They are now matched and should be separated
immediately.
Following the ‘matching/pairing’ the sensor will send data continuously to
the Tekelek Eco Water Monitor for approximately 10 minutes. Each time
the Monitor receives a reading, it will make a clicking noise and the LED on
the Monitor will blink (this is ‘fast’ mode for the sensor).
During this time, confirm that the matching procedure was successful by
slowly raising and lowering the sensor over a flat surface and observing
that the display in the
Tekelek Eco Water Monitor
changes. ‘Fast’ mode
will stop after 10 minutes. The sensor is now ready to fit onto the tank and
should be fitted whilst in ‘Fast’ mode.
You should now proceed immediately to fit the sensor to your tank. If it
is not fitted within 10 minutes, the Tekelek Eco Water Monitor may
display an error or an incorrect reading. It may then take up to 2 hours
before the correct tank level information is displayed on the Tekelek Eco
Water Monitor screen.
STEP 3 - INSTALLING THE TEKELEK SENSOR ON THE TANK
The procedure is the same for fitting to both old and new tanks. For
bunded tanks ensure that the sensor is located on top of the inner tank.
For Tanks with pre-drilled 30/32mm (1.22 inch) hole
•
Remove cap from hole and insert sensor, ensuring the weather seal
is securely in place.
•
Ensure the sensor is vertical on top of the tank.
•
Tighten on to the tank using the 2-stainless steel 19mm (0.75 inch)
long self-tapping screws supplied.
Do not use longer screws. Do not
over-tighten.


