background image


4

 / 

24


VII. Video/Image Files Upload 

7.1 Power off the camera. 


7.2 Remove the memory card from the camera. 


7.3 Insert the memory card into a proper PC by using a card reader. 


7.4 Removable disk drive folder appears. 


7.5 All the video and photo files can be accessed in the DCIM folder. 


VIII. Reset


When the camera is powered on, using a pin to push the reset button once to restart the camera. 

This will not reset the time or delete any files. Please reset the camera only if it is not responding. 


IX. Charging 

Connect the camera to an external power supply by using a DC5V 1A USB charger adapter and the USB cable 

provided to charge the camera battery, the red indicator light will keep flashing  slowly  during the charging 

process. It would take about 1.5 hours to obtain a full charge. The red indicator light will be solid on when the 

camera is fully charged. 


Summary of Contents for GL7100

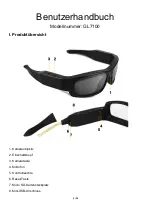
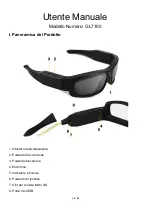
Page 1: ...1 24 User Manual Model Number GL7100 I Product Overview 1 Camera Lens 2 Power Button 3 Camera Button 4 Microphone 5 Indicator Light 6 Reset Button 7 Micro SD Card Slot 8 Mini USB Port ...

Page 2: ... 1 Power on the camera by pressing and holding down the power button for 3 seconds the red indicator light will be turned on and flash 5 times slowly then keep flashing quickly the camera will start video recording automatically The indicator light will keeps flashing during the recording process 4 2 Press the power button once to stop video recording the red indicator light will be solid on for a...

Page 3: ... then keep flashing again 5 4 Power off the camera by pressing and holding down the power button for 5 seconds the red indicator light will be turned off VI Set Date and Time Stamp 6 1 Power off the camera 6 2 Remove the memory card from the camera 6 3 Insert the memory card into a proper PC by using a card reader 6 4 Removable disk drive folder appears 6 5 Click on the drive in the root directory...

Page 4: ...ing a pin to push the reset button once to restart the camera This will not reset the time or delete any files Please reset the camera only if it is not responding IX Charging Connect the camera to an external power supply by using a DC5V 1A USB charger adapter and the USB cable provided to charge the camera battery the red indicator light will keep flashing slowly during the charging process It w...

Page 5: ...5 24 Benutzerhandbuch Modellnummer GL7100 I Produktübersicht 1 Kameraobjektiv 2 Einschaltknopf 3 Kamerataste 4 Mikrofon 5 Kontrollleuchte 6 Reset Taste 7 Micro SD Kartensteckplatz 8 Mini USB Anschluss ...

Page 6: ...eicherkarte der Klasse 10 IV Videoaufnahme 4 1 Schalten Sie die Kamera ein indem Sie die Ein Aus Taste 3 Sekunden lang gedrückt halten Die rote Anzeigelampe leuchtet auf und blinkt fünfmal langsam Dann blinkt die Kamera schnell weiter Die Videoaufnahme startet automatisch Die Kontrollleuchte blinkt während des Aufnahmevorgangs weiter 4 2 Drücken Sie die Ein Aus Taste einmal um die Videoaufnahme zu...

Page 7: ...5 4 Schalten Sie die Kamera aus indem Sie die Ein Aus Taste 5 Sekunden lang gedrückt halten Die rote Anzeigelampe erlischt VI Stellen Sie Datum und Uhrzeit ein 6 1 Schalten Sie die Kamera aus 6 2 Entfernen Sie die Speicherkarte aus der Kamera 6 3 Setzen Sie die Speicherkarte mit einem Kartenleser in einen geeigneten PC ein 6 4 Der Ordner für Wechseldatenträger wird angezeigt 6 5 Klicken Sie auf da...

Page 8: ... Sie die Reset Taste mit einem Stift einmal um die Kamera neu zu starten Dadurch wird die Uhrzeit nicht zurückgesetzt und es werden keine Dateien gelöscht Bitte setzen Sie die Kamera nur zurück wenn sie nicht reagiert IX Aufladen Schließen Sie die Kamera mit einem DC5V 1A USB Ladeadapter und dem mitgelieferten USB Kabel zum Laden des Kamera Akkus an eine externe Stromversorgung an Die rote Anzeige...

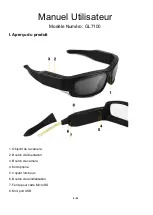
Page 9: ...sateur Modèle Numéro GL7100 I Aperçu du produit 1 Objectif de la caméra 2 Bouton d alimentation 3 Bouton de caméra 4 Microphone 5 Voyant lumineux 6 Bouton de réinitialisation 7 Fente pour carte Micro SD 8 Mini port USB ...

Page 10: ...enant enfoncé le bouton d alimentation pendant 3 secondes le voyant rouge s allume et clignote 5 fois lentement puis continue de clignoter rapidement et l appareil commence automatiquement l enregistrement vidéo Le voyant continuera à clignoter pendant le processus d enregistrement 4 2 Appuyez une fois sur le bouton d alimentation pour arrêter l enregistrement vidéo Le voyant rouge reste allumé pe...

Page 11: ...to puis continue de clignoter 5 4 Eteignez caméra en maintenant enfoncé le bouton d alimentation pendant 5 secondes le voyant rouge s éteindra VI Définir la date et l heure 6 1 Éteignez la caméra 6 2 Retirez la carte mémoire de caméra 6 3 Insérez la carte mémoire dans un PC approprié à l aide d un lecteur de carte 6 4 Le dossier du lecteur de disque amovible apparaît 6 5 Cliquez sur le lecteur dan...

Page 12: ...st allumée utilisez une épingle pour appuyer une fois sur le bouton de réinitialisation pour redémarrer la caméra Cela ne réinitialisera pas l heure et ne supprimera aucun fichier Veuillez réinitialiser caméra uniquement s il ne répond pas IX Recharger Connectez caméra à une source d alimentation externe en utilisant un adaptateur de chargeur USB DC5V 1A et le câble USB fourni pour charger la batt...

Page 13: ...dello Numero GL7100 I Panoramica del Prodotto 1 Obiettivo della telecamera 2 Pulsante di accensione 3 Pulsante telecamera 4 Microfono 5 Indicatore luminoso 6 Pulsante di ripristino 7 Slot per scheda Micro SD 8 Porta mini USB ...

Page 14: ...dere la telecamera tenendo premuto il pulsante di accensione per 3 secondi la spia rossa si accenderà e lampeggerà 5 volte lentamente quindi continuerà a lampeggiare rapidamente la videocamera inizierà automaticamente la registrazione video La spia continua a lampeggiare durante il processo di registrazione 4 2 Premere una volta il pulsante di accensione per interrompere la registrazione video la ...

Page 15: ...to quindi continua a lampeggiare di nuovo 5 4 Spegnere la telecamera tenendo premuto il pulsante di accensione per 5 secondi la spia rossa si spegne VI Imposta Data e Ora 6 1 Spegnere la telecamera 6 2 Rimuovere la scheda di memoria dalla telecamera 6 3 Inserire la scheda di memoria in un PC appropriato utilizzando un lettore di schede 6 4 Viene visualizzata la cartella dell unità disco rimovibile...

Page 16: ...uando la telecamera è accesa utilizzare un perno per premere una volta il pulsante di ripristino per riavviare la telecamera Ciò non reimposterà l ora né eliminerà alcun file Si prega di ripristinare la telecamera solo se non risponde IX Ricaricare Collegare la telecamera a un alimentatore esterno utilizzando un adattatore per caricabatterie USB DC5V 1A e il cavo USB in dotazione per caricare la b...

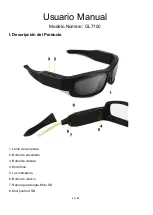
Page 17: ...o Manual Modelo Número GL7100 I Descripción del Producto 1 Lente de la cámara 2 Botón de encendido 3 Botón de cámara 4 Micrófono 5 Luz indicadora 6 Botón de reinicio 7 Ranura para tarjeta Micro SD 8 Mini puerto USB ...

Page 18: ...resionado el botón de encendido durante 3 segundos la luz indicadora roja se encenderá y parpadeará 5 veces lentamente luego siga parpadeando rápidamente la cámara comenzará la grabación de video automáticamente La luz indicadora seguirá parpadeando durante el proceso de grabación 4 2 Presione el botón de encendido una vez para detener la grabación de video la luz indicadora roja permanecerá encen...

Page 19: ...na foto y luego volverá a parpadear 5 4 Apague la cámara presionando y manteniendo presionado el botón de encendido durante 5 segundos la luz indicadora roja se apagará VI Establecer Fecha y Hora 6 1 Apague la cámara 6 2 Retire la tarjeta de memoria de la cámara 6 3 Inserte la tarjeta de memoria en una PC adecuada utilizando un lector de tarjetas 6 4 Aparece la carpeta de la unidad de disco extraí...

Page 20: ...o la cámara está encendida use un alfiler para presionar el botón de reinicio una vez para reiniciar la cámara Esto no restablecerá la hora ni eliminará ningún archivo Restablezca la cámara solo si no responde IX Recargar Conecte la cámara a una fuente de alimentación externa utilizando un adaptador de cargador USB DC5V 1A y el cable USB provisto para cargar la batería de la cámara la luz indicado...

Page 21: ...21 24 取扱説明書 モデル番号 GL7100 I 製品の概要 1 カメラレンズ 2 電源スイッチ 3 カメラボタン 4 マイク 5 インジケータライト 6 リセットボタン 7 マイクロ SD カードスロット 8 ミニ USB ポート ...

Page 22: ... を超えることはで きません マイクロ SDHC クラス 10 メモリカードを使用することをお勧めします IV ビデオ録画 4 1 電源ボタンを 3 秒間押し続けてカメラの電源を入れると 赤色のインジケータライトが 5 回 ゆっくり点滅します その後 すばやく点滅を続けると カメラは自動的にビデオ録画を開始し ます 録画中はインジケータライトが点滅し続けます 4 2 ビデオ録画を停止するには 電源ボタンを 1 回押します 赤いインジケータランプが約 3 秒 間点灯した後 点滅し続けます これは カメラがすでにスタンバイモードに戻っていることを 示します 4 3 電源ボタンを 5 秒間押し続けてカメラの電源を切ると 赤いインジケータライトが消えます V カメラ 静止画 5 1 電源ボタンを 3 秒間押し続けてカメラの電源を入れると 赤色のインジケータライトが 5 回 ゆっくり点滅します その...

Page 23: ...源を切ると 赤いインジケータライトが消えます VI 日付とタイムスタンプを設定する 6 1 カメラの電源を切ります 6 2 カメラからメモリーカードを取り出します 6 3 カードリーダーを使用して メモリカードを適切なPCに挿入します 6 4 リムーバブルディスクドライブのフォルダが表示されます 6 5 ルートディレクトリ内およびルートディレクトリ内のドライブをクリックして time txt と いう名前のTXTドキュメントファイルを作成します 6 6 現在の日時を正しい形式でtxtファイルに入力します 年 月 日 時 分 秒 例 2018 12 19 13 40 49 6 7 ファイルを保存し カメラにメモリカードを挿入します 6 8 カメラの電源を入れると システムが自動的にプログラムをアップグレードします VII ビデオ 画像ファイルのアップロード 7 1 カメラの電源を切ります ...

Page 24: ...イルと写真ファイルはDCIMフォルダにアクセスできます VIII リセット カメラの電源が入っているときに ピンを使ってリセットボタンを1回押すと カメラが再起動し ます これによって時間がリセットされたり ファイルが削除されたりすることはありません 応答しない場合にのみカメラをリセットしてください IX 充電 DC5V 1A USB 充電アダプタとカメラのバッテリーを充電するために提供された USB ケーブルを 使用して カメラを外部電源に接続します 充電中は赤いインジケータライトがゆっくり点滅し ます フル充電するには約 1 5 時間かかります カメラが完全に充電されると 赤色のインジ ケータライトが点灯します ...

Reviews: