background image


å

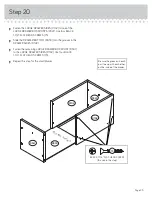
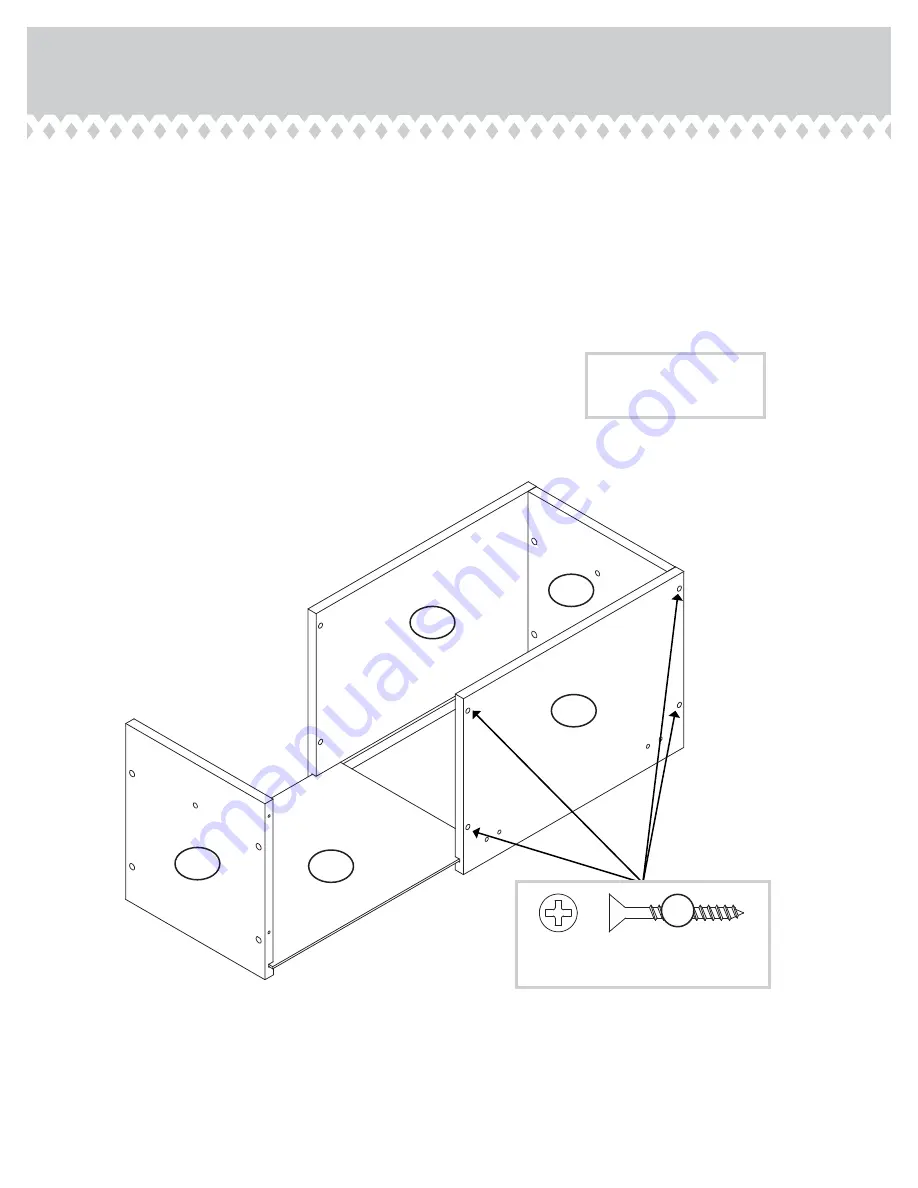
Fasten the LARGE DRAWER SIDES (D102) to one of the
LARGE DRAWER BOX FRONTS (D341). Use four BLACK 
1-1/4" FLAT HEAD SCREWS (7S).


å

Slide the DRAWER BOTTOM (D930) into the grooves in the
DRAWER SIDES (D102).


å

Fasten the remaining LARGE DRAWER BOX FRONT (D341)
to the LARGE DRAWER SIDES (D102). Use four BLACK 
1-1/4" FLAT HEAD SCREWS (7S).


å

Repeat this step for the small drawer.

Step 20

Page 25

Finished sur

face

D102

D930

D102

Be sure the grooves in each 
part line up with each other 
on the inside of the drawer.

BLACK 1-1/4" FLAT HEAD SCREW

(16 used in this step)

7S

D341

D341

Summary of Contents for 5418793

Page 1: ...THIS INSTRUCTION BOOKLET CONTAINS IMPORTANT SAFETY INFORMATION PLEASE READ AND KEEP FOR FUTURE REFERENCE ChalkedWood Computer Desk Model 5418793 www teknikoffice co uk For all your newfangled gadgetry Teknik ...

Page 2: ... to help distinguish similar parts from each other Use this part identification to help identify similar parts A RIGHT END 1 B LEFT END 1 C RIGHT UPRIGHT 1 D LEFT UPRIGHT 1 D102 LARGE DRAWER SIDE 2 D214 SMALL DRAWER SIDE 2 D340 SMALL DRAWER BOX FRONT 2 D341 LARGE DRAWER BOX FRONT 2 D930 DRAWER BOTTOM 2 E TOP 1 F RIGHT BOTTOM 2 G LEFT BOTTOM 1 H MODESTY PANEL 1 I BACK 2 J KEYBOARD BRACE 2 K DOOR 1 L...

Page 3: ...Part Identification Now you know our ABCs Page 3 A B C D E F G H I J K L M2 N O P D341 T D340 W X D102 D214 D102 D930 D930 D214 D340 D341 J M2 X M2 X M2 X F I W ...

Page 4: ...LIDE 1 DD BLACK RIGHT DRAWER SLIDE 1 CC BLACK LEFT CABINET RAIL 1 BB BLACK RIGHT CABINET RAIL 1 AA FILE GLIDE 2 3B 12F TWIST LOCK FASTENER 2 METAL BRACKET 1 4G ANGLE BRACKET 4 44G RUBBER SLEEVE 4 2R METAL PIN 8 1R CORD CLIP 1 4P BACKPLATE 1 125K KEYBOARD HINGE 2 12H CAM COVER 10 33P NAIL 30 1N CAM DOWEL 20 2F HIDDEN CAM 32 1F CAM SCREW 12 8F LARGE RUBBER SLEEVE 1 58G 124K KNOB 4 14H HINGE 2 FILE R...

Page 5: ...1 4 FLAT HEAD SCREW 16 7S BLACK 9 16 LARGE HEAD SCREW 9 1S BLACK 1 2 FLAT HEAD SCREW 4 11S GOLD 5 16 FLAT HEAD SCREW 20 3S BLACK 1 1 8 MACHINE SCREW 3 21S BROWN 1 FLAT HEAD SCREW 4 18S BLACK 7 8 LARGE HEAD SCREW 8 17S BLACK 7 8 MACHINE SCREW 1 37S SILVER 5 8 FLAT HEAD SCREW 4 23S SILVER 9 16 LARGE HEAD SCREW 2 54S 30S BLACK 1 9 16 FLAT HEAD SCREW 4 ...

Page 6: ...d floor or on the empty carton to avoid scratching your unit or the floor å To begin assembly push two SAUDER TWIST LOCK FASTENERS 12F into the large holes in the MODESTY PANEL H Page 6 Do not tighten the TWIST LOCK FASTENERS in this step H 12F ...

Page 7: ...edges of the ENDS and UPRIGHTS Step 2 Page 7 Arrow Arrow 32 used 20 used Arrow Insert the metal end of the CAM DOWEL into the HIDDEN CAM Arrow Do not tighten the HIDDEN CAMS in this step Do not insert CAM DOWELS into these edges Do not insert CAM DOWELS into these edges 1F 2F 1F 1F A B C D F G J J F Arrow The arrow in the HIDDEN CAM must point toward the hole in the edge of the board Hole ...

Page 8: ...ght GOLD 5 16 FLAT HEAD SCREWS 3S through holes 1 and 3 Page 8 A C 1 2 3 4 1 2 3 4 Roller end Roller end 1 2 3 4 1 2 3 4 Edge with CAM DOWELS S u r f a c e w i t h H I D D E N C A M S S u r f a c e w i t h H I D D E N C A M S Remember Righty tighty Lefty loosey GOLD 5 16 FLAT HEAD SCREW 8 used in this step 3S ...

Page 9: ... NOTE The CABINET RAILS are marked CABINET RIGHT and CABINET LEFT for easy identification Step 4 Page 9 J J BB AA Roller end Roller end S u r f a c e w i t h H I D D E N C A M S S u r f a c e w i t h H I D D E N C A M S Edge with CAM DOWELS Edge with CAM DOWELS GOLD 5 16 FLAT HEAD SCREW 4 used in this step 3S ...

Page 10: ...Step 5 å Turn twelve CAM SCREWS 8F into the LEGS M2 Page 10 Remember Righty tighty Lefty loosey 12 used 8F M2 M2 M2 M2 ...

Page 11: ... r f a c e w i t h H I D D E N C A M S S u r f a c e w i t h H I D D E N C A M S S u r f a c e w i t h H I D D E N C A M S S u r f a c e w i t h H I D D E N C A M S A B C D These surfaces should be even 1 2 M2 M2 M2 M2 These surfaces should be even These surfaces should be even These surfaces should be even ...

Page 12: ...Step 7 Page 12 M2 M2 M2 M2 X X X X å Fasten a FOOT X to each LEG M2 Use four BLACK BLACK 1 9 16 FLAT HEAD SCREWS 30S BLACK 1 9 16 FLAT HEAD SCREW 4 used in this step 30S ...

Page 13: ...he adjoining part NOTE The dowel end of the FASTENER must remain fully inserted in the hole of the adjoining part while locking the FASTENER 2 Tighten the FASTENER with a Phillips screwdriver as tight as possible Dowel end H Surface with TWIST LOCK FASTENERS Rounded edge Do not stand the unit upright without the BACK fastened The unit may collapse Caution E S u r f a c e w i t h h o l e s ...

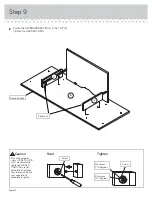
Page 14: ...age 14 Start Tighten Arrow Minimum 190 degrees Caution Risk of damage or injury HIDDEN CAMS must be completely tightened HIDDEN CAMS that are not completely tightened may loosen and parts may separate To completely tighten Arrow Maximum 210 degrees E J J Rounded edge Roller end ...

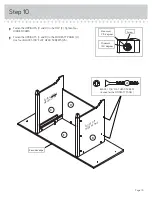
Page 15: ...he UPRIGHTS C and D to the MODESTY PANEL H Use four BLACK 1 7 8 FLAT HEAD SCREWS 2S Step 10 Page 15 E D H C Rounded edge Surface without HIDDEN CAMS Surface with HIDDEN CAMS Arrow Minimum 190 degrees Maximum 210 degrees BLACK 1 7 8 FLAT HEAD SCREW 4 used for the MODESTY PANEL 2S ...

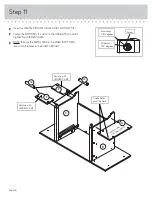
Page 16: ...nd D Tighten four HIDDEN CAMS å NOTE Be sure the METAL PINS in the RIGHT BOTTOMS insert into the holes in the RIGHT UPRIGHT Page 16 Arrow Minimum 190 degrees Maximum 210 degrees D C G F F 1R 1R These holes must be here S u r f a c e w i t h H I D D E N C A M S Surface with HIDDEN CAMS Surface with HIDDEN CAMS ...

Page 17: ... B to the BOTTOMS F and G and TOP E Tighten eight HIDDEN CAMS å NOTE Be sure the METAL PINS in the RIGHT BOTTOMS insert into the holes in the RIGHT END Step 12 Page 17 Arrow Minimum 190 degrees Maximum 210 degrees G F F B A E ...

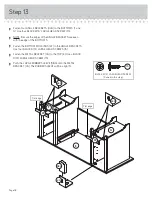
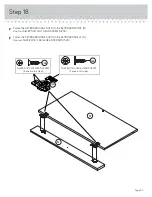
Page 18: ...BOTTOMS å Fasten the BOTTOM MOLDINGS W to the ANGLE BRACKETS Use four BLACK 9 16 LARGE HEAD SCREWS 1S å Fasten the METAL BRACKET 4G to the TOP E Use a BLACK 9 16 LARGE HEAD SCREW 1S å Push the LARGE RUBBER SLEEVE 58G onto the METAL BRACKET 4G The RUBBER SLEEVE will be a tight fit Page 18 F 44G 44G 4G 58G G W W E Flat edge Flat edge BLACK 9 16 LARGE HEAD SCREW 9 used in this step 1S ...

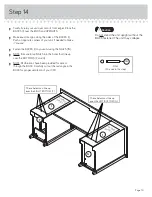
Page 19: ...S into the holes that line up over the BOTTOMS F and G å NOTE Perforations have been provided for access through the BACK Carefully cut out the rectangle in the BACK for proper ventilation of your CPU Step 14 Page 19 F i n i s h e d s u r f a c e F i n i s h e d s u r f a c e NAIL 30 used in this step 1N G F I I These holes must line up over the RIGHT BOTTOM F These holes must line up over the LEF...

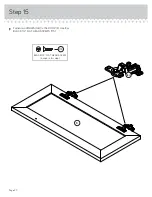
Page 20: ...Step 15 å Fasten two HINGES 14H to the DOOR K Use four BLACK 1 2 FLAT HEAD SCREWS 11S Page 20 BLACK 1 2 FLAT HEAD SCREW 4 used in this step 11S 14H K ...

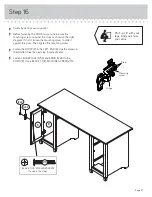
Page 21: ...e it against the stops Then tighten the mounting screw å Fasten the DOOR K to the LEFT END B Use the screws in the HINGES See the next step for adjustments å Fasten a BACKPLATE 125K and KNOB 124K to the DOOR K Use a BLACK 1 1 8 MACHINE SCREW 21S Step 16 Page 21 BLACK 1 1 8 MACHINE SCREW 1 used in this step 21S 124K B K 125K Pro Tip Lift with your legs And you know your arms Mounting screw Stop Hin...

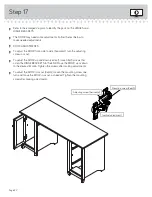
Page 22: ... adjusting screw in or out å To adjust the DOOR up and down vertical loosen both screws that asten the HINGE BRACKETS to the END Move the DOOR up or down to the desired location Tighten the screws after making adjustments å To adjust the DOOR in or out depth loosen the mounting screw one turn and move the DOOR in or out as needed Tighten the mounting screw after making adjustments Page 22 Adjustin...

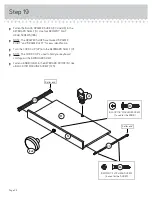
Page 23: ...four SILVER 5 8 FLAT HEAD SCREWS 23S å Fasten the KEYBOARD HINGES 12H to the KEYBOARD SHELF O Use two SILVER 9 16 LARGE HEAD SCREWS 54S Step 18 Page 23 SILVER 5 8 FLAT HEAD SCREW 4 used in this step 23S SILVER 9 16 LARGE HEAD SCREW 2 used in this step 54S 12H O N ...

Page 24: ...for easy identification å Turn the CORD CLIP 4P into the KEYBOARD SHELF O å NOTE The CORD CLIP is used to hold your keyboard cord against the KEYBOARD SHELF å Fasten a KNOB 124K to the KEYBOARD FRONT N Use a BLACK 7 8 MACHINE SCREW 37S Page 24 BROWN 1 FLAT HEAD SCREW 4 used for the SLIDES 18S BLACK 7 8 MACHINE SCREW 1 used for the KNOB 37S Roller end Roller end 4P O DD CC N 124K ...

Page 25: ...R SIDES D102 å Fasten the remaining LARGE DRAWER BOX FRONT D341 to the LARGE DRAWER SIDES D102 Use four BLACK 1 1 4 FLAT HEAD SCREWS 7S å Repeat this step for the small drawer Step 20 Page 25 F i n i s h e d s u r f a c e D102 D930 D102 Be sure the grooves in each part line up with each other on the inside of the drawer BLACK 1 1 4 FLAT HEAD SCREW 16 used in this step 7S D341 D341 ...

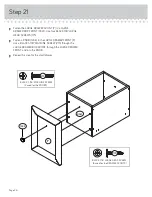
Page 26: ...KNOB 124K to the LARGE DRAWER FRONT P Use a BLACK 1 1 8 MACHINE SCREW 21S through the LARGE DRAWER BOX FRONT through the LARGE DRAWER FRONT and into the KNOB å Repeat this step for the small drawer Page 26 P BLACK 1 1 8 MACHINE SCREW 2 used for the KNOBS 21S BLACK 7 8 LARGE HEAD SCREW 8 used for the DRAWER FRONTS 17S D341 124K ...

Page 27: ...e LARGE DRAWER SIDES D102 Use four GOLD 5 16 FLAT HEAD SCREWS 3S through holes 2 and 4 å Repeat this step for the small drawer Step 22 Page 27 1 2 3 4 Roller end Roller end 1 2 3 4 D102 D102 GOLD 5 16 FLAT HEAD SCREW 8 used in this step 3S 4 screws per drawer ...

Page 28: ...he FILE GLIDE 3B on the RIGHT DRAWER SIDE å Slide another FILE GLIDE 3B onto the other end of the FILE RODS 7B then press this FILE GLIDE over the LEFT DRAWER SIDE D102 Page 28 Insert the FILE RODS into the holes of your choice in the FILE GLIDES depending on your file sizes 3B D102 D102 3B 7B 7B ...

Page 29: ...nd the rollers on the unit Lift the front of the drawers up and slide them into the unit Repeat this step to insert the KEYBOARD SHELF O å NOTE Please read the back pages of the instruction booklet for important safety information å This completes assembly Clean with your favorite furniture polish or a damp cloth Wipe dry Step 24 Page 29 To adjust the drawers loosen the first screw in the SLIDE mov...

Page 30: ...y moving furniture that is not designed and equipped with casters Furniture can tip over or break if improperly moved Physical injury Furniture can be very heavy Breakage of tops particularly with double pedestal furniture drawers at both ends Unload shelves and drawers from top to bottom before moving the unit Do not push furniture especially on a carpeted floor Have a friend help you lift the ite...

Reviews: