background image

WARNING

Please use your furniture correctly and safely. Improper use can cause safety hazards, 

or damage to your furniture or household items

Carefully read the following safety information.

Death or serious injury may occur when children climb on audio and/or video equipment furniture. A remote control or toys 

placed on the furnishing may encourage a child to climb on the furnishing and as a result may tip over onto the child.

NEVER

 allow children to climb or play with the TV or furnishing supporting the TV.

NEVER

 place toys, food, remote, etc. on top of the TV or TV furnishing.

ALWAYS

 use either the safety hardware as instructed or other wall anchoring device.

Relocating audio and/or video equipment to furniture not specifi cally designed to support audio and/or video equipment 

may result in death or serious injury due to furniture collapse or over turning onto a child.

NEVER

 place a TV on furniture that is not intended to support a TV.

NEVER

 exceed the maximum size and weight of the TV shown in the instructions.

Be sure to apply the TV warning label as shown in the instructions.

Overloading drawers and shelves may result in furniture that can break or sag, or tip-over which may result in injury. 

NEVER

 exceed the weight limits shown in the instructions. 

Place the heavier items on lower shelves as far back from the front as possible.

Load the bottom surfaces fi rst to avoid top-heavy furniture.

Moving furniture that is not designed to be moved or equipped with casters may result in injury or damage to furnishings or 

personal property.

ALWAYS

 unload shelves and drawers, starting with the top surfaces, before moving.

NEVER

 push or pull furniture on carpet. Have a friend help lift properly to move and/or reposition it.

Summary of Contents for 5420649

Page 1: ...www teknikoffice co uk It stands You sit A thing of beauty this one Industrial Styled Sideboard Boulevard Cafe Collection Model 5420649 Teknik ...

Page 2: ...y This Sauder unit is designed for use with televisions weighing less than 70 pounds Never use with a TV that weighs more The size of the television front to back and side to side must fit within the space defined in the diagram Never place the front edge of the TV past the front edge of the TV support shelf or stop molding if equipped Never allow the sides of the TV to extend past the side edges of...

Page 3: ...this part identification to help identify similar parts Now you know our ABCs A RIGHT END 1 B LEFT END 1 C UPRIGHT 1 D TOP 1 E REAR TOP TUBE 1 F FRONT TOP TUBE 1 G BACK 1 H ADJUSTABLE SHELF 2 I UPRIGHT TUBE 1 J REAR BOTTOM TUBE 1 K BOTTOM 1 L FRONT BOTTOM TUBE 1 M FOOT 2 N FOOT BRACE 8 O LEFT DOOR 2 P RIGHT DOOR 2 A B C D E F G H H J I K L N N N N N N N N M M O O P P Page 3 ...

Page 4: ...BLACK 1 3 8 HEX HEAD SCREW 8 13 BLACK 5 8 PAN HEAD SCREW 8 14 BLACK 1 2 HEX HEAD SCREW 20 15 BLACK 1 2 PAN HEAD SCREW 28 17 BLACK 1 2 MACHINE SCREW 16 16 MAGNETIC CATCH 4 10 METAL PIN 8 7 RUBBER SLEEVE 8 8 L WRENCH 1 9 APPLIQUE CARD 1 5 BLACK 2 1 4 PAN HEAD SCREW 6 12 Refer to the last step for proper location and application WARNING LABEL 1 11 5 22 68 22 68 70 lbs 31 75 kg 31 75 kg Page 4 ...

Page 5: ... F to the TOP D Use twelve BLACK 1 2 PAN HEAD SCREWS 17 BLACK 1 2 FLAT HEAD SCREW 12 used in this step 17 D E F These holes must be here The TUBE should cover the long edge of the TOP The TUBE should cover the long edge of the TOP These edges must be even This block must be here This block must be here The tabs should face each other Page 5 ...

Page 6: ...o the TOP D Use four BLACK 5 8 PAN HEAD SCREWS 14 å Turn two LARGE CAM SCREWS 2 into the TOP D å Turn four SMALL CAM SCREWS 3 into the REAR TOP TUBE E Step 2 10 BLACK 5 8 PAN HEAD SCREW 4 used for the MAGNETIC CATHCHES 14 D E 3 2 Page 6 ...

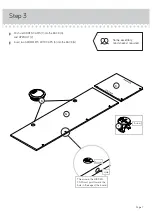
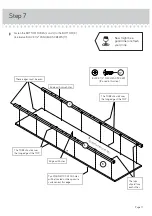
Page 7: ...o the BACK G and UPRIGHT C å Insert two GROMMETS WITH CAPS 6 into the BACK G Step 3 The arrow in the HIDDEN CAM must point toward the hole in the edge of the board Hole Arrow Arrow 1 G 6 C Page 7 Some assembly and snacks required ...

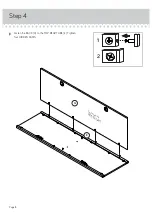
Page 8: ...å Fasten the BACK G to the TOP REAR TUBE E Tighten four HIDDEN CAMS Step 4 G E Surface with HIDDEN CAMS 1 2 Page 8 ...

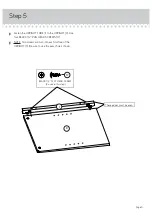
Page 9: ...PRIGHT C Use four BLACK 1 2 PAN HEAD SCREWS 17 å NOTE Two screws will turn into each surface of the UPRIGHT C Be sure to use the exact holes shown Step 5 BLACK 1 2 FLAT HEAD SCREW 4 used in this step 17 C I These edges must be even Page 9 ...

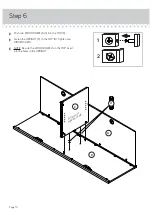
Page 10: ...D DOWELS 4 into the TOP D å Fasten the UPRIGHT C to the TOP D Tighten two HIDDEN CAMS å NOTE Be sure the WOOD DOWELS in the TOP insert into the holes in the UPRIGHT Step 6 1 2 4 Surface with HIDDEN CAMS D G C Page 10 ...

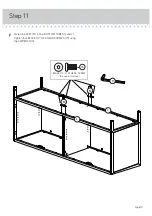
Page 11: ... 17 The TUBE should cover the long edge of the TOP The TUBE should cover the long edge of the TOP These edges must be even Edge with more holes Edge with holes Surface with more holes The tabs should face each other Page 11 Now might be a good time to refresh your drink Two MAGNETIC CATCH holes will be located on the opposite surface near this edge ...

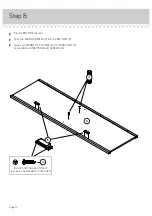
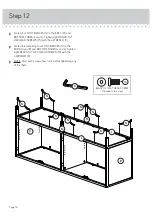
Page 12: ...K over å Push two WOOD DOWELS 4 into the BOTTOM K å Fasten two MAGNETIC CATCHES 10 to the BOTTOM K Use four BLACK 5 8 PAN HEAD SCREWS 14 Step 8 10 BLACK 5 8 PAN HEAD SCREW 4 used for the MAGNETIC CATHCHES 14 4 K Page 12 ...

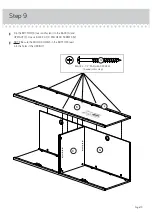
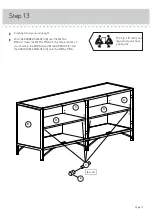
Page 13: ...the BACK G and UPRIGHT C Use six BLACK 2 1 4 PAN HEAD SCREWS 12 å NOTE Be sure the WOOD DOWELS in the BOTTOM insert into the holes in the UPRIGHT Step 9 BLACK 2 1 4 PAN HEAD SCREW 6 used in this step 12 K G C Surfacewithout WOODDOWELS Page 13 J ...

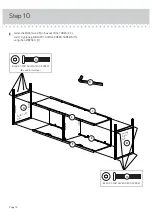
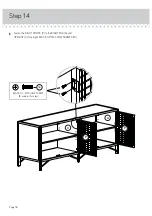
Page 14: ...the TUBES E F J and L Tighten eight BLACK 1 3 8 HEX HEAD SCREWS 13 using the L WRENCH 9 Step 10 9 BLACK 1 3 8 ALLEN HEAD SCREW 13 BLACK 1 3 8 ALLEN HEAD SCREW 8 used in this step 13 A B J L E F Surface with holes Surface without holes Page 14 ...

Page 15: ...å Fasten the FEET M to the BOTTOM TUBES J and L Tighten four BLACK 1 2 HEX HEAD SCREWS 15 using the L WRENCH 9 Step 11 9 J L M M BLACK 1 2 FLAT HEAD SCREW 4 used in this step 15 Page 15 ...

Page 16: ...RENCH 9 å Fasten the remaining four FOOT BRACES N to the ENDS A and B and BOTTOM TUBES J and L Tighten eight BLACK 1 2 HEX HEAD SCREWS 15 with the L WRENCH 9 å NOTE Start each screw a few turns before tightening any of the them Step 12 A B J L N N N N N N N N BLACK 1 2 FLAT HEAD SCREW 16 used in this step 15 M M 9 Page 16 ...

Page 17: ...VES 8 over the METAL PINS 7 Insert the METAL PINS into the hole locations of your choice in the ENDS A and B and UPRIGHT C Set the ADJUSTABLE SHELVES H onto the METAL PINS Step 13 A B 7 8 C H H Page 17 Pro Tip Lift with your legs And you know your arms 8 used ...

Page 18: ...å Fasten the RIGHT DOORS P to the RIGHT END A and UPRIGHT C Use eight BLACK 1 2 MACHINE SCREWS 16 Step 14 BLACK 1 2 MACHINE SCREW 8 used in this step 16 A C P P Page 18 ...

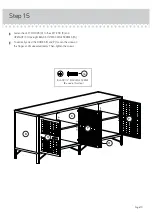
Page 19: ... and UPRIGHT C Use eight BLACK 1 2 MACHINE SCREWS 16 å To vertically adjust the DOORS O and P loosen the screws in the hinges and make adjustments Then tighten the screws Step 15 BLACK 1 2 MACHINE SCREW 8 used in this step 16 O P P O Page 19 B C ...

Page 20: ... the label as shown in the diagram å NOTE This is a permanent label intended to last for the life of the product Once applied do not try to remove it å NOTE Please read the back pages of the instruction booklet for important safety information å This completes assembly Clean with your favorite furniture polish or a damp cloth Wipe dry 5 22 68 22 68 70 lbs 31 75 kg 31 75 kg 5 22 68 22 68 70 lbs 31 ...

Page 21: ... or video equipment may result in death or serious injury due to furniture collapse or over turning onto a child NEVER place a TV on furniture that is not intended to support a TV NEVER exceed the maximum size and weight of the TV shown in the instructions Be sure to apply the TV warning label as shown in the instructions Overloading drawers and shelves may result in furniture that can break or sa...

Reviews: