background image

Step 3

 å

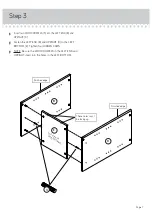
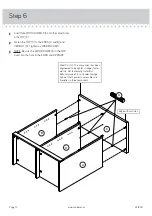
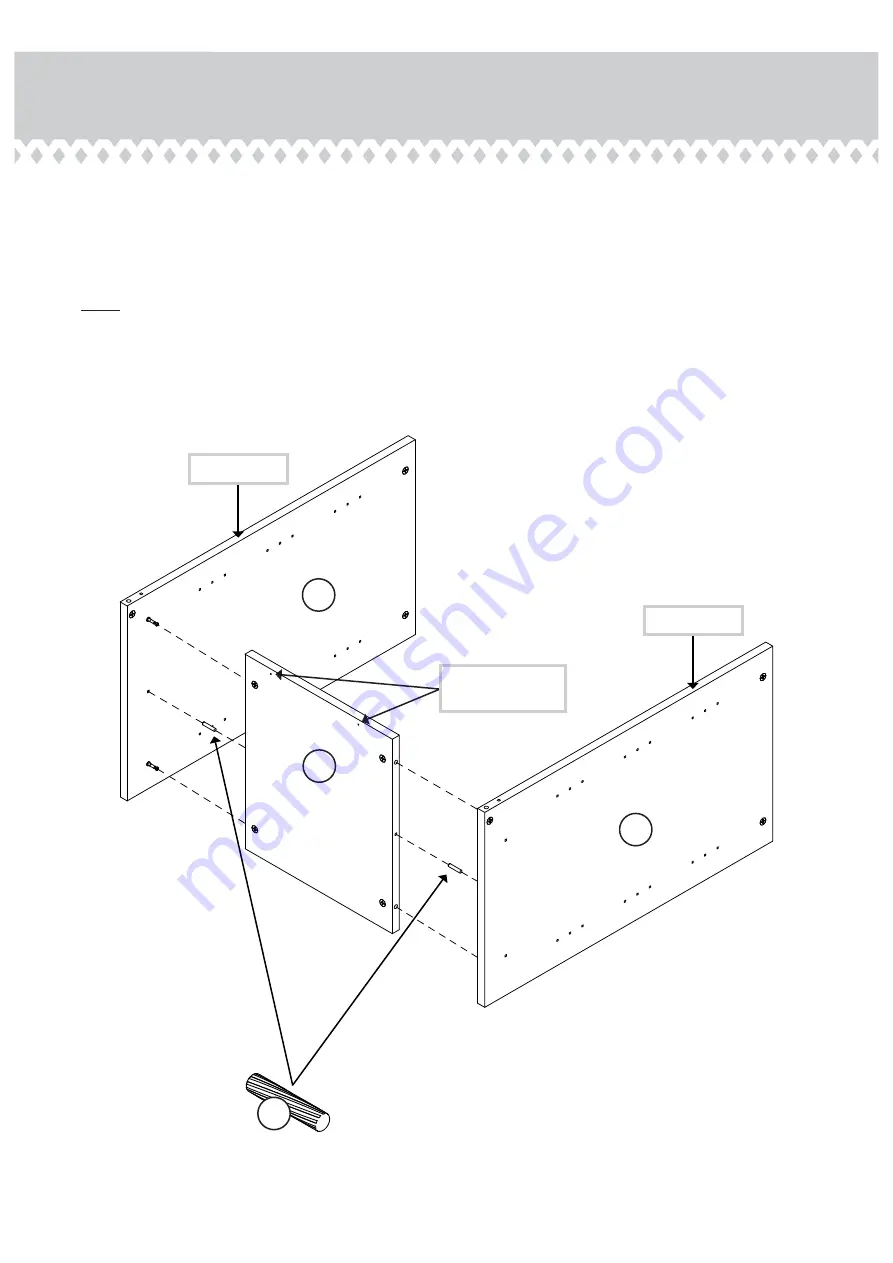
Insert two WOOD DOWELS (3) into the LEFT END (B) and
UPRIGHT (D).

 å

Fasten the LEFT END (B) and UPRIGHT (D) to the LEFT
BOTTOM (E). Tighten four HIDDEN CAMS.

 å

NOTE: Be sure the WOOD DOWELS in the LEFT END and
UPRIGHT insert into the holes in the LEFT BOTTOM. 

Finished edge

Finished edge

Sur

face with

HIDDEN CAMS

3

B

E

D

These holes must 
be facing up.

Page 7

Summary of Contents for 5421405

Page 1: ...at yourshelf Open Storage Cabinet Craft Collection Model 5421405 NOTE THIS INSTRUCTION BOOKLET CONTAINS IMPORTANT SAFETY INFORMATION PLEASE READ AND KEEP FOR FUTURE REFERENCE Teknik www teknikoffice co uk ...

Page 2: ...mbly Tools Required No 2 Phillips Screwdriver Tip Shown Actual Size Skip the power trip This time 3 4 5 12 13 14 15 16 17 18 19 Part Identification Hardware Identification Assembly Steps Français Español Safety Warranty Page 2 ...

Page 3: ...e edge to help distinguish similar parts from each other Use this part identification to help identify similar parts Now you know our ABCs A RIGHT END 1 B LEFT END 1 C TOP 1 D UPRIGHT 1 E LEFT BOTTOM 1 F RIGHT BOTTOM 1 G ADJUSTABLE SHELF 6 H BASE 1 I UPPER BACK 1 J LOWER BACK 1 A B C D E F G H I J G G G G G Page 3 ...

Page 4: ...are shown actual size You may receive extra hardware with your unit HIDDEN CAM 17 1 CAM SCREW 17 2 CAM COVER CARD 1 6 WOOD DOWEL 9 3 SILVER 1 2 FLAT HEAD SCREW 26 7 METAL PIN 24 5 SILVER 1 2 PAN HEAD SCREW 8 8 METAL BRACKET 4 4 Page 4 ...

Page 5: ... or on the empty carton to avoid scratching your unit or the floor å Push seventeen HIDDEN CAMS 1 into the ENDS A and B UPRIGHT D BOTTOMS E and F 1 Arrow 17 used Arrow The arrow in the HIDDEN CAM must point toward the hole in the edge of the board Hole Page 5 ...

Page 6: ...Step 2 å Turn seventeen CAM SCREWS 2 into the ENDS A and B TOP C UPRIGHT D and BASE H B A C D H 2 17 used Page 6 2 ...

Page 7: ...en the LEFT END B and UPRIGHT D to the LEFT BOTTOM E Tighten four HIDDEN CAMS å NOTE Be sure the WOOD DOWELS in the LEFT END and UPRIGHT insert into the holes in the LEFT BOTTOM Finished edge Finished edge Surface with HIDDEN CAMS 3 B E D These holes must be facing up Page 7 ...

Page 8: ... 3 into the RIGHT END A å Fasten the RIGHT END A to the RIGHT BOTTOM F Tighten two HIDDEN CAMS å NOTE Be sure the WOOD DOWEL in the RIGHT END inserts into the hole in the RIGHT BOTTOM å Fasten four METAL BRACKETS 4 to the BOTTOMS E and F Use four SILVER 1 2 PAN HEAD SCREWS 8 D SILVER 1 2 PAN HEAD SCREW 4 used in this step 8 Page 8 E Slotted hole ...

Page 9: ...ENDS A and B and UPRIGHT D Tighten three HIDDEN CAMS å NOTE Be sure the WOOD DOWELS in the ENDS and UPRIGHT insert into the hole in the BASE å Fasten the BASE H to the BOTTOMS E and F Use four SILVER 1 2 PAN HEAD SCREWS 8 3 A D B H SILVER 1 2 PAN HEAD SCREW 4 used in this step 8 F E Flat edge Page 9 ...

Page 10: ...Be sure the WOOD DOWELS in the TOP insert into the hole in the ENDS and UPRIGHT A D B C 3 Meet Part C This component has been engineered to be lighter stronger faster well ok Not technically faster But definitely makes for a sturdier Storage Cabinet that s easier to assemble and friendlier to the environment Page 10 www sauder com 421405 Edge without holes ...

Page 11: ...r unit å NOTE Be sure the holes in the BACKS line up over the UPRIGHT D and BOTTOMS E and F å Fasten the BACKS I and J to the ENDS A and B TOP C UPRIGHT D and BOTTOMS E and F Use twenty six SILVER 1 2 FLAT HEAD SCREWS 7 J I D F E A B C SILVER 1 2 FLAT HEAD SCREW 26 used in this step 7 Page 11 ...

Page 12: ... PINS 5 å Peel a CAM COVER from the CAM COVER CARD 6 and stick one onto each visible HIDDEN CAM å NOTE Please read the back pages of the instruction booklet for important safety information å This completes assembly Clean with your favorite furniture polish or a damp cloth Wipe dry A B D 24 used 5 25 lbs 15 lbs 40 lbs 40 lbs Page 12 G 15 lbs G 15 lbs G 15 lbs G 15 lbs G 15 lbs G ...

Page 13: ...sult in death or serious injury due to furniture collapse or tip over NEVER place a TV on furniture that is not intended to support a TV This product is not designed to support a television unless a TV warning label is included and the instructions specifically state the size and weight of the television Overloading drawers and shelves may result in furniture that can break or sag or tip over which...

Reviews: