background image

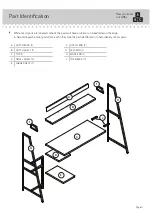
Part Identifi cation


å

While not all parts are labeled, some of the parts will have a label or an inked letter on the edge 
to help distinguish similar parts from each other. Use this part identifi cation to help identify similar parts.

Now you know

our ABCs.

A

HUTCH BACK (1)

B

HUTCH SHELF (1)

C

TOP (1)

D

SMALL SHELF (1)

E

LARGE SHELF (1)

F

HUTCH END (2)

G

LEFT END (1)

H

RIGHT END (1)

J

TOP BRACE (2)

A

B

C

D

E

F

F

G

H

J

Page 3

Summary of Contents for 5424933

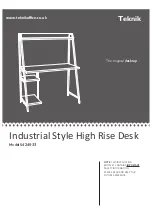
Page 1: ...dustrial Style High Rise Desk Model 5424933 NOTE THIS INSTRUCTION BOOKLET CONTAINS IMPORTANT SAFETY INFORMATION PLEASE READ AND KEEP FOR FUTURE REFERENCE The original desktop Teknik www teknikoffice co uk ...

Page 2: ...mbly Tools Required Part Identification Hardware Identification Assembly Steps Français Español Safety Warranty No 2 Phillips Screwdriver Tip Shown Actual Size 3 4 5 12 13 14 15 16 17 18 19 Skip the power trip This time Page 2 ...

Page 3: ...letter on the edge to help distinguish similar parts from each other Use this part identification to help identify similar parts Now you know our ABCs A HUTCH BACK 1 B HUTCH SHELF 1 C TOP 1 D SMALL SHELF 1 E LARGE SHELF 1 F HUTCH END 2 G LEFT END 1 H RIGHT END 1 J TOP BRACE 2 A B C D E F F G H J Page 3 ...

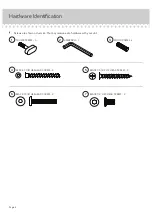
Page 4: ...shown actual size You may receive extra hardware with your unit THUMB SCREW 9 1 L WRENCH 1 2 WOOD DOWEL 2 3 Page 4 4 BLACK 1 7 8 HEX HEAD SCREW 4 BLACK 1 2 HEX HEAD SCREW 2 7 BLACK 1 3 4 FLAT HEAD SCREW 3 5 6 BLACK 1 3 8 HEX HEAD SCREW 2 ...

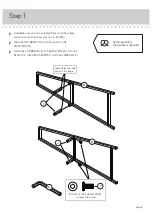
Page 5: ...he floor å Slide the TOP BRACES J onto the posts on the RIGHT END H å Fasten the TOP BRACES J to the RIGHT END H Turn two BLACK 1 2 HEX HEAD SCREWS 7 with the L WRENCH 2 2 H H These holes must be closer to this edge J J Page 5 Some assembly and snacks required BLACK 1 2 HEX HEAD SCREW 2 used in this step 7 ...

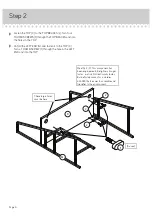
Page 6: ...to the TOP C Turn a THUMB SCREW 1 through the hole in the LEFT END and into the TOP Step 2 1 5 used These large holes must be here J C G Page 6 J J Meet Part C This component has been engineered to be lighter stronger faster well ok Not technically faster But definitely makes for a sturdier 424933 that s easier to assemble and friendlier to the environment ...

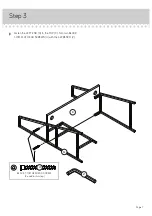
Page 7: ...Step 3 å Fasten the LEFT END G to the TOP C Turn two BLACK 1 7 8 FLAT HEAD SCREWS 4 with the L WRENCH 2 2 C G Page 7 BLACK 1 7 8 HEX HEAD SCREW 2 used in this step 4 ...

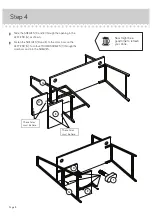
Page 8: ... as shown å Fasten the SHELVES D and E to the cross bars on the LEFT END G Turn four THUMB SCREWS 1 through the crossbars and into the SHELVES Step 4 D D E E G G Page 8 Now might be a good time to refresh your drink 1 These holes must be here These holes must be here ...

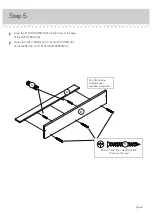
Page 9: ...e holes in the edge of the HUTCH BACK A å Fasten the HUTCH BACK A to the HUTCH SHELF B Use three BLACK 1 3 4 FLAT HEAD SCREWS 5 3 A B Page 9 BLACK 1 3 4 FLAT HEAD SCREW 3 used in this step 5 Part B Another sturdier easier friendlier component ...

Page 10: ...ten the HUTCH ENDS F to the HUTCH BACK A Turn two BLACK 1 7 8 FLAT HEAD SCREWS 4 with the L WRENCH 2 F F This hole must be here This hole must be here 2 Page 10 BLACK 1 7 8 HEX HEAD SCREW 2 used in this step 4 A 4 ...

Page 11: ...it upright å Fasten the HUTCH SHELF B to the ENDS H and G Turn two BLACK 1 3 8 HEX HEAD SCREWS 6 with the L WRENCH 2 G H B 2 Page 11 Pro Tip Lift with your legs And you know your arms BLACK 1 3 8 HEX HEAD SCREW 2 used in this step 6 6 ...

Page 12: ...y moving furniture that is not designed and equipped with casters Furniture can tip over or break if improperly moved Physical injury Furniture can be very heavy Breakage of tops particularly with double pedestal furniture drawers at both ends Unload shelves and drawers from top to bottom before moving the unit Do not push furniture especially on a carpeted floor Have a friend help you lift the ite...

Reviews: