background image

 å

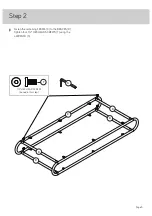
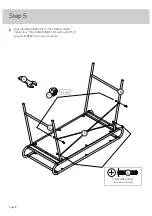
Fasten the remaining FRAME (C) to the BRACES (D).
Tighten four 1/2" HEX HEAD SCREWS (7) using the 
L-WRENCH (3).

Step 2

Page 5

1/2" HEX HEAD SCREW

(4 used in this step)

7

C

D

D

D

D

3

Summary of Contents for 5426463

Page 1: ...OTE THIS INSTRUCTION BOOKLET CONTAINS IMPORTANT SAFETY INFORMATION PLEASE READ AND KEEP FOR FUTURE REFERENCE You could totally write a novel on this Metro Desk Model 5426463 Teknik www teknikoffice co uk ...

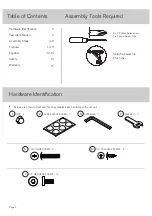
Page 2: ...entification Part Identification Assembly Steps Français Español Safety Warranty 2 3 4 9 10 11 12 13 14 15 å Screws are shown actual size You may receive extra hardware with your unit Hardware Identification 1 2 HEX HEAD SCREW 14 7 5 1 MACHINE SCREW 4 1 2 PAN HEAD SCREW 6 6 L WRENCH 1 3 WRENCH 1 4 2 GLASS SPACER CARD 1 NUT 4 1 Page 2 ...

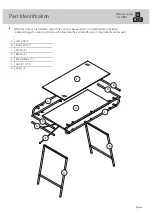
Page 3: ... label or an inked letter on the edge to help distinguish similar parts from each other Use this part identification to help identify similar parts Now you know our ABCs A LEFT END 1 B RIGHT END 1 C FRAME 2 D BRACE 4 E BACK BRACE 1 F GLASS TOP 1 G SHELF 1 A B C C D D D D E F G Page 3 ...

Page 4: ...rpeted floor or on the empty carton to avoid scratching your unit or the floor å Fasten the BRACES D to one of the FRAMES C Tighten four 1 2 HEX HEAD SCREWS 7 using the L WRENCH 3 Page 4 1 2 HEX HEAD SCREW 4 used in this step 7 C D D D D 3 ...

Page 5: ...å Fasten the remaining FRAME C to the BRACES D Tighten four 1 2 HEX HEAD SCREWS 7 using the L WRENCH 3 Step 2 Page 5 1 2 HEX HEAD SCREW 4 used in this step 7 C D D D D 3 ...

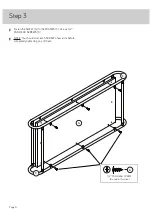
Page 6: ...n the SHELF G to the FRAMES C Use six 1 2 PAN HEAD SCREWS 6 å NOTE You should start each SCREW a few turns before completely tightening any of them Step 3 Page 6 1 2 PAN HEAD SCREW 6 used in this step 6 C C G ...

Page 7: ... the SHELF G Tighten six 1 2 HEX HEAD SCREWS 7 using the L WRENCH 3 å NOTE You should start each SCREW a few turns before completely tightening any of them Page 7 These holes must be here G B A 1 2 HEX HEAD SCREW 6 used in this step 7 3 ...

Page 8: ...å Fasten the BACK BRACE E to the ENDS A and B Tighten four 1 MACHINE SCREWS 5 and four NUTS 1 using the WRENCH 4 and a screwdriver Step 5 Page 8 1 MACHINE SCREW 4 used in this step 5 4 used B A E 1 4 ...

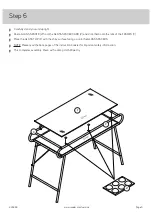
Page 9: ...of the FRAMES C Step 6 Page 9 www sauder com service 426463 2 å Place the GLASS TOP F with the shiny surface facing up onto the GLASS SPACERS å NOTE Please read the back pages of the instruction booklet for important safety information å This completes assembly Clean with a damp cloth Wipe dry F C C 5 0 l b s 3 5 l b s ...

Page 10: ...can tip over Overloaded shelves can break Never exceed the weight limits shown in the instructions Work from bottom to top when loading shelves Place the heavier items on the lower shelves Placing TVs on furniture items that are not designed to support a television is hazardous Risk of injury or death TVs can be very heavy Plus the weight and location of the picture tube tends to make TVs unbalanc...

Reviews: