background image


å

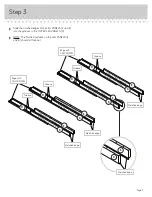
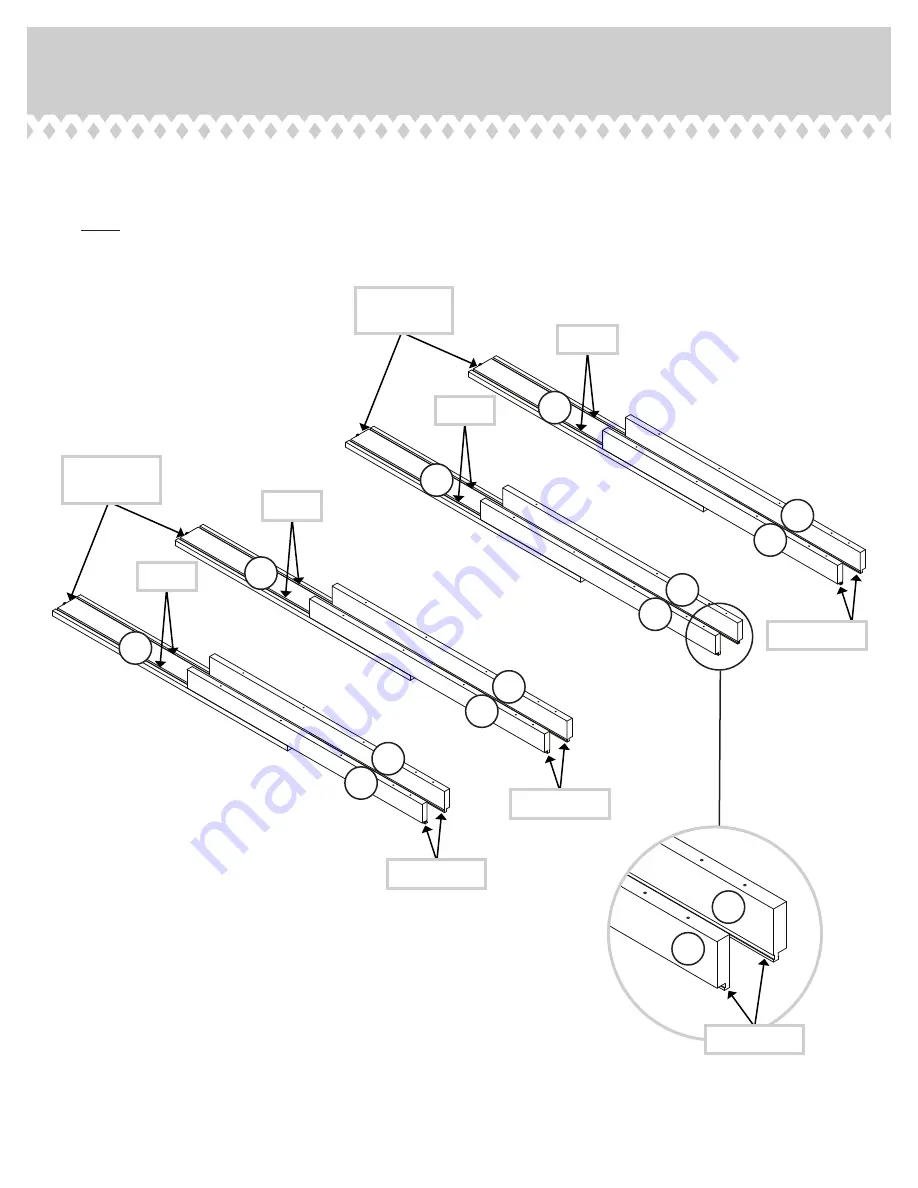
Slide the notched edges of the LEG PANELS (E and K)
into the grooves in the OUTER LEG PANELS (D).


å

NOTE: The fi nished surfaces on the LEG PANELS (E
and K) should all face out.

Step 3

Page 7

D

D

D

D

K

E

Finished sur

face

Unfi

 nished sur

face

K

E

Finished sur

face

Unfi

 nished sur

face

K

E

Finished sur

face

Unfi

 nished sur

face

K

E

Finished sur

face

Unfi

 nished sur

face

K

E

Notched edge

Notched edge

Groove

Groove

Groove

Groove

Notched edge

Notched edge

Edge with 
CAM DOWEL

Edge with 
CAM DOWEL

Summary of Contents for 5427127

Page 1: ...Counter Height Work Bench Vintage Oak Model 5427127 www teknikoffice co uk Welcome to the big kid table Teknik ...

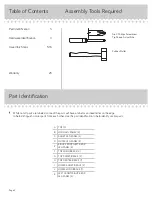
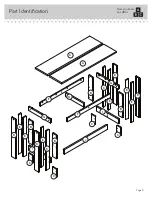
Page 2: ... are labeled some of the parts will have a label or an inked letter on the edge to help distinguish similar parts from each other Use this part identification to help identify similar parts A TOP 2 B LONG LEG PANEL 4 C SHORT LEG PANEL 4 D OUTER LEG PANEL 4 E RIGHT FRONT LEFT REAR LEG PANEL 4 F TOP LONG BRACE 2 G TOP SHORT BRACE 2 H TOP CENTER BRACE 1 I LOWER SHORT BRACE 2 J LOWER LONG BRACE 1 K LEF...

Page 3: ...Part Identification Now you know our ABCs Page 3 A B C D E F G H I J K A F G I E E E K K K D D D B B B C C C ...

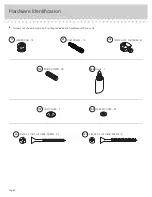
Page 4: ...al size You may receive extra hardware with your unit Page 4 BLACK 1 7 8 FLAT HEAD SCREW 42 2S SILVER 2 FLAT HEAD SCREW 6 57S CAM COVER 4 13P 10F TWIST LOCK FASTENER 8 SCREW COVER 44 18P WOOD DOWEL 28 15F HIDDEN CAM 14 1F CAM DOWEL 14 2F GLUE 1 54M ...

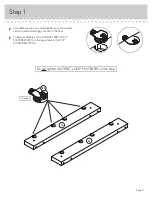
Page 5: ...r or on the empty carton to avoid scratching your unit or the floor å To begin assembly push a SAUDER TWIST LOCK FASTENER 10F into the large holes in the TOP SHORT BRACES G Page 5 8 used 10F Do not tighten the TWIST LOCK FASTENERS in this step G G ...

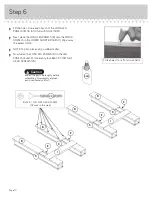
Page 6: ...P LONG BRACES F and TOP CENTER BRACE H Then insert the metal end of a CAM DOWEL 2F into each HIDDEN CAM Do not tighten the HIDDEN CAMS in this step Insert the metal end of the CAM DOWEL into the HIDDEN CAM Arrow 14 used D F H F D D D Push these two HIDDEN CAMS completely down in the holes ...

Page 7: ...PANELS E and K should all face out Step 3 Page 7 D D D D K E Finished surface Unfinished surface K E Finished surface Unfinished surface K E Finished surface Unfinished surface K E Finished surface Unfinished surface K E Notched edge Notched edge Groove Groove Groove Groove Notched edge Notched edge Edge with CAM DOWEL Edge with CAM DOWEL ...
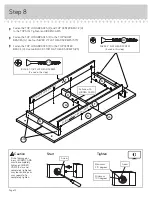
Page 8: ... of the SHORT LEG PANELS C 1 4 to 1 2 full with GLUE 54M Then insert eight WOOD DOWELS 15F into the holes Wipe away the excess GLUE å Next fasten the SHORT LEG PANELS C to the LEG PANELS E and K Use sixteen BLACK 1 7 8 FLAT HEAD SCREWS 2S 8 used Edge without CAM DOWEL Edge without CAM DOWEL Edge without CAM DOWEL Edge without CAM DOWEL BLACK 1 7 8 FLAT HEAD SCREW 16 used in this step 2S 2S K E K E...

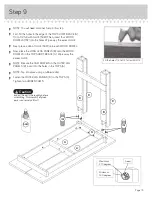
Page 9: ...S I 1 4 to 1 2 full with GLUE 54M Then insert eight WOOD DOWELS 15F into the holes Wipe away the excess GLUE å Next fill the holes in the other edges of the LOWER SHORT BRACES I 1 4 to 1 2 full with GLUE 54M å Now place the LOWER SHORT BRACES I onto the WOOD DOWELS in the SHORT LEG PANELS C Wipe away the excess GLUE å NOTE Tap into place using a rubber mallet 15F 8 used C C C C I I Surface with mor...

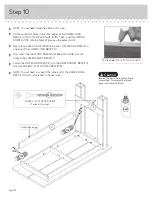
Page 10: ...ch of the LONG LEG PANELS B 1 4 to 1 2 full with GLUE 54M å Next place the LONG LEG PANELS B onto the WOOD DOWELS in the LOWER SHORT BRACES I Wipe away the excess GLUE å NOTE Tap into place using a rubber mallet å Now fasten the LONG LEG PANELS B to the LEG PANELS E and K Use twenty four BLACK 1 7 8 FLAT HEAD SCREWS 2S I I B B B B BLACK 1 7 8 FLAT HEAD SCREW 24 used in this step 2S K E K E K E K E...

Page 11: ...he hole of the adjoining part NOTE The dowel end of the FASTENER must remain fully inserted in the hole of the adjoining part while locking the FASTENER 2 Tighten the FASTENER with a Phillips screwdriver as tight as possible Dowel end G A A G Surface without TWIST LOCK FASTENERS Surface with TWIST LOCK FASTENERS These holes must be here There should be a small gap between the TOPS A ...

Page 12: ... 8 FLAT HEAD SCREWS 2S Page 12 Start Tighten Arrow Minimum 190 degrees Caution Risk of damage or injury HIDDEN CAMS must be completely tightened HIDDEN CAMS that are not completely tightened may loosen and parts may separate To completely tighten Arrow Maximum 210 degrees Surface without HIDDEN CAMS Surface with HIDDEN CAMS SILVER 2 FLAT HEAD SCREW 4 used in this step 57S G A A G F F H Surface wit...

Page 13: ...hen insert four WOOD DOWELS 15F into the holes Wipe away the excess GLUE å Next place a dab of GLUE 54M onto each WOOD DOWEL å Now place the LONG LEGS PANELS B onto the WOOD DOWELS in the TOP SHORT BRACE G Wipe away the excess GLUE å NOTE Be sure the CAM DOWELS in the OUTER LEG PANELS D insert into the holes in the TOPS A å NOTE Tap into place using a rubber mallet å Fasten the OUTER LEG PANELS D ...

Page 14: ...å Now insert the two WOOD DOWELS dabbed with GLUE into the holes in the LOWER SHORT BRACE I å Fasten the LOWER LONG BRACE J to the LOWER SHORT BRACE I Use one SILVER 2 FLAT HEAD SCREW 57S å NOTE You will need to support the loose end of the LOWER LONG BRACE J until it is fastened in the next step Page 14 Fill the holes 1 4 to 1 2 full with GLUE Inspect the parts thoroughly before assembling Disass...

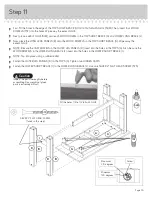
Page 15: ...sert into the holes in the TOPS A Also be sure the WOOD DOWELS in the LOWER LONG BRACE J insert into the holes in the LOWER SHORT BRACE I å NOTE Tap into place using a rubber mallet å Fasten the OUTER LEG PANELS D to the TOPS A Tighten two HIDDEN CAMS å Fasten the LOWER SHORT BRACE I to the LOWER LONG BRACE J Use one SILVER 2 FLAT HEAD SCREW 57S Step 11 Page 15 Fill the holes 1 4 to 1 2 full with ...

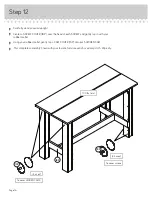
Page 16: ...EW and gently tap in with your rubber mallet å Using your rubber mallet gently tap a CAM COVER 13P onto each HIDDEN CAM å This completes assembly Clean with your favorite furniture polish or a damp cloth Wipe dry Page 16 44 used To cover screws 18P To cover HIDDEN CAMS 4 used 13P 18P 100 lbs total ...

Reviews: