background image

Step 6

 å

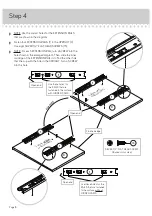
Insert one WOOD DOWEL (5) into the UPRIGHT (C).

 å

Fasten the LEFT BRACE (G) to the UPRIGHT (C). Tighten one HIDDEN CAM.

 å

NOTE: Be sure the WOOD DOWEL in the UPRIGHT inserts into the LEFT BRACE.

 å

Insert four WOOD DOWELS (5) into the LEFT END (B).

 å

Fasten the LEFT END (B) to the SHELF (E), LEFT BRACE (G), and BOTTOMS (H and I). Tighten fi ve HIDDEN CAMS.

 å

NOTE: You will need to use your STUBBY SCREWDRIVER to tighten the HIDDEN CAMS in the SHELF.

 å

NOTE: Be sure the WOOD DOWELS in the LEFT END insert into the SHELF, LEFT BRACE, and BOTTOMS.

Page 10

C

I

H

E

Sur

face without 

HIDDEN CAMS

5

G

B

Surface with 
HIDDEN CAMS

5

5

Finished edge

Summary of Contents for Craft 5421407

Page 1: ...binet Craft Collection Model 5421407 NOTE THIS INSTRUCTION BOOKLET CONTAINS IMPORTANT SAFETY INFORMATION PLEASE READ AND KEEP FOR FUTURE REFERENCE You ll love what we have in storage Teknik www teknikoffice co uk ...

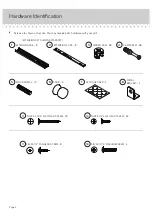
Page 2: ... help distinguish similar parts from each other Use this part identification to help identify similar parts A RIGHT END 1 B LEFT END 1 C UPRIGHT 1 D TOP 1 E SHELF 1 F RIGHT BRACE 1 G LEFT BRACE 1 H FRONT BOTTOM 1 I REAR BOTTOM 1 J BOTTOM BRACE 1 K SKIRT 1 L BACK 1 M SMALL RIGHT DRAWER FRONT 1 N SMALL LEFT DRAWER FRONT 1 O LARGE RIGHT DRAWER FRONT 1 P LARGE LEFT DRAWER FRONT 1 Q SMALL RIGHT DRAWER S...

Page 3: ...Part Identification Now you know our ABCs Page 3 A B C D E F G H I J K L M N O Q R S T U V W W Q R S W P T U V W ...

Page 4: ... Page 4 HIDDEN CAM 38 3 APPLIQUE CARD 4 7 EXTENSION SET SHOWN SEPARATED 1 EXTENSION RAIL 8 2 EXTENSION SLIDE 8 WOOD DOWEL 15 5 KNOB 4 6 SILVER 1 2 FLAT HEAD SCREW 52 15 SILVER 1 3 16 FLAT HEAD SCREW 18 11 CAM SCREW 38 4 METAL BRACKET 4 8 SILVER 1 2 PAN HEAD SCREW 8 17 18 SILVER 11 16 MACHINE SCREW 4 ...

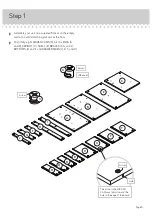
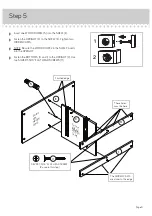
Page 5: ...r the floor å Push thirty eight HIDDEN CAMS 3 into the ENDS A and B UPRIGHT C SHELF E BRACES F G and J BOTTOMS H and I and DRAWER SIDES Q R T and U Page 5 3 Arrow Arrow 38 used 3 A C B E F G H I Q R T U Q R T U J Arrow The arrow in the HIDDEN CAM must point toward the hole in the edge of the board Hole ...

Page 6: ...RAWER FRONTS M N O and P å NOTE Be sure to use the exact holes shown Page 6 4 38 used A B D M N O P C E H I K 4 Meet Part D This component has been engineered to be lighter stronger faster well ok Not technically faster But definitely makes for a sturdier Storage Cabinet that s easier to assemble and friendlier to the environment Angled edge ...

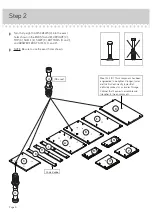
Page 7: ...e enlarged diagram Then slide the inner cartridge of the EXTENSION RAIL in to find the other hole that lines up with the hole in the END Turn a SCREW into this hole å NOTE The EXTENSION SLIDES will be used later for the DRAWERS B SILVER 1 2 FLAT HEAD SCREW 8 used in this step 15 1 1 S u r f a c e w i t h H I D D E N C A M S 1 1 A S u r f a c e w i t h H I D D E N C A M S Finished edge Open end Fini...

Page 8: ...e of the EXTENSION RAIL in to find the other hole that lines up with the hole in the UPRIGHT Turn a SCREW into this hole Page 8 F L I P O VER C SILVER 1 2 FLAT HEAD SCREW 8 used in this step 15 1 1 C 1 1 1 Use these holes for the RAILS that are fastened to the surface with HIDDEN CAMS Open end Open end 1 Open end S u r f a c e w i t h H I D D E N C A M S Finished edge S u r f a c e w i t h o u t H ...

Page 9: ...n the SHELF inserts into the UPRIGHT å Fasten the BOTTOMS H and I to the UPRIGHT C Use two SILVER 1 3 16 FLAT HEAD SCREWS 11 Step 5 Page 9 C I H E Surface with HIDDEN CAMS Surface without HIDDEN CAMS These holes must be here The HIDDEN CAMS are closer to this edge 5 1 2 SILVER 1 3 16 FLAT HEAD SCREW 2 used in this step 11 Finished edge ...

Page 10: ...WOOD DOWELS 5 into the LEFT END B å Fasten the LEFT END B to the SHELF E LEFT BRACE G and BOTTOMS H and I Tighten five HIDDEN CAMS å NOTE You will need to use your STUBBY SCREWDRIVER to tighten the HIDDEN CAMS in the SHELF å NOTE Be sure the WOOD DOWELS in the LEFT END insert into the SHELF LEFT BRACE and BOTTOMS Page 10 C I H E Surface without HIDDEN CAMS 5 G B Surface with HIDDEN CAMS 5 5 Finishe...

Page 11: ...rt four WOOD DOWELS 5 into the RIGHT END A å Fasten the RIGHT END A to the SHELF E RIGHT BRACE F and BOTTOMS H and I Tighten five HIDDEN CAMS å NOTE You will need to use your STUBBY SCREWDRIVER to tighten the HIDDEN CAMS in the SHELF å NOTE Be sure the WOOD DOWELS in the RIGHT END insert into the SHELF RIGHT BRACE and BOTTOMS C I H E Surface with HIDDEN CAMS F A Surface with HIDDEN CAMS 5 Finished ...

Page 12: ...Step 8 å Fasten four METAL BRACKETS 8 to the SKIRT K exactly as shown Use four SILVER 1 2 PAN HEAD SCREWS 17 Page 12 K SILVER 1 2 PAN HEAD SCREW 4 used in this step 17 8 Angled edge Slotted hole ...

Page 13: ...ert into the SKIRT å Fasten the SKIRT K to the FRONT BOTTOM H Use four SILVER 1 2 PAN HEAD SCREWS 17 through the METAL BRACKETS on the SKIRT and into the FRONT BOTTOM å Fasten the BOTTOM BRACE J to the BOTTOMS H and I Tighten two HIDDEN CAMS Step 9 Page 13 5 5 K J I H Surface without HIDDEN CAMS Angled edge SILVER 1 2 PAN HEAD SCREW 4 used in this step 17 A B ...

Page 14: ... Insert two WOOD DOWELS 5 into the ENDS A and B å Fasten the TOP D to the ENDS A and B Tighten four HIDDEN CAMS å NOTE Be sure the WOOD DOWELS in the ENDS insert into the TOP Page 14 5 A B D These edges must be even Edge with holes Unfinished edge ...

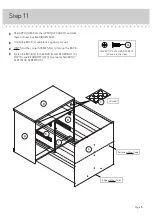
Page 15: ...t against your unit å HINT Start the corner SCREWS first to hold up the BACK å Fasten the BACK L to the ENDS A and B UPRIGHT C TOP D and REAR BOTTOM I Use twenty SILVER 1 2 FLAT HEAD SCREWS 15 Step 11 Page 15 A B D C I L SILVER 1 2 FLAT HEAD SCREW 20 used in this step 15 7 Edge without holes 4 used Surface without tape ...

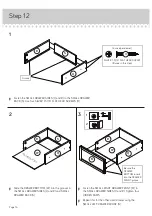
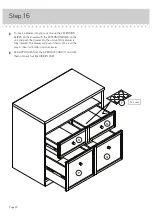
Page 16: ...n four HIDDEN CAMS å Repeat this for the other small drawer using the SMALL LEFT DRAWER FRONT N å Fasten the SMALL DRAWER SIDES Q and R to the SMALL DRAWER BACK S Use four SILVER 1 3 16 FLAT HEAD SCREWS 11 1 1 2 S R Q S R Q R Q W M W Groove Be sure the DRAWER BOTTOM inserts into the DRAWER FRONT groove SILVER 1 3 16 FLAT HEAD SCREW 8 used in this step 11 4 used per drawer F i n i s h e d s u r f a...

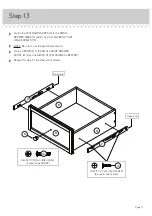
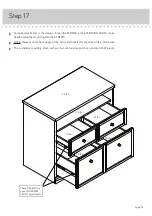
Page 17: ...sure to use the exact holes shown å Fasten a KNOB 6 to the SMALL RIGHT DRAWER FRONT M Use one SILVER 11 16 MACHINE SCREW 18 å Repeat this step for the other small drawer Step 13 Page 17 R Q M 2 2 6 Open end Open end SILVER 1 2 FLAT HEAD SCREW 8 used for the SLIDES 15 SILVER 11 16 MACHINE SCREW 2 used for the KNOBS 18 ...

Page 18: ...n four HIDDEN CAMS å Repeat this for the other large drawer using the LARGE LEFT DRAWER FRONT P å Fasten the LARGE DRAWER SIDES T and U to the LARGE DRAWER BACK V Use four SILVER 1 3 16 FLAT HEAD SCREWS 11 1 Be sure the DRAWER BOTTOM inserts into the DRAWER FRONT groove 1 2 SILVER 1 3 16 FLAT HEAD SCREW 8 used in this step 11 4 used per drawer Groove V U T W F i n i s h e d s u r f a c e V U T O U...

Page 19: ...WS 15 å NOTE Be sure to use the exact holes shown å Fasten a KNOB 6 to the LARGE RIGHT DRAWER FRONT O Use one SILVER 11 16 MACHINE SCREW 18 å Repeat this step for the other large drawer U T SILVER 1 2 FLAT HEAD SCREW 8 used for the SLIDES 15 6 O 2 2 Open end Open end SILVER 11 16 MACHINE SCREW 2 used for the KNOBS 18 ...

Page 20: ...TENSION RAILS on the unit and push the drawer into the unit until the drawer is fully inserted The drawer will push in hard until it is all the way in then it will slide in and out easier å Peel APPLIQUES from the APPLIQUE CARD 7 and stick them onto each visible HIDDEN CAM Page 20 O M P N 7 16 used ...

Page 21: ...ustments and tighten the SCREWS å NOTE Please read the back pages of the instruction booklet for important safety information å This completes assembly Clean with your favorite furniture polish or a damp cloth Wipe dry 25 lbs 25 lbs 15 lbs 35 lbs 15 lbs 35 lbs These SCREWS are used for DRAWER FRONT adjustments ...

Page 22: ...rloaded drawers or shelves can break Never exceed the weight limits shown in the instructions Work from bottom to top when loading shelves and drawers Place the heavier items on the lower shelves or in lower drawers Placing TVs on furniture items that are not designed to support a television is hazardous Risk of injury or death TVs can be very heavy Plus the weight and location of the picture tube...

Reviews: