background image

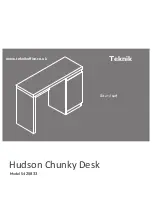
Hudson Chunky Desk


Model


5

425833

Sit

 and 

surf

.

Teknik

www.teknikoffice.co.uk


Summary of Contents for Hudson Chunky Desk 5425833

Page 1: ...Hudson Chunky Desk Model 5425833 Sit and surf Teknik www teknikoffice co uk ...

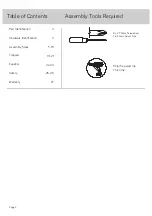
Page 2: ...dware Identification Assembly Steps Français Español Safety Warranty No 2 Phillips Screwdriver Tip Shown Actual Size Table of Contents Assembly Tools Required Skip the power trip This time 3 4 5 18 19 21 22 24 25 26 27 Page 2 ...

Page 3: ... on the edge to help distinguish similar parts from each other Use this part identification to help identify similar parts Now you know our ABCs A LEFT END 1 B RIGHT END 1 C UPRIGHT 1 D TOP 1 E BOTTOM 1 F ADJUSTABLE SHELF 1 G DOOR 1 H VALANCE 1 J MODESTY PANEL 1 K BACK 1 L SKIRT 1 Page 3 A B C D E F G H J K L ...

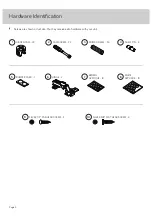
Page 4: ...al size You may receive extra hardware with your unit Page 4 SILVER 1 2 PAN HEAD SCREW 4 9 5 BUMPER CARD 1 SHELF PIN 4 4 6 HINGE 2 BROWN APPLIQUE 8 7 WHITE APPLIQUE 10 8 SILVER 5 8 FLAT HEAD SCREW 4 10 CAM SCREW 22 2 HIDDEN CAM 22 1 WOOD DOWEL 30 3 ...

Page 5: ... Turn the CAM SCREW or gently tap the CAM DOWEL until the shoulder is against the surface of the part 1 Hidden Cam Hidden Cam Arrow Push a HIDDEN CAM into the part The arrow in the HIDDEN CAM must point toward the hole in the edge of the board Hole 2 3 1 2 Insert the CAM SCREW or CAM DOWEL into the HIDDEN CAM Tighten the HIDDEN CAM Page 5 ...

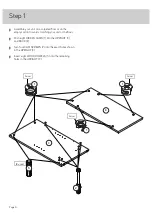
Page 6: ...id scratching your unit or the floor å Push eight HIDDEN CAMS 1 into the UPRIGHT C and BACK K å Turn four CAM SCREWS 2 into the exact holes shown in the UPRIGHT C å Insert eight WOOD DOWELS 3 into the remaining holes in the UPRIGHT C Page 6 1 C K 1 Arrow Arrow Arrow 2 1 3 8 used ...

Page 7: ...å Fasten the BACK K to the UPRIGHT C Tighten two HIDDEN CAMS å NOTE Be sure the WOOD DOWELS in the UPRIGHT insert into the BACK Step 2 Page 7 C K Edge with HIDDEN CAMS Surface with HIDDEN CAMS ...

Page 8: ... into the BOTTOM E å Fasten the BOTTOM E to the UPRIGHT C Tighten two HIDDEN CAMS å NOTE Be sure the WOOD DOWELS in the UPRIGHT insert into the BOTTOM Step 3 Page 8 C E E Arrow Surface with HIDDEN CAMS Unfinished edge 1 1 Arrow ...

Page 9: ...onto the WOOD DOWELS in the UPRIGHT C as shown å NOTE The VALANCE H is wider than the SKIRT L Step 4 Page 9 L H C Finished edge Unfinished edge These edges should be even Just think The sooner you do this the sooner you do something else ...

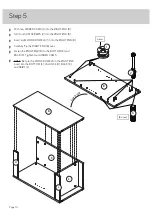
Page 10: ...WOOD DOWELS 3 into the RIGHT END B å Carefully flip the RIGHT END B over å Fasten the RIGHT END B to the BOTTOM E and BACK K Tighten four HIDDEN CAMS å NOTE Be sure the WOOD DOWELS in the RIGHT END insert into the BOTTOM E VALANCE H BACK K and SKIRT L Step 5 Page 10 3 F L I P OVER B B E L H K 8 used 2 1 Arrow ...

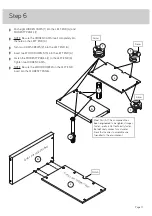
Page 11: ...Y PANEL J to the LEFT END A Tighten two HIDDEN CAMS å NOTE Be sure the WOOD DOWELS in the LEFT END insert into the MODESTY PANEL Step 6 Page 11 A J A J 3 S u r f a c e w i t h H I D D E N C A M S Surface with HIDDEN CAMS Notch Meet Part A This component has been engineered to be lighter stronger faster well ok Not technically faster But definitely makes for a sturdier Desk that s easier to assemble...

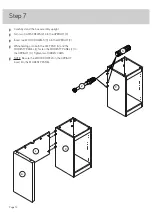
Page 12: ... C å Insert two WOOD DOWELS 3 into the UPRIGHT C å While holding onto both the LEFT END A and the MODESTY PANEL J fasten the MODESTY PANEL J to the UPRIGHT C Tighten two HIDDEN CAMS å NOTE Be sure the WOOD DOWELS in the UPRIGHT insert into the MODESTY PANEL Step 7 Page 12 A J C C 3 2 ...

Page 13: ... exact holes shown in the TOP D å Then insert ten WOOD DOWELS 3 into the remaining holes in the TOP D Step 8 Page 13 Part D Another sturdier easier friendlier component D 10 used 3 Don t worry It isn t Rome This can be built in a day 2 2 2 ...

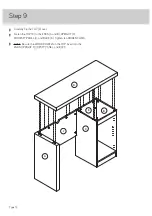
Page 14: ... over å Fasten the TOP D to the ENDS A and B UPRIGHT C MODESTY PANEL J and BACK K Tighten ten HIDDEN CAMS å NOTE Be sure the WOOD DOWELS in the TOP insert into the ENDS UPRIGHT MODESTY PANEL and BACK Step 9 Page 14 A J C D B K ...

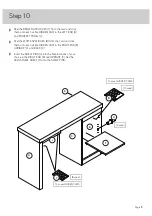
Page 15: ...IQUES 8 from the card and stick them onto each visible HIDDEN CAM in the RIGHT END B UPRIGHT C and BACK K å Insert the SHELF PINS 4 into the hole locations of your choice in the RIGHT END B and UPRIGHT C Set the ADJUSTABLE SHELF F onto the SHELF PINS Step 10 Page 15 C B A J F K 4 7 To cover HIDDEN CAMS 8 used 8 10 used To cover HIDDEN CAMS 4 used ...

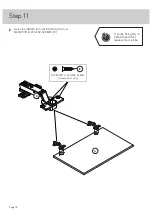
Page 16: ...sten the HINGES 6 to the DOOR G Use four SILVER 5 8 FLAT HEAD SCREWS 10 Step 11 Page 16 G 6 If you re doing this to help a friend don t leave without a bite SILVER 5 8 FLAT HEAD SCREW 4 used in this step 10 ...

Page 17: ...on the DOOR G to the RIGHT END B as shown in the lower diagram Use four SILVER 1 2 PAN HEAD SCREWS 9 å NOTE You should start each SCREW a few turns before completely tightening any of them å Peel a BUMPER from the BUMPER CARD 5 and stick it on the DOOR G where it comes into contact with the UPRIGHT C å See the next step for DOOR adjustments Step 12 Page 17 Mounting screw Stop Hinge SILVER 1 2 PAN ...

Page 18: ...t screws Move the DOOR up or down to the desired location Tighten the screws after making adjustments å To adjust the DOOR in or out depth loosen the mounting screw one turn and move the DOOR in or out as needed Tighten the mounting screw after making adjustments å NOTE Please read the back pages of the instruction booklet for important safety information å This completes assembly Clean with a dam...

Page 19: ...y moving furniture that is not designed and equipped with casters Furniture can tip over or break if improperly moved Physical injury Furniture can be very heavy Breakage of tops particularly with double pedestal furniture drawers at both ends Unload shelves and drawers from top to bottom before moving the unit Do not push furniture especially on a carpeted floor Have a friend help you lift the ite...

Reviews: