


148
Phaser 750 Color Printer
Troubleshooting Phaser 750 Printers
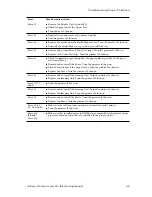
Error codes
If the printer’s front panel displays a message
Error XX,
find the error code in this table
and follow the instructions for resolving the problem. If problems persist, check the
Tektronix web site
www2.tek.com/TekSMART/
or contact service.
Error
User Corrective Action
Error 01
■
Remove and re-install the black Toner Cartridge, then turn the printer off and
on.
■
Replace the black Toner Cartridge, then turn the printer off and on.
Error 02
■
Remove and re-install the cyan Toner Cartridge, then turn the printer off and
on.
■
Replace the cyan Toner Cartridge, then turn the printer off and on.
Error 03
■
Remove and re-install the magenta Toner Cartridge, then turn the printer off
and on.
■
Replace the magenta Toner Cartridge, then turn the printer off and on.
Error 04
■
Remove and re-install the yellow Toner Cartridge, then turn the printer off and
on.
■
Replace the yellow Toner Cartridge, then turn the printer off and on.
Error 05, 10
,
11
,
12
, and
13
■
Turn the printer power off, then on.
Error 20
■
Remove and re-install the Imaging Unit (make sure that Imaging Unit is locked
in place). Turn the printer off, then on.
■
Remove and re-install the Main Charge Grid. Turn the printer off, then on.
■
Remove and re-install the Transfer Kit. Turn the printer off, then on.
■
Remove and re-install each of the Toner Cartridges. Turn the printer off, then
on.
■
Replace the Main Charge Grid. Turn the printer off, then on.
■
Replace the Imaging Unit (make sure that Imaging Unit is locked in place). Turn
the printer off, then on.
■
Replace the Transfer Kit. Turn the printer off, then on.
■
Replace the Toner Cartridges. Turn the printer off, then on.
Error 21
,
22
,
30
, and
32
■
Remove and re-install the Imaging Unit (make sure that Imaging Unit is locked
in place). Turn the printer off, then on.
■
Replace the Imaging Unit (make sure that Imaging Unit is locked in place). Turn
the printer off, then on.
■
If a problem persists for Error 30, clean the sensor. See
page 156
.
Error 33
■
Check for jammed paper throughout the paper path (especially in paper feeder).
■
Remove and re-install the paper feeder and Transfer Kit. Turn the printer off,
then on.
Error 40
,
41
,
42
, and
43
■
Check for jammed paper in the Fuser. Re-install the Fuser. Turn the printer off,
then on.
■
Make sure that you have the correct Fuser for your local printer power supply:
110-Volt Fuser
Part Number 016-1839-00
220-Volt Fuser
Part Number 016-1840-00
■
Replace the Fuser. Turn the printer off, then on.
Error 50
,
51
■
Turn the printer off, then on.


