


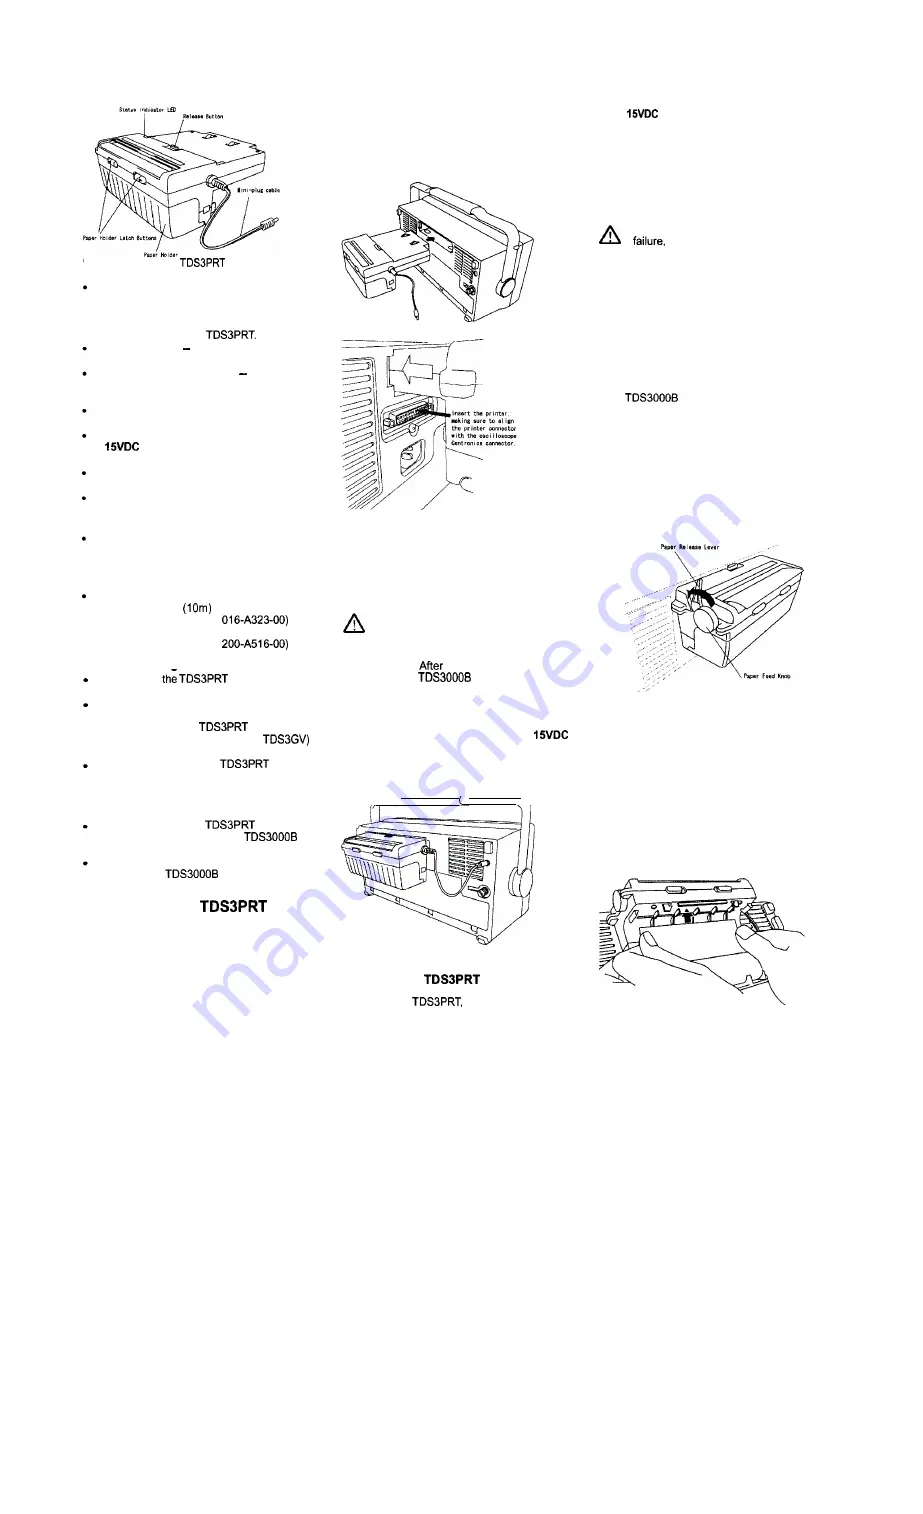
Figure 2. Parts of the
thermal printer
Status Indicator LED -The status indicator
LED turns on during printer power-up, when
the thermal paper is used up, when the
paper release lever is open, or if there is an
error condition in the
Release Button Disconnects the printer
from the oscilloscope when pressed down.
Paper Holder Latch buttons Slide these
latch buttons towards the center of the
printer to open the paper holder.
Paper Holder-A swing-down cover that
contains the thermal printer paper roll.
Mini-plug cable -Connect this cable to
Out terminal located on the rear
panel of the oscilloscope.
Paper Release Lever -The lever to hold
the print paper down (refer to Figure 6).
Paper Feed Knob -The knob for paper
feeding (refer to Figure 6).
Accessories
Standard Accessories
Thermal paper (1 roll)
Instruction Manual (this document)
Software package (1 set)
Optional Accessories/Parts
Thermal paper
10 rolls
(Tektronix Part number
Paper holder
(Tektronix Part number
Before Installinn the Printer
Do not use
printer to carry,
or help carry, the oscilloscope.
Because the TDSJPRT is installed in the
same opening as a communication module,
you cannot use the
printer and a
communication module (such as
simultaneously.
You cannot operate the
printer
from the rechargeable battery pack in a
TDS3000 Series oscilloscope. This printer
requires AC power to operate when
installed in a TDS3000 Series oscilloscope.
You can operate the
from the
rechargeable battery pack in
Series oscilloscopes.
You cannot use the TDSJPRT printer with a
TDS3000 or
Series oscilloscope
that is installed in the optional rackmount.
Installing the
Printer
Do the following steps to install the TDSJPRT
printer in your oscilloscope:
1.
Disconnect the power cord from the
oscilloscope rear panel.
2.
(If present) Press down on the blank panel
latch tab to remove the blank panel
3.
Attach the front cover to the oscilloscope.
4.
Place the oscilloscope so that its front side
faces downward.
5.
Insert the printer into the oscilloscope as
shown in Figure 3.
Make sure that the
Centronics connectors snugly mate and
correctly align with each other while
observing the printer insertion from the
side (refer to Figure 4).
Figure 3. Direction of Printer Insertion
Figure 4. Position adjustment of connectors
6.
Insert the printer until release button
comes to its raised position.
7.
Place the oscilloscope to its upright
position, then remove the front cover.
Caution:
Do not hold the oscilloscope’s
carrying handle during printer installation
or removal.
Your hand may be caught
by the carrying handle and result in personal
injury.
Hold the oscilloscope instead of the
carrying handle.
installing the printer into
the TDS3000 or
Series oscilloscope,
adjust the oscilloscope carrying handle if
necessary to prevent the handle from contacting
or interfering with the TDSJPRT operation.
6.
Connect the mini-plug cable to the
Out
terminal on the right side of the rear
panel.
9.
Connect the power cord to the rear panel
of the oscilloscope.
Figure 5. Installed printer
Removing the
Printer
To remove the
do the following steps:
1.
After turning the power off, disconnect the
power cord from the rear panel of the
oscilloscope.
2.
Disconnect the mini-plug cable from the
Out terminal located on the rear of
the oscilloscope.
3.
Press the release button at the top of the
printer while pulling the printer out of the
oscilloscope. Use a gentle side-to-side
rocking motion while pulling on the printer.
Caution:
To reduce the potential of personal
injury and/or unexpected equipment
Install the blank panel on the
oscilloscope when the printer is not installed.
Loading the Printer Paper
You
can load the thermal printer paper using an
automatic method or a manual method.
Automatic Paper Loading
To load the thermal printer paper automatically,
do the following steps:
1.
Check that the oscilloscope is providing
power to the printer (AC or battery for the
Series, AC only for the
TDS3000 Series).
2.
Slide the pair of paper holder latch buttons
towards the center of the printer to open
the paper holder.
The paper holder will
swing down.
3.
If you are removing paper from the printer
before installing new paper, push the paper
release lever until it clicks in the released
(open) position and remove the old paper
roll. Refer to Figure 6.
Figure 6. Paper release lever and paper feed knob
4.
Push the paper release lever to its locked
(closed) position.
Note:
The automatic loading mechanism
does not work if you do not return the paper
release lever to its locked position.
5.
Align the edge of the new roll paper strip
with the direction shown in Figure 7, and
insert it into the paper feed port. The paper
is automatically fed until the tip of roll
paper is visible on the paper cutter.
Figure 7. Inserting paper into the printer feed slot
6.
If the paper is not feeding straight. raise
the paper release lever, adjust the paper
position, and then close the release lever.


