background image

Installing the Equipment

19

2.4.5

Start Up

The first time that you connect to a Tmedia VoIP Gateway, you must configure it as a standalone unit.

Once the configuration settings have been applied, your TMG800 will start up and display the web 
portal configuration management tool.

2.4.5.1

Configuring the Role

To configure the role of your TMG800 as a standalone unit, do the following:

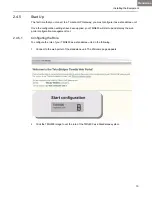
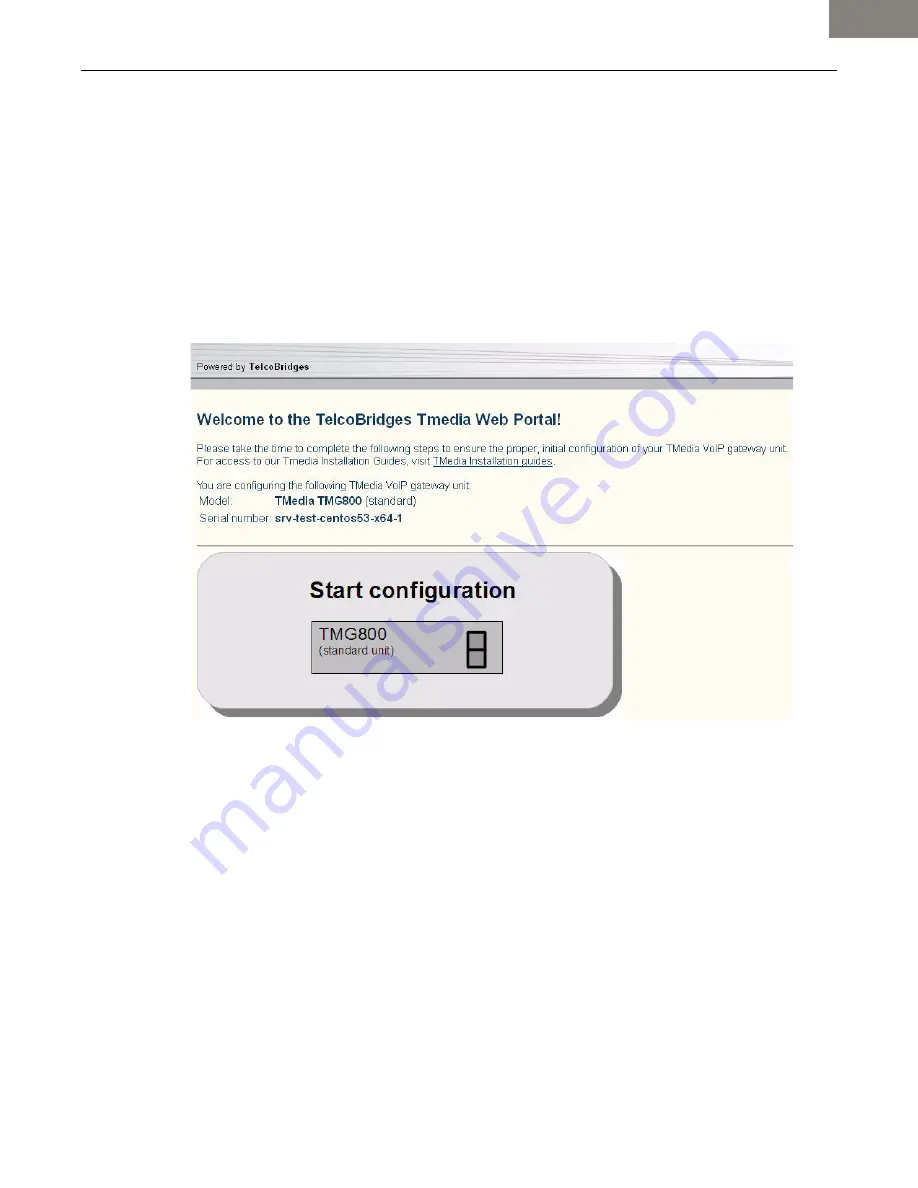
1. Connect to the web portal of the standalone unit. The Welcome page appears.

2. Click the TMG800 image to set the role of the TMG800 as a Standalone system.

Standalone

Summary of Contents for Tmedia TMG800

Page 1: ...TMG800 TMG800 1 System Installation Guide 9010 00179 1A Issue 3 0b ...

Page 2: ...TB Support or visit the TBWiki http docs telcobridges com TelcoBridges is committed to continually improving product designs as a result product specifications may be subject to change without notification 2003 2012 TelcoBridges All rights reserved TelcoBridges Tmedia TMG800 TMG3200 RJ TMG3200 TE TMG3200 DS3 TMG3200 STM1 TMG7800 TE TMG7800 DS3 TMG7800 STM1 TMG7800 CTRL TMG CONTROL TMG7800 TMS Tmed...

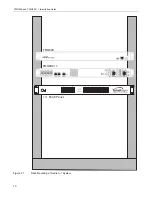
Page 3: ...alone System This term is used when a description in this document applies to the TMG800 operating as a standalone unit Tmedia 1 1 System This term is used when a description in this document applies to the TMG800 operating in conjunction with the TMG800 1 This term also includes the 1 1 patch panels TMG3200 This term is used when a description in this document applies to all variations of the TMG...

Page 4: ...iv TMG800 and TMG800 1 Installation Guide ...

Page 5: ...e PSTN 15 2 4 4 Powering Up 16 2 4 4 1 Connecting to AC Power 16 2 4 4 2 Connecting to DC Power 17 2 4 5 Start Up 19 2 4 5 1 Configuring the Role 19 2 5 Tmedia 1 1 System 21 2 5 1 Connecting to the Tmedia 1 1 System Management Interfaces 22 2 5 2 Connecting to the Tmedia Control Network 23 2 5 3 Connecting to the Tmedia 1 1 System VoIP Network s 24 2 5 4 Connecting to the PSTN in a Tmedia 1 1 Syst...

Page 6: ...andalone TMG800 47 5 4 1 Reconfigure a Standalone Unit as a Primary Unit in a 1 1 System 47 5 4 2 Install the TMG800 1 on the Equipment Rack 50 5 4 3 Install a Patch Panel 50 5 4 4 Connect to the TMG800 1 1 Management Interface 50 5 4 5 Connect to the Tmedia Control Network 50 5 4 6 Connect to the VoIP Network 50 5 4 7 Connect to the PSTN Network 51 5 4 8 Power Up the Tmedia VoIP Gateway 51 5 4 9 ...

Page 7: ...g Dump Files Mandatory 64 7 6 Application Logs 65 7 7 Backdoor Tools 65 7 7 1 tbx_cli_tools_remote 65 7 7 2 Line Trunk Status Tbshowls 66 7 7 3 VoIP Traffic Capture 66 7 7 4 Network Analysis Tools 67 7 7 4 1 Wireshark formerly called Ethereal 67 7 7 4 2 tcpdump 67 7 7 5 Tbstreamlisten 67 7 7 6 Stream Server Audio Packets to Wave File 67 7 7 7 tbsigtrace Signaling Traces 67 Appendix A Wiring Diagra...

Page 8: ...viii TMG800 and TMG800 1 Installation Guide ...

Page 9: ...s Tmedia Standalone System TMG800 operating in standalone mode Tmedia 1 1 System TMG800 operating in conjunction with a TMG800 1 including its associated 1 1 patch panel The following topics are covered Recognizing your Tmedia 1 1 system shown in figure 1 1 Installation overview Installation prerequisites Other recommended reading ...

Page 10: ... system Connecting to the Tmedia Management Interface Connecting to the VoIP network Connecting to the PSTN Powering Up Initial System Configuration Note In addition to installation procedures a series of topics are provided describing upgrades maintenance and troubleshooting of a Tmedia 1 1 system Figure 1 1 TMG800 and TMG800 1 Front and Rear Views TMG800 RJ front view Tmedia 1 1 Patch Panel 8 T1...

Page 11: ...5 1 Connecting to the Tmedia 1 1 System Management Interfaces on page 29 for further information 1 3 Preventing Electrostatic Discharge Damage Electrostatic discharge ESD can damage equipment and impair electrical circuitry It may occur if electronic printed circuit cards are improperly handled and may cause complete or intermittent failure Always follow ESD prevention procedures when removing and...

Page 12: ...eways and have been trained to work with the equipment If you have any technical questions TelcoBridges TB Support technical support team can be reached via telephone or email Telephone 1 866 438 4703 support telcobridges com Documents exploring various aspects of the Tmedia system are available at the TelcoBridges TBWiki http docs telcobridges com mediawiki index php Main_Page ...

Page 13: ...uipment This chapter provides information about the following topics Package contents Rack mounting the Tmedia 1 1 system Connecting to the Tmedia management interface Connecting to a VoIP network Connecting to a PSTN network Connecting power Powering down ...

Page 14: ...ge 2 One 1 set of mounting brackets and screws used to mount the TMG800 to a 19 rack One 1 DB 9 to RJ 45 adapter to interface the serial port of your computer with the RJ 45 port of the TMG800 Three 3 CAT5 Ethernet straight cables male male 3 meters in length One 1 Important Notice two sided document containing pertinent product serial numbers and other important information One 1 Product Warranty...

Page 15: ...torial view of the equipment set up Two 2 AC or DC power cables The associated 1 1 patch panel for your TMG800 1 See figure 1 1 on page 2 for further details Not included with the TMG800 1 A 19 equipment rack The TMG800 must be installed in a standard 19 wide equipment rack 1 1 Patch Panel A 1 1 patch panel is required for the proper connection of the Tmedia 1 1 system and is automatically include...

Page 16: ...ia Equipment The TMG800 and TMG800 1 are each housed in a 1U chassis as tabulated in table 2 2 on page 8 It is important that you provide for enough room on the equipment rack to allow for the installation of the TMG800 and TMG800 1 Consider the available space on your equipment rack and the height of the TMG800 and TMG800 1 Due to the rear exhaust heat vents and the efficient heat dissipation des...

Page 17: ...igure 2 1 on page 10 Do the same for the angle bracket on the right hand side 2 Start mounting equipment at the top most position of the rack keeping in mind the space required on the equipment rack as described in Section 2 2 2 Vertical Placement of Tmedia Equipment on page 8 To mount the TMG800 1 proceed as follows 1 Install the TMG800 1 below the TMG800 as shown in figure 2 1 on page 10 2 To at...

Page 18: ...10 TMG800 and TMG800 1 Installation Guide Figure 2 1 Rack Mounting a Tmedia 1 1 System TMG800 TMG800 1 1 1 Patch Panel ...

Page 19: ...em Setup I am setting up a TMG800 as a standalone system I am setting up a TMG800 to work in conjunction with a TMG800 1 Follow the procedures of Section 2 4 Tmedia Standalone System Follow the procedures of Section 2 5 Tmedia 1 1 System I am adding or replacing a TMG800 or TMG800 1 in an existing system Follow the procedures of Chapter 5 Hardware Maintenance Procedures 1 1 System Setup Adding Rep...

Page 20: ...ne system This section covers the following procedures for a TMG800 standalone system Section 2 4 1 Connecting to the Tmedia Management Interface on page 13 Section 2 4 2 Connecting to a VoIP Network on page 14 Section 2 4 3 Connecting to the PSTN on page 15 Section 2 4 4 Powering Up on page 16 Section 2 4 5 Start Up on page 19 Standalone ...

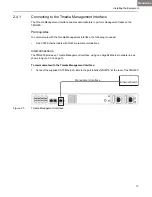
Page 21: ...llowing is needed One CAT5 Ethernet cable with RJ45 male male terminations Interconnections The TMG800 provides a Tmedia Management Interface using one Gigabit Ethernet network link as shown in figure 2 3 on page 13 To communicate with the Tmedia Management Interface 1 Connect the supplied CAT5 Ethernet cable to the port labelled MGMT0 at the rear of the TMG800 Figure 2 3 Tmedia Management Interfa...

Page 22: ...cables with RJ45 male male terminations If your system has access to a second VoIP network you can connect it to a second VoIP interface of the TMG800 with an RJ45 male male CAT5 Ethernet cable Connections The TMG800 is connected to the VoIP network by one or optionally two Ethernet GigE network links as shown in figure 2 4 on page 14 To connect the TMG800 to the VoIP network 1 Connect a CAT5 Ethe...

Page 23: ... your own cables refer to page 92 in Appendix A for crossover or straight cable wiring connections Note All ports may not be active T1 E1 ports are activated by software license the number of active ports depends on the licenses purchased To connect the TMG800 RJ RJ48C type to the PSTN 1 Start with port 0 located at the top and leftmost position Connect one cable between this port and the T1 E1 li...

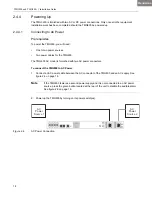
Page 24: ...MG800 The TMG800 AC model is furnished with two AC power connectors To connect the TMG800 to AC Power 1 Connect an AC power cable between the AC connector of the TMG800 and an AC supply See figure 2 6 on page 16 Note If the TMG800 features a second power supply and it is not connected to an AC power source press the green button located at the rear of the unit to disable the audible alarm See figu...

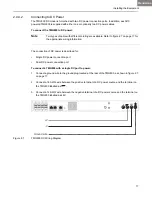
Page 25: ...rmation The connection of DC power is described for Single DC power connection port Dual DC power connection port To connect a TMG800 with a single DC port to power 1 Connect a ground wire to the ground plug located at the rear of the TMG800 as shown in figure 2 7 on page 17 2 Connect a 14 AWG wire between the positive terminal of a DC power source and the terminal on the TMG800 labelled as 3 Conn...

Page 26: ...2 Connect one lead of the DC power cable to the positive terminal of the DC power source as shown in figure 2 8 on page 18 3 Connect the other lead of the DC power cable to the negative side of the DC power source 4 Repeat steps 1 3 for the second power DC power source Figure 2 8 TMG800 Redundant DC Supply Wiring Diagram NOTE DC power cable supplied with TMG3202 Two types Black Red and Yellow Blac...

Page 27: ...ngs have been applied your TMG800 will start up and display the web portal configuration management tool 2 4 5 1 Configuring the Role To configure the role of your TMG800 as a standalone unit do the following 1 Connect to the web portal of the standalone unit The Welcome page appears 2 Click the TMG800 image to set the role of the TMG800 as a Standalone system Standalone ...

Page 28: ...20 TMG800 and TMG800 1 Installation Guide The Progress page is displayed confirming the change Standalone ...

Page 29: ...dia 1 1 System Management Interfaces on page 22 Section 2 5 2 Connecting to the Tmedia Control Network on page 23 Section 2 5 3 Connecting to the Tmedia 1 1 System VoIP Network s on page 24 Section 2 5 4 Connecting to the PSTN in a Tmedia 1 1 System on page 25 Section 2 5 5 Powering Up on page 27 Section 2 5 5 1 Connecting to AC Power on page 27 Section 2 5 5 2 Connecting to DC Power on page 28 1 ...

Page 30: ...h RJ45 male male terminations Interconnections Within a 1 1 system there is a management interface for a TMG3200 and a TMG3200 1 each requiring a Gigabit Ethernet network link See figure 2 9 on page 22 To communicate with the Tmedia Management Interface 1 Connect an RJ45 cable from the TMG800 to an Ethernet switch 2 Connect an RJ45 cable from the TMG800 1 to an Ethernet switch Figure 2 9 Tmedia Ma...

Page 31: ...Two CAT5 Ethernet cables with RJ45 male male terminations Connections The TMG800 and TMG800 1 are connected to the Tmedia control network using two CAT5 Ethernet cables as shown in figure 2 10 on page 23 To connect to the Tmedia control network 1 Connect the VoIP 0 connector on the TMG800 to the ETH0 connector on the TMG800 1 2 Connect the VoIP 1 connector on the TMG800 to the ETH1 connector on th...

Page 32: ...oIP network you will need Two gigabit layer 2 Ethernet switches A second one is required to support redundancy of the VoIP interface Four CAT5 Ethernet cables with RJ45 male male terminations Two IP addresses located on different subnets Connections The TMG800 and TMG800 1 are connected to the VoIP network by one or optionally two Ethernet GigE network links as shown in figure 2 11 on page 24 To c...

Page 33: ...In other words they do not cross the RX and TX signals Connections between the patch panels and a Tmedia 1 1 system require straight cables The supplied T1 E1 cables are straight cables Cables used to connect the network to the 1 1 patch panel must do the cross connection To connect both the TMG800 RJ and TMG800 RJ 1 1 RJ48C type to the PSTN 1 Connect T1 E1 lines 0 7 of the network section of the ...

Page 34: ...26 TMG800 and TMG800 1 Installation Guide Figure 2 12 TMG800 RJ and TMG800 RJ 1 1 connecting to the TDM 1 1 8 T1 E1 patch panel TMG800 RJ TMG800 RJ 1 1 Tmedia Tmedia 1 1 From Network 1 1 ...

Page 35: ...wo independent AC power sources Two power cables for each TMG800 and TMG800 1 2 5 5 1 Connecting to AC Power The TMG800 and TMG800 1 AC models are furnished with two AC power connectors To connect the TMG800 and TMG800 1 to AC Power 1 Connect the first power connector of each unit to the first power source See Figure 2 13 2 Connect the second power connector of each unit to the second power source...

Page 36: ...age 28 1a Connect one lead of each DC power cable to the positive terminal of the DC power source 1b Connect the other lead of each DC power cable to the negative side of the DC power source 2 Repeat the previous steps for DC power source two Figure 2 14 TMG800 and TMG800 1 DC Power Connections NOTE DC power cable supplied with TMG3202 Two types Black Red and Yellow Black Cable Type Voltage Ov Gro...

Page 37: ... Once these configuration settings have been applied your Tmedia VoIP Gateway will start up and display the web portal configuration management tool 2 5 6 1 Primary Unit 1 Connect to the web portal The Welcome page appears Note The Welcome page indicates whether the TMG800 is a primary or secondary unit 2 To select the manner in which you wish to use the TMG800 click the TMG800 1 image 1 1 ...

Page 38: ...0 1 Installation Guide 3 To indicate that this unit will be used as the primary unit in a Tmedia 1 1 system click the TMG800 Standard image The Validation page is displayed 4 Click Yes it s connected like that already 1 1 ...

Page 39: ...Installing the Equipment 31 The Progress page is displayed 1 1 ...

Page 40: ... and TMG800 1 Installation Guide 2 5 6 2 Secondary Unit 1 Connect to the web portal of the Tmedia 1 1 The Welcome page appears 2 Click Yes it s already connected like that 3 Click Yes to configure the Vlans 1 1 ...

Page 41: ...Installing the Equipment 33 1 1 ...

Page 42: ...Attention DO NOT TURN OFF the power to the Tmedia VoIP Gateway using the power switch located at the rear unless the Linux host has been properly shut down beforehand using the reset button display or manually using the shutdown command Allow enough time for the Linux host to shut down before turning the power to the Tmedia VoIP Gateway off e g 1 min Be aware that the shutdown procedure of the uni...

Page 43: ...he Tmedia VoIP Gateway Retrieving Tmedia VoIP Gateway Information Changing the Tmedia VoIP Gateway Management Port IP Address Changing the Tmedia VoIP Gateway Management Port Passwords Setting the Tmedia VoIP Gateway Time Zone Configuring the Tmedia VoIP Gateway Using the Web Portal Changing VoIP IP Interface Addresses ...

Page 44: ...dicated on the shipment sheet Figure 3 1 Tmedia Management Interface 3 2 Retrieving Tmedia VoIP Gateway Information Note The following procedure must be performed on both the TMG800 as well as the TMG800 1 1 The Tmedia VoIP Gateway enables you to retrieve system information with the following shell commands tbproduct retrieve the Tmedia product type See http docs telcobridges com mediawiki index p...

Page 45: ...The following procedure must be performed on both the TMG800 as well as the TMG800 1 1 Once logged you are logged on to the Tmedia VoIP Gateway type passwd to change the password being used The following information will be displayed root TB003540 passwd Changing password for user root New UNIX password Retype new UNIX password passwd all authentication tokens updated successfully 3 5 Setting the ...

Page 46: ...Portal System Configuration Tutorial Guide This document can be obtained from TelcoBridges TB Wiki at http docs telcobridges com mediawiki index php Web_Portal The Web Portal can be accessed with a Web browser The default url is http Tmedia MGMT0 IP address 12358 Note A TMG800 and TMG800 1 can access the Web Portal from either one of their IP addresses The default login information to access the W...

Page 47: ...39 Chapter 4 System Backups This chapter provides information about the following topics Creating a database backup Downloading a database backup Uploading a database backup Restoring a database backup ...

Page 48: ...ownloaded to an external storage device To learn about how to download system backups refer to http docs telcobridges com mediawiki index php Toolpack_v2 5 Downloading_a_Database_Backup 4 3 Uploading a Database Backup An external backup of your database can be uploaded to your Tmedia device To learn about how to upload a database backup refer to http docs telcobridges com mediawiki index php Toolp...

Page 49: ...er provides information about the following topics Preparing for hardware replacement Choosing your maintenance procedure Replacing a standalone TMG800 Adding a TMG800 1 to a standalone TMG800 Replacing a unit on a Tmedia 1 1 system Replacing a Power Supply ...

Page 50: ... units Prior to replacing hardware you must have the following A license key A backup of your system settings Obtaining a License Key To obtain a license key connect to the license server at https licenses telcobridges com Figure 5 1 License Server To learn more about how to obtain a license key refer to http docs telcobridges com mediawiki index php Support License_server ...

Page 51: ...the procedures of Section 5 3 Replacing a Standalone TMG3200 Follow the procedures of Section 5 4 Adding a TMG800 1 to a Standalone TMG800 Follow the procedures of Section 5 5 Replacing a Tmedia VoIP Gateway in a Tmedia 1 1 System Replacing a Power Supply AC Refer to Section 5 6 1 DC Refer to Section 5 6 2 I am adding a TMG800 1 to a TMG3200 Standalone system I am replacing a TMG800 Standalone uni...

Page 52: ... 5 1 Preparing for Hardware Replacement on page 42 For repaired units returned from the factory the license key is already installed To remove a defective unit 1 If you are replacing an on site spare unit delete the previous configuration on the TMG800 2 Shutdown the TMG800 Note If you need to modify the Tmedia Management port refer to Section 3 3 Changing the Tmedia VoIP Gateway Management Port I...

Page 53: ...rts for connection to different VoIP networks This provides an access point to manage VoIP traffic Should one of the IP networks fail the TMG800 will continue to manage VoIP traffic using the alternate network 5 3 2 4 Connect to the PSTN Network The TMG800 features a variety of interfaces to the PSTN network Follow the procedure described in Section 2 4 1 Connecting to the Tmedia Management Interf...

Page 54: ...enu Apply the configuration on the system 3b If a database backup is not available Configure the system using the web portal Apply the configuration on the system 5 3 4 Restoring a Backup Copy of a Database The backup of your system configuration settings described in Section 4 1 Creating a Database Backup on page 40 will need to be restored after the replacement of the defective unit Restoring a ...

Page 55: ...tall the TMG800 1 1 on the equipment rack Install a patch panel Connect to the TMG800 1 1 Management interface Connect to the Tmedia Control network Connect to the VoIP network Connect to the PSTN network Power up the TMG800 1 1 Start up 5 4 1 Reconfigure a Standalone Unit as a Primary Unit in a 1 1 System 1 Connect to the web portal of the Standalone TMG800 2 Select Status from the navigation pan...

Page 56: ...1 Installation Guide 4 Select ResetHostRole for the action and click Apply Action 5 Reconnect to the same TMG800 The Welcome page appears 6 To select the manner in which you wish to use the TMG800 click the TMG800 1 1 image ...

Page 57: ... Maintenance Procedures 49 7 To indicate that this unit will be used as the primary unit in a Tmedia 1 1 system click the TMG800 Standard image The Validation page is displayed 8 Click Save configure the Vlans ...

Page 58: ...e connected to a TMG800 1 1 thereby enabling a sharing of system resources 5 4 6 Connect to the VoIP Network The Tmedia 1 1 features dual GigE ports for connection to different VoIP networks This provides an access point to manage VoIP traffic Should one of the IP networks fail the Tmedia 1 1 will continue to manage VoIP traffic using the alternate network If your system features a TMG800 RJ TDM i...

Page 59: ...n Section 2 5 3 Connecting to the Tmedia 1 1 System VoIP Network s on page 24 Gigabit Ethernet Switch 1 Gigabit Ethernet Switch 2 VoIP Network 1 VoIP Network 2 VoIP Network 1 VoIP Network 2 If your system features a TMG800 RJ TDM interface refer to Section 2 4 3 Connecting to the PSTN on page 15 If your system is using AC power refer to Section 2 5 5 Powering Up on page 27 If your system is using ...

Page 60: ... TMG800 and TMG800 1 Installation Guide 5 4 9 Start Up 1 Connect to the web portal of the Tmedia 1 1 The Welcome page appears 2 Click Yes it s already connected like that 3 Click Ok to configure the Vlans ...

Page 61: ...Hardware Maintenance Procedures 53 ...

Page 62: ...unit Installation of a replacement unit Startup unit 5 5 1 Removing a Defective Unit To remove a defective unit 1 If you are replacing a spare unit you must reset the role Refer to Section 5 5 1 1 Resetting the Role of the Spare Unit 2 Shutdown the TMG800 or TMG800 1 3 Disconnect from the PSTN network 4 Disconnect from the VoIP network 5 Disconnect from the Tmedia Control network 6 Disconnect from...

Page 63: ...Hardware Maintenance Procedures 55 3 Select the Hosts status tab 4 Select ResetHostRole for the action and click Apply Action ...

Page 64: ...e The Tmedia Management Interface enables administrators to perform management tasks on the Tmedia VoIP Gateway 5 5 2 3 Connect to the VoIP Network Tmedia VoIP gateways feature dual GigE ports for connection to different VoIP networks This provides an access point to manage VoIP traffic Should one of the IP networks fail the Tmedia 1 1 will continue to manage VoIP traffic using the alternate netwo...

Page 65: ... modify the Tmedia Management port refer to Section 3 3 Changing the Tmedia VoIP Gateway Management Port IP Address on page 37 2b If you need to configure the unit in primary mode when replacing a TMG800 refer to Section 2 5 6 1 Primary Unit on page 29 2c If you need to configure the unit in Secondary mode when replacing a TMG800 1 1 refer to Section 2 5 6 2 Secondary Unit on page 32 If your syste...

Page 66: ...Secondary Unit If you are replacing a secondary unit with another replacement secondary unit follow the procedure in Section 2 5 6 2 Secondary Unit on page 32 5 6 Replacing a Power Supply The replacement of a power supply will vary according to the type of power supply AC power DC power 5 6 1 Replacing AC Power Supply 1 Unplug the power cord from the defective power supply 2 Hold down the red leve...

Page 67: ...he TMG800 and TMG800 1 each require separate licenses To install a new license on a Tmedia system follow the steps described at the following link http docs telcobridges com mediawiki index php Add Change_Licenses Note A license upgrade may require an interruption of service A time extension of a temporary license will not cause a service interruption however changing features will ...

Page 68: ...60 TMG800 and TMG800 1 Installation Guide ...

Page 69: ...n about the following topics Connecting to the Serial Port of the Tmedia VoIP Gateway Configuring the Terminal Emulator application Reporting a Problem Preparing your setup information TbDebug Debug Dump Files Application Logs Backdoor Tools tbsigtrace Signaling Traces ...

Page 70: ... the Tmedia VoIP Gateway as shown in figure 7 1 on page 62 See page 93 in Appendix A for a RJ 45 pinout description 2 If your computer s serial port features a DB9 connector use the DB9 to RJ 45 adapter supplied with your Tmedia VoIP Gateway If your computer s serial port features a USB connector you will need to provide a USB to DB9 adaptor Refer to figure 7 2 on page 62 Figure 7 1 Computer to Tm...

Page 71: ...r console application to communicate with the Tmedia VoIP Gateway in order to configure initial settings Available terminal emulation software includes HyperTerminal Putty Minicom To configure the terminal emulator application 1 Set the baud rate bits per second to 9600 2 Set the data rate to 8 bits 3 Set the parity to None 4 Set the stop bits to 1 5 Set the flow control to None ...

Page 72: ... information must include Physical connections If necessary describe it in a network diagram Specifying the product name Telecommunication connectivity diagram for example E1 T1 DS3 STM 1 OC 3 VoIP Ethernet switch etc Remote access to system SSH VPN VNC Remote desktop etc For a signaling related problem specify which side is initiating the call 7 5 Tbdebug Dump Files Mandatory The tbdebug copies i...

Page 73: ..._Portal_Sections Backups Note This data is collected by tbdebug 7 7 Backdoor Tools A number of backdoor tools are available as follows tbx_cli_tools_remote tbshowls VoIP Traffic Capture Wireshark tbstreamlisten Stream server audio packets to wave file tbsigtrace 7 7 1 tbx_cli_tools_remote The tbx_cli_tools_remote tool can be used to get the text based GUI control of TB applications like Toolpack_E...

Page 74: ... the Web Portal 7 7 3 VoIP Traffic Capture When troubleshooting VoIP related issues you can use to use VoIP port mirroring to capture all incoming and outgoing network packets from a VoIP network interface using the other VoIP interface A direct physical connection can be established with a host s Gigabit Ethernet interface and the other VoIP interface Wireshark or tcpdump is used on the host to c...

Page 75: ... a TDM stream Please ask customer support for instructions regarding this function 7 7 6 Stream Server Audio Packets to Wave File You can capture all audio packets transmitted to and from the Stream Server and convert them into wave files for analysis You can use Wireshark or tcpdump on the server running the tbstreamserver application The conversion tool streamserver_pkt_to_wav can be found at th...

Page 76: ...68 TMG800 and TMG800 1 Installation Guide ...

Page 77: ...69 Appendix A Wiring Diagrams ...

Page 78: ... 8 Not Connected RJ48C T1 E1 Wiring Schematic Crossover Cable 1 8 RX Ring 1 RX Tip 2 Not Connected 3 TX Ring 4 TX Tip 5 Not Connected 6 Not Connected 7 Not Connected 8 1 RX Ring 2 RX Tip 3 Not Connected 4 TX Ring 5 TX Tip 6 Not Connected 7 Not Connected 8 Not Connected RJ48C T1 E1 Wiring Schematic Straight Cable RX Ring 1 RX Tip 2 Not Connected 3 TX Ring 4 TX Tip 5 Not Connected 6 Not Connected 7 ...

Page 79: ...Wiring Diagrams 71 A 2 RJ48 Console Wiring Diagram Figure A 2 Console Pinout 1 N C 2 Rx 3 Tx 4 N C 5 GND 6 N C 7 N C 8 N C 9 N C 1 N C 2 N C 3 N C 4 GND 5 Tx 6 Rx 7 N C 8 N C DB 9 RJ 45 2 3 5 1 8 ...

Page 80: ...72 TMG800 and TMG800 1 Installation Guide ...

Reviews: